Installing a Skylight

By letting in light, skylights can transform a room, making a bathroom seem larger, a kitchen warm and cheery, or a bedroom a place to watch the stars. And because of marked improvements in flashing and quality control, skylights can now
be installed without fear of leaks from outside or excessive heat loss from within.

Where you put the skylight is partly aesthetic and partly structural. If it’s a kitchen unit, catch the morning sun by facing it east. If placed in a hallway, even a small unit provides enough light to let you do without electric light during the day. In a bathroom, privacy is the main issue. Avoid skylights in south-facing roofs unless you’re designing for passive solar gain; such skylights can roast you in the summer. Similarly, skylights in west-facing roofs may create too much heat in the South and Southwest United States. Avoid skylights that straddle a ridge because they are difficult to flash and likely to leak.

SELECTING A SKYLIGHT

Consider a number of things when buying a sky­light, not least of which is the manufacturer. Although sizes have become pretty much stan­dard, quality varies greatly—so ask local contrac­tors or lumber suppliers which brands they pre­fer. Here are a few aspects to investigate:

► Do you want ventilating (openable) or fixed (closed) skylights? Skylights that open can vent excess heat. And turn-tilt models pivot so they’re easy to clean.

► Is it energy efficient? Most units come with doubled thermal-pane glass, but units should also have a thermal break to minimize loss by conduction. A metal frame that’s continuous (inside to out) will wick off a lot of indoor heat. A better bet is sealed wood.

► Does it have step-flashing along its sides (desirable for shingle roofing) or strip flash­ing, which must be caulked to keep water out? If the unit is wide (more than 32 in.), does the maker supply a cricket to deflect water around the skylight head?

Does the unit have tempered glass?

That’s an important consideration if a tree limb overhangs your roof. Your building code may require such glass.

If the unit will be installed beyond reach, how easy is it to open and close? Remote – controlled units with motors can be pro­grammed to open at a given temperature, and shut when an electronic sensor detects rain, but such units are more expensive and more temperamental than manually operated ones.

Can you get units with screens, blinds, shades or polarizing tints? Low-Ecoatings selectively admit light while reflecting heat. Note: There are different coating types for cold and hot climates, so ask your supplier which is appropriate for your area.

image256

Skylights dramatically change rooms. Because drywall joints and nail holes will be illuminated, too, apply joint compound generously and sand carefully. Heat buildup in the lightwell can cause compound to shrink, so you may need to apply an extra coat.

Concrete Finishes

An exposed concrete slab can be an attractive finished flooring surface. Usually when a slab will be used as a finished floor it must be trow­eled to a smoother finish than a slab slated for use as a subfloor. Smooth-surfaced concrete re­quires the expertise of an experienced trades – person. When it is first poured, the concrete will have more water than it needs to complete the setting reaction. Some of this extra water will come to the surface. If the concrete is fin­ished before the extra water has fully migrated upward, it will become trapped in the upper layer of the concrete, resulting in a weakened surface that will release concrete dust into the indoor environment. The window of oppor­tunity for properly smoothing the surface is short. If too much time has elapsed, the sur­face will have set and will remain rough.

For exposed finished slabs, control joint locations must be carefully planned for their esthetics, and often more joints are added to minimize random cracking. Color is often added, either mixed into the wet concrete or applied after the concrete sets. Because the slab is usually poured near the beginning of the construction, it must be kept covered dur­ing the course of construction to ensure that it is not damaged or stained. All of these factors will add to the price of the concrete work, but the process will still be cost-effective when the price of covering the concrete with another material is considered.

Both the coloring agents and the surface treatment must be selected carefully to achieve a healthy finish. One process uses muriatic acid to stain floors. Although the finished floor will not outgas, muriatic acid is a highly toxic chemical that requires protective equipment for the installers, and the wash-off is consid­ered hazardous waste that must be properly disposed of.

More benign methods for staining or col­oring exposed slabs may be specified:

• Do not use aniline-based coloring agents.

• Use only high-quality mineral pigments such as Chromix Admixture and Litho – chrome Color Hardener or Davis Colors. Verify with the manufacturer that the se­lected color is free of chromium and other heavy metals.

• PureColor is a two-stage stain formula­tion of pure mineral ions and oxygen cat­alyst for concrete surfaces. Colors can be custom mixed.

• A solution of iron sulfate (fertilizer) re­acts with the concrete, producing yellow,

orange, red, and brown stain hues depend­ing on the chemical composition of the concrete.

Acceptable sealers are listed in the next sec­tion.

TYPES OF VENTS

Types of vents are numerous. Do you know what an island vent is? How much do you know about relief vents? Depending upon your level of knowledge in the plumbing trade, you might be aware of all types of vents, but not all read­ers are. Before we jump into sizing examples, I’d like to make sure that all of my readers are aware of the various types of vents. With this in mind, I will provide a number of vent drawings for readers to devour. So, let’s get on with the visual examples of various vent types.

73

TYPES OF VENTS

TYPES OF VENTS

vent


Оси It Vert


Drain*


TYPES OF VENTS

TYPES OF VENTS

TYPES OF VENTS

Vert


Branch Vent


<=Vent


Vent


Drain


Drain


TYPES OF VENTS

TYPES OF VENTS

TYPES OF VENTS

TYPES OF VENTS

TYPES OF VENTS

TYPES OF VENTS

L*Qend


Vent


Drain


TYPES OF VENTS

TYPES OF VENTS

TYPES OF VENTS

TYPES OF VENTS

Legend


Drain


Vent


Vent Stack


11/2* Trap


Trap Ann


TYPES OF VENTS

TYPES OF VENTS

TYPES OF VENTS

Drainage Branch


vent Stack


Drainage Branch


Drainage Branch


Drainage Branch


Soil Stack


Building Drain


TYPES OF VENTS

TYPES OF VENTS

TYPES OF VENTS

TYPES OF VENTS

TYPES OF VENTS

TYPES OF VENTS

TYPES OF VENTS

FIGURE 5.17 ■ Circuit vent with a relief vent. (Courtesy of McGraw-Hill)


Подпись: When in doubt about if a vent is needed, install one. If you are not sure about the size of a vent, make it larger than what you believe is needed. For example, a toilet requires a vent with a minimum diameter of 2 inches. Most other residential fixtures can be vented with a pipe that has a diameter of 1.5 inches. All homes must have at least one 3-inch vent.Подпись: ✓ fast code fact When computing the distance from a trap to a vent, you must use the developed length of the entire piping. For example, you would measure from the trap along the length of the drainpipe to the point where the vent is connected to the drain. In other words, you can’t measure on a short angle from a vent to a trap; you must measure the total length of the pipe used as a drain.

► sensible shortcut

REPLACING GLASS

Wear goggles and gloves when replacing dam­aged glass and dried-out putty (glazing com­pound). Although a glazier’s chisel will easily remove most putty, use paint stripper or an elec­tric putty softener to dislodge the tough stuff. (But do not use chemical stripper and heat at the same time.) Because direct heat can crack glass, cover nearby panes with a piece of hardboard wrapped in protective foil. After removing the old putty, glazier’s points, and damaged glass, sand the frame lightly, using 180-grit sandpaper.

Prepping the frame. Before applying new glaz­ing compound to weathered sashes, brush the exposed wood with a sealant or a half-and-half mixture of alcohol (or turpentine) and linseed oil. This will prevent the dry wood from sucking the oil out of the fresh putty. Let the sash dry for an hour or two. Then spread a thin bed of putty along the lip that receives the glass. This bed of putty will prevent rattling and seal air leaks. The replacement pane should be in. smaller than the width and length of the frame.

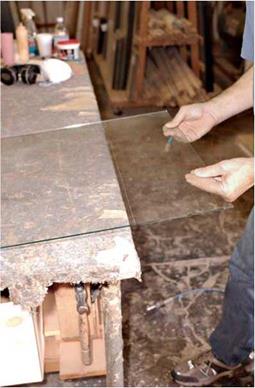
Cutting the glass. After scribing the glass with a glass cutter, gently rap the ball end of the cutter along the underside of the cut—up and down its length—until a clear line develops. Then, with the cut directly over a table edge, quickly snap the waste portion free. If the waste piece is too small to grip, use glass pliers. Note: Old glass is imper­fect and often hard to cut because it’s irregular and often doesn’t break cleanly.

As you place the glass in the frame, press around the edges so that the putty will seat evenly beneath the pane. With a putty knife held almost flat against the glass, push in new glazier’s points until they are half-buried. (Never hammer the points in; you may break the glass.) Sink a point every 6 in., or at least one for each side of the glass. Be particularly careful when pushing points into muntins (the wooden strips between panes); if you push a point in too far, you could crack the adjacent pane. Glass in metal-frame windows is usually held in place by metal spring clips, which can be reused.

Once the replacement pane is held fast by glazier’s points, apply putty generously. Scoop
out a palmful of putty and knead it in one hand until it is soft and pliable. Use your thumb to press the putty into the frame, applying moderate pressure. You’ll recover any excess when you trim, so use a lot of putty now to ensure getting a good seal.

To trim off the excess, hold the knife blade at an angle of about 45° to the glass, with a corner of the blade touching the glass and the middle of the blade resting on the frame. Pull the knife evenly toward you, plowing a steady furrow through the putty. Go back and touch up the corners after removing most of the excess. You

Подпись: Don't use putty with insulated glass. Otherwise, oils in the putty will attack and degrade the seal on the glass. Instead, use a closed-cell foam, peel-and-stick glazing tape. The tape is sticky on both sides: One side sticks to the frame, the other to the glass. 1111 image254Подпись: Double-sided, self-adhering foam tape has largely replaced putty in production glazing. Tape, unlike putty, is uniformly thick, quick to install, and won't degrade the seals of insulated glass.image255Подпись: However, once the glass is placed in glazing tape, it's difficult to reseat. So seat the panes carefully if you use tape.

shouldn’t be able to see putty from the inside of the window once it has been trimmed.

If the putty doesn’t stick, either you’re holding the knife handle too high or there is dust on the frame or the glass. If the problem is just the drag of the knife blade across the putty, a bit of saliva on the blade will lubricate it. When the putty has cured for a week, overpaint it slightly onto the glass to seal the putty from weather.

Stop the Air Leaks, Stop Losing Heat

Air leaks can account for 30% of a home’s energy loss, so it pays to seek out and seal every penetration between the living (condi­tioned) space and the attic (unconditioned) space before adding insulation. Don’t leave any batt unturned when hunting down air leaks. Dust deposits in leaking air stain in­sulation brown or black, so you can start by looking for discoloration in the insulation.

I treat the drywall ceiling as the air barrier and seal all penetrations, joints, and holes. The open framing for soffits and chases is a highway for air leaks from wall cavities into the attic. Another gaping hole is the attic – stair bulkhead (see the sidebar on p. 53).

I install an insulated and gasketed cover for the attic access panel or pull-down stair­way. You can buy a ready-made access cover or make your own. The cover can be fit within the riser or on top of it. When the cover sits on top of the riser, apply the gasket material (usually adhesive-backed foam tape) to the cover (not the floor) so that it’s not damaged when someone accesses the attic.

Next, I seal recessed-light cans and ceiling-mounted light-fixture boxes. Both are often overlooked, but when combined are one of the biggest sources of air leaks. The holes and the perimeter of ceiling-mounted
electrical boxes should be sealed to the dry – wall with a fire-resistant sealant or foam (see the sidebar on p. 49). Gaps around ducts, wires, and pipes that penetrate into the attic must be located and closed, too. Most inexpensive and old bathroom exhaust – fan boxes have open seams and holes that should be covered with mastic or duct­sealing tape. The fan-box perimeter should be sealed to the drywall with caulk or foam.

Another typical area to block off and seal is the 2-in.-wide space between framing and masonry chimneys. Combustible materials aren’t allowed to contact the masonry, so it’s best to use sheet metal to block the space.

I also seal the joint between the drywall and the wall plates. The thin joints between

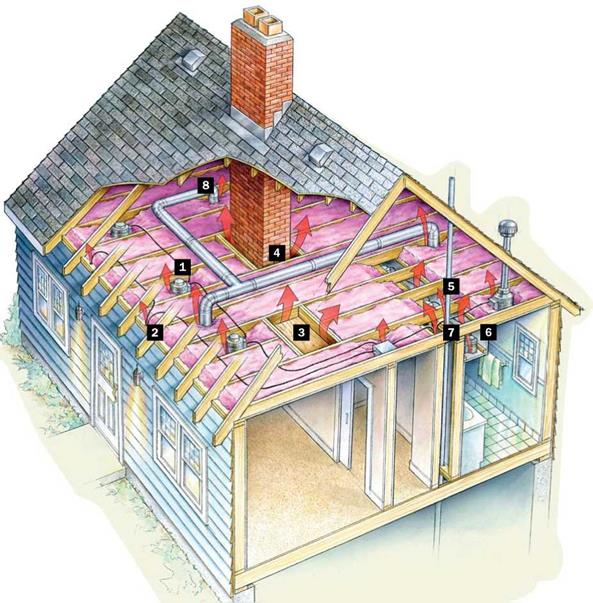
Подпись: If air leaks aren't properly sealed, the insulation typically placed between the ceiling joists of a conventional attic is only partially effective. These leaks can range in size from a pinhole to the gap surrounding the typical 3-ft. by 4-ft. access hatch. For the contractor or homeowner who wants to create a tighter building envelope, the hardest part of the task is finding the air leaks; sealing them is relatively easy. Подпись: Below is a checklist. 1. Recessed lights and electrical boxes 2. Holes for wires or pipes in drywall and framing 3. Attic hatchway 4. Spaces between the framing and the chimney 5. Plumbing or electrical chases 6. Framed soffits that are open to the attic 7. Drywall joints between ceiling and wall plates 8. Leaky joints in ductwork

Stop the Air Leaks, Stop Losing HeatPotential Air Leaks in the Attic

A word of caution: Air-sealing a house can lead to backdrafting of natural draft combustion appliances like water heaters, furnaces, or boilers. To avoid creating a carbon-monoxide hazard, have a combustion-safety assessment done before tightening a house, and add a fresh-air intake duct to each burner.

the ceiling drywall and the wall top plates might seem insignificant, but they add up when you figure the linear footage of walls. Expanding foam or sealing caulk easily fills the gaps.

Подпись: Choose the Right Air Sealant for the JobПодпись:Stop the Air Leaks, Stop Losing HeatПодпись: Fire-blocking foam DAP® www.dap.com Stop the Air Leaks, Stop Losing HeatПодпись: Fire-blocking caulk 3M® www.3m.com Подпись: Fire-barrier caulk 3M Address Wiring Issues

Because old knob-and-tube wiring can’t be buried under new insulation, have an elec­trician replace any old wires in the attic be­fore adding insulation. Ideally, all junction boxes should be raised above the level of the insulation. When elevating the junction boxes isn’t an option, you should install clearly marked permanent tags that can be seen above the insulation level.

While I am working in the attic, I like to install two electrical conduits (one line volt­age and one telecom/low voltage) between the attic and the basement or the crawlspace to make any future wiring upgrades easier to accomplish.

ON THE JOB SITE

There’s more to carpentry than the ability to drive a nail with a hammer.

A big part of being a good carpenter is knowing not only the names of tools and how to use them but also the parts and materials that make up a house. Whether it’s a 6d finish nail or a frieze board, you need to know what your co­workers are talking about.

In this chapter, I’ll discuss briefly the parts of a typical house and how they go together. Then I’ll talk about the various materials (lumber, fasteners, hardware) that make up a house. Knowing the parts and how they go together will help you read plans and learn howto estimate and order the amount of materials needed.

THE HOUSE STRUCTURE

When I was a child, I thought that houses just were. They existed like the hills, the trees, and the wind. It was only when I saw houses actually being built that I realized they are put together board by board and nail by nail. The construction starts at ground level, with the foundation.

The foundation of a house can be a full concrete basement, concrete stemwalls (short walls) with a crawl space under the house (see the left photo on p. 66), a concrete slab, concrete piers on foot­ings, or pressure-treated wood on solid ground. Local codes and soil conditions generally dictate the type of foundation that a house will have.

Pressure-treated mudsills installed on the top of foundation walls help tie the floor system to the foundation and support the floor joists. Pressure-treated wood is impregnated with a preservative that inhibits dry rot (a fungus that can destroy wood) and helps repel termites, which can otherwise make a meal of your house and cause a lot of damage.

Pressure-treated wood is usually easily identified by its greenish color, and, because of the chemicals used in it, you should handle it and cut it with care.

I wear gloves and a long-sleeve shirt when working with it to keep the chem­icals off my body; I also wear a mask to help avoid breathing the dust.

Girders are often needed to support floor joists with long spans. The size of the girders will vary, depending on the load they carry. The house plans will indicate the size, based on local codes.

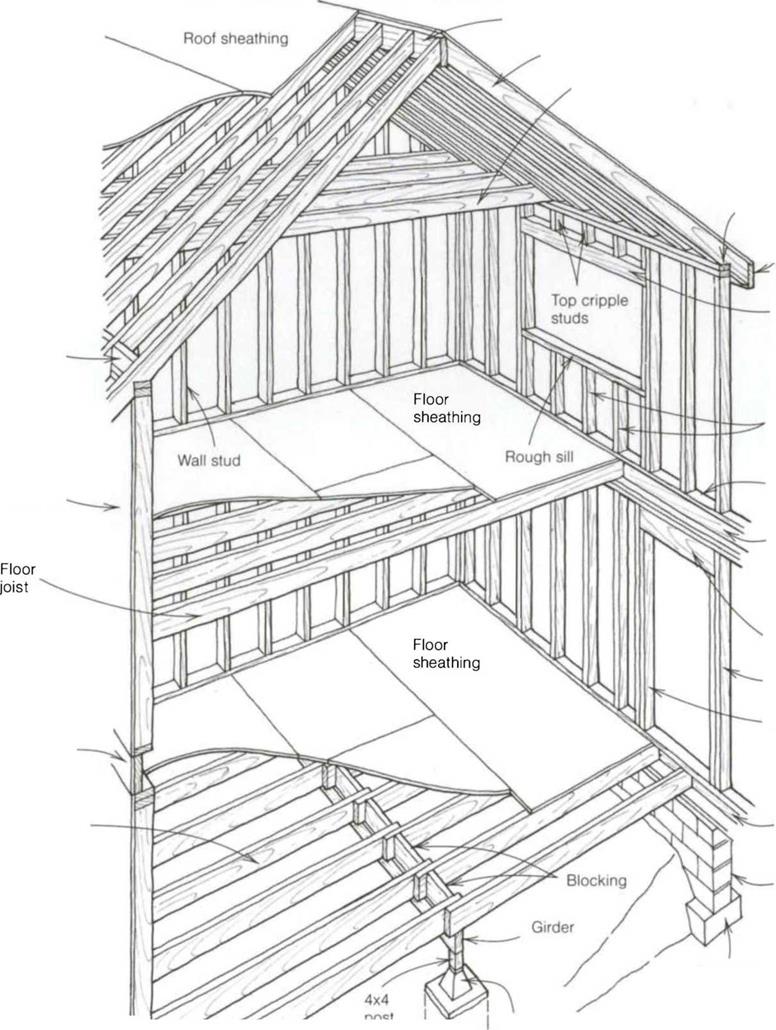
The house frame


Ridge beam Rafter


Ceiling joist


Double top plate Fascia


Window

header


Frieze

block


Bottom cripple studs


Wall

sheathing


Bottom

plate

Rim joist


Door header

King stud Trimmer stud


Rim

joist


Rim joist


Floor joist


Foundation

wall


Concrete

footing


Footing _>!


Concrete pier


ON THE JOB SITE

ON THE JOB SITE

A house foundation can be a combination of full concrete basement and concrete stemwalls enclosing a crawl space, such as shown here, or just stemwalls with a crawl space, a concrete slab, or concrete piers on footings. (Photo by Roe A. Osborn.)


ON THE JOB SITE

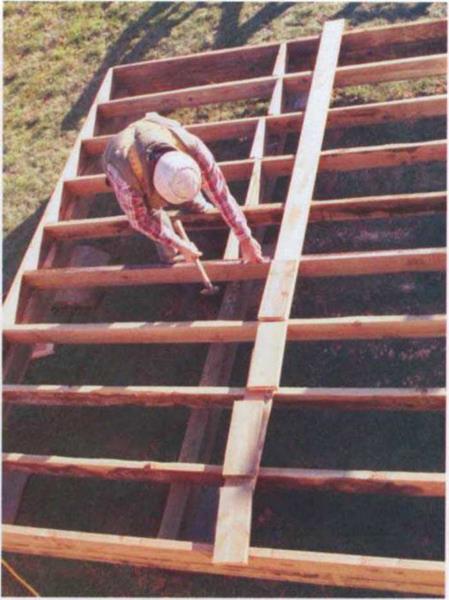
Floor joists form the platform, or floor, of the house and usually are spaced 16 in. or 24 in. on center.


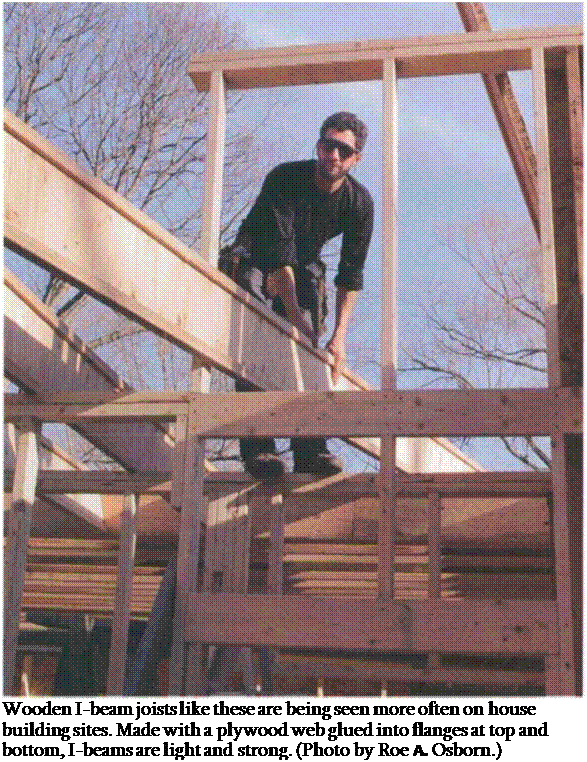
Floor joists are placed horizontally over and perpendicular to the girders and form the platform, or floor, of a house (see the right photo above). Joists are usually spaced 16 in. or 24 in. on center (o. c.). Today, many builders use manu­factured joists (such as Trus-Joists) rather than regular 2x lumber because these joists are straight, can span long dis­tances, and don’t shrink much (see the photo on the facing page).

Floor sheathing—generally 4×8 sheets of 5/s-in. or 3A-in. tongue-and-groove plywood or oriented strand board (OSB)—comes next. To help eliminate floor squeaks, the sheathing should be glued to the joists with construction adhesive and then nailed in place.

Wall plates are the horizontal members that hold together the pieces in a wall. Each wall has three plates—one on the bottom and two on top (called a top plate and a double top plate, respec­tively). The plates are usually made from long, straight 2x stock. The width of the plate stock depends on the width of the walls. Exterior walls often are built with 2x6sto accommodate the extra insula­tion required by many building codes. Interior walls (both studs and plates) are typically built from 2x4s. If you are fram­ing on a concrete slab, the bottom plate needs to be pressure-treated wood to resist rot and insect damage.

Studs are the vertical wall members nailed to the wall plates. Typical spacing is either 16 in. o. c. or 24 in. o. c. The
Подпись:studs are the same width as the plates.

If you are building a house with 8-ft. ceilings, you can save time and avoid waste by purchasing studs precut to 921A in. This length, plus the three hori­zontal 2x plates—which are actually 11/2 in. thick (for more on lumber dimen­sions, see the sidebar on p. 68)—gives you a wall height of 963A in. After putting Уг-іп. drywall on the ceiling, you’ll have a ceiling height of roughly 8 ft.

Where there are openings in walls, whether for doors or windows, the load (or weight) from the upper stories or roof must be transferred around the opening and down to the foundation. Otherwise, the weight from above may not allow a door or window to open and close properly and could cause other, more serious, structural problems like a sagging roof. This load transfer is accomplished with a header and a pair of wall studs. A header is a horizontal member that is sized according to the width of the opening and the load bear­ing on it. For example, a garage-door header has to be much larger than a standard window header because the garage opening is larger.

Wall studs are nailed into the header on each end. The header is supported by a trimmer stud (the same width as the wall studs) placed underneath on both ends. A trimmer stud runs from the bot­tom plate to the header on a door and from the rough sill to the header on a window. The space between the header and the double top plate or the window­sill and the bottom plate is filled with cripple studs (also called jack studs).

After all the walls have been framed straight and plumb, the ceiling is cov­ered with joists, just like the floor, and the roof is built. The traditional method of building a roof is to connect a series of rafters to a ridge beam that runs the length of the building. These days, how­
ever, many houses are built with roof trusses delivered fully assembled to the job site. Trusses consist of a rafter chord, a joist chord, and posts and webbing between the chords to give them struc­tural strength (see the photo on p. 69). Trusses are strong, make building a roof fast and easy, and are available just about everywhere in the country.

Once all the walls and roof have been framed, the house can be sheathed (though sometimes walls are sheathed

Подпись: Studs are the vertical members that make up the frame of a wall and usually are spaced 16 in. o.c. or 24 in. o.c. (Photo by Roger Turk.)
before being raised). Exterior walls are most often sheathed with 4×8 sheets of Уг-іп. plywood or OSB. Roofs are usually sheathed with Уг-іп. to 5/s-in. ply­wood or OSB (depending on the span between rafters).

Once the house has been sheathed and roofed, windows and doors are installed, the house is sided, and the interior is fin­
ished and trimmed out. That’s the basics. I’ll explain the process in detail in Chapters 4 through 8.

LUMBER

Now that we’ve covered the basic parts of a house, let’s look at the specific materials that go into it. Lumber is graded for both strength and appear­ance. Construction-grade lumber used in

VENT SYSTEM CALCULATIONS

T

Подпись:he calculations of vent systems are not very difficult to understand. There are sizing tables that you can use to compute pipe sizes. Plumbers need to understand the types of vents and master plumbers must be able to assign pipe sizes to them. The task is important, but not really very difficult for experienced plumbers. In many cases, engineers and architects are the ones who design plumbing systems. This is okay. But, it is not always the case. Hav­ing the ability to size a vent system is something that is basically a requirement for a master plumber’s license. Of course, there are many types of plumbing vents. We can talk about dry vents, wet vents, branch vents, yoke vents, and lots of other types of vents. Before we get into the sizing of vents, I want to identify typical types of plumbing vents.

This may be old news to you. If it is, skip past the section and jump right into the sizing information. But, if you are not versed in the full arrangement of vents, you might enjoy the illustrations that I will provide to indicate the basic ingredients of various types of vents.

Permeability of Cracked Pavements

In distressed pavements a large proportion of ingress may be through cracks, even if the intact material is relatively impermeable. It has been suggested that there are four factors which influence infiltration rates in cracked asphaltic pavements (Ridgeway, 1976):

• the water-carrying capacity of the crack or joint,

• the amount of cracking present,

• the area that drains to each crack, and

• the intensity and duration of the rainfall.

The first of these is of particular concern in this chapter and is addressed in Sec­tion 5.4.2.

5.2 Measuring Permeability

5.4.1 Laboratory Permeability Determination

Both constant head and falling head laboratory methods are available to determine the permeability of asphaltic cores, often with sides sealed using a membrane and/or a confining pressure to prevent edge-leakage (Cooley, 1999). There is some evidence (Maupin, 2000) that the falling-head device is the better device for testing both cores and moulded cylindrical specimens. There are some standardized test procedures of which the recent standard published by FDOT (2006), is an example. A schematic of their laboratory permeameter with flexible walls is given in Fig. 5.2. There is also a European standard available (CEN, 2004).

Permeability of Intact Asphaltic Mixtures

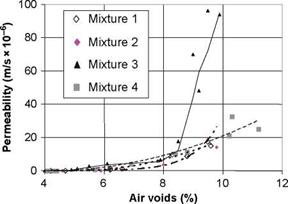
The permeability of asphaltic mixtures is controlled by the size and interconnec­tion of the void space. To illustrate this, some recent data is given in Fig. 5.1. This presents results for various hot-mix asphaltic specimens as described in Table 5.1. Figure 5.1 shows that permeability values of intact asphaltic materials are typically in the 0 to 40 x 10-6 m/s range. It is apparent that permeability is insignificant at less than approximately 7% air voids but can then rapidly increase. Probably this is be­cause interconnection of voids becomes possible at these high air void ratios and be­cause mixtures that exhibit such air void proportions may be inadequately prepared leaving permeable fissures in the material’s structure. Other authors (Zube, 1962; Brown et al., 1989 and Santucci et al., 1985) conclude that a limit of 8% air voids should be adopted to avoid rapid oxidation and subsequent cracking and/or ravelling and to keep permeability low.

Подпись: Fig. 5.1 Laboratory determination of permeability of laboratory moulded cylinders of asphaltic mixtures (see Table 5.1 [Vivar & Haddock, 2007]). Reproduced with permission of J. Haddock
Permeability of Intact Asphaltic Mixtures

Furthermore, higher permeability values are associated with asphaltic mixtures having larger voids. Larger voids are found both in fine-grained mixtures having high in-situ air void contents or in coarser grained mixtures at lower void contents. For example, Table 5.2 summarises the air void content at which a threshold be­tween essentially non-permeable and permeable behaviour was observed in-situ,

Table 5.1 Summary of hot-mix asphaltic specimens for which results are plotted in Fig. 5.1 (af­ter Vivar & Haddock, 2007)

Gradation

Density*

(%)

NMAS (mm)

9.5

19

90

Coarse

92

94

Mixture 1

Mixture 3

96

90

Fine

92

94

Mixture 2

Mixture 4

96

* expressed as

% of maximum

theoretical mixture specific gravity

NMAS = nominal maximum aggregate size.

Table 5.2 Relationship between grading, air voids and permeability (after Cooley et al., 2001)

Nominal max. aggregates size (mm)

In-situ air void content when permeability increases (%)

Permeability (m/s x 10-6)

9.5

7.7

10

12.5

7.7

10

19

5.5

12

25

4.4

15

together with the permeability coefficient at that point (Cooley et al., 2001). The laboratory derived data of Fig. 5.1 tells a similar story although with a threshold void content of 8-9% for a permeability of 10 x 10-6 m/s. Both data sets reveal that the coarse, low-fines mixtures are least well-performing. In Fig. 5.1, Mixture 3, the poor performance is seen in the rapid increase in post-threshold permeability, while in Table 5.2 the threshold air-void content at which permeability increases is much lower.

Shimming Windows

ALL window frames must be shimmed securely. Pairs of tapered shims allow you to plumb and level window frames in out-of-square openings; supporting frame jambs and preventing deflection even as you drive screws or nails through them.

Ideally, you should shim each side jamb within 4 in. of its top and bottom corners, and every 16 in. in between—a minimum of three shim points along each jamb.

If the rough sill is level and uniformly supports the windowsill, don’t shim underneath it. Window makers disagree about shimming the head jamb. Some recommend that you shim head jambs at the same intervals as side jambs; others suggest not shimming at all because if the header sags, shims beneath it could deflect the head jamb. To be safe, follow the installation instructions that come with your window.

As explained on p. 94, you can nail through or below shims as long they’re snug.

At each shimming point, use a pair of 10d galvanized finish nails or 3-in. galvanized or stainless-steel trim-head screws to keep the jambs from twisting. Screws are more expensive but allow you to make adjustments easily. If the shims are green or "yard wet," there’s no need to predrill them to avoid splits; otherwise, predrill. You can easily fill and paint dimpled nail heads and countersunk screw heads in the jambs. Or you can remove the inside window stops, nail through the jambs, and replace the stops to hide the nails.

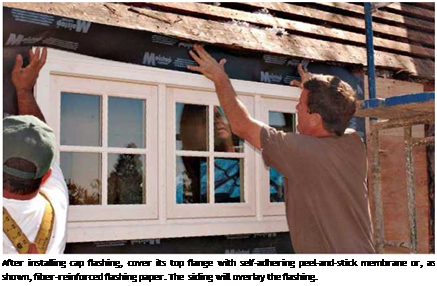
Подпись: After installing cap flashing, cover its top flange with self-adhering peel-and-stick membrane or, as shown, fiber-reinforced flashing paper. The siding will overlay the flashing.

Window Repairs

Old houses often have ailing windows, unopen – able because they’re swollen shut or entombed in paint. Try to repair windows during a sunny stretch, but have a roll of sheet plastic on hand to
tack over the openings in case a storm catches you by surprise. Above all, be patient, use force very sparingly on balky windows, and wear gog­gles and gloves.

FREEING SASHES

The window may just be painted shut. Rap around the perimeter of the sashes with a ham­mer, using a wooden block to prevent marring. Then run a scraper or a putty knife along the sash edges.

If the lower sash still won’t move, remove the inside stop, which is usually screwed on, if you can find the screws under all that paint. If you can’t pry up the stop, use a chisel to cut it out; stops are easy to replace. But try not to damage the jamb. Once the inside stop is out, pull out the lower sash and disconnect the sash cord if it hasn’t already rotted away. Use a narrow scraper to remove paint or debris from the sash channel. With a putty knife, clean up the sash channels, and then lightly sand them. Try the sash to see if it now slides more smoothly. If so, wax the chan-

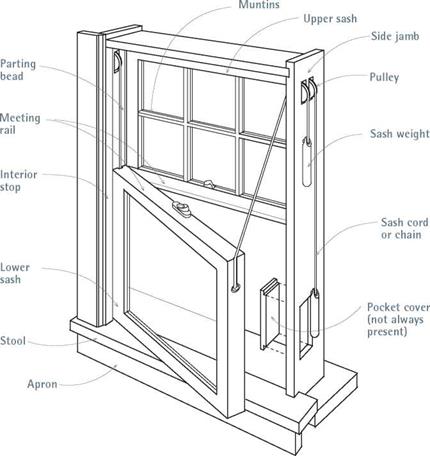
Double-Hung Window Elements

PROnP

Retrofitting cap flashing takes dexterity. Cut back the siding nails 2 in. to 4 in. above the opening, and pry up the siding so you can slide the top flange of the Z-bar cap flashing under the building paper and siding, while simultaneously holding up the window unit. You can nail the top flange of the Z-bar through the siding, but that’s not impera­tive. Wedged into place, the cap flashing won’t go anywhere.

image2511111

Подпись: Using a straightedge to guide your cut, pull the glass cutter, with an even pressure, toward you. One pass of the cutter should do it. Then use the ball end of the cutter to rap lightly along the line. Подпись: Wearing gloves and safety glasses, place the scribed line over a table edge and snap the glass sharply; it will break along the line.image253

nels (a piece of candle works fine) and the sides of the sash, replace the sash, and reattach the inside stop.

If a sash weight has come loose from its cord or chain, reattach it while the sash is out. Access to these weights varies, but there is often a removable panel toward the bottom of each jamb. If there is no such panel, pry the jamb trim off.