Category A HOUSE

VENTING A CRAWL-SPACE FOUNDATION—OR NOT

VENTING A CRAWL-SPACE FOUNDATION—OR NOT

Until recently, most crawl-space foundations were built with vents to promote air circulation and help prevent damaging levels of moisture from building up beneath the house. In northern states, builders often install vents that can be closed in the winter to keep out cold air. The same is done on the Oregon coast to keep out moist air. Many local building codes require crawl-space ventilation, so be sure to check with your building department to find out which requirements are in effect.

Codes requiring vents usually stipulate that a vent be in­stalled 2 ft. from each corner of the foundation and every 6 ft. on at least three sides of the building. For appearance’s sake, most builders try to leave vents off the front of the building.

If you need to install crawl-space vents, there are several ways to do so. Some factory-made vents are designed for installation in openings formed in a poured concrete wall. Others are sized to fit in concrete block walls. For a simple, inexpen­sive, and attractive vent, cut sections of 3-in.- or 4-in.-dia. plastic pipe and put them in the foundation wall forms before pouring the concrete. Use ad­hesive to secure pieces of 1/4-in. wire mesh (also called hardware cloth) over indoor pipe sections to keep out animals. Still another way to ventilate a crawl space is by cutting openings in the rim joists, as shown in the illustra­tion at right.

Unvented Crawl Spaces

Based on relatively new research, builders in some regions are begin­ning to eliminate vents and treat crawl spaces like small basements. The idea behind this type of construction is
that you start with a dry crawl space and keep it that way. Sealing off a wet crawl space can lead to a moldy disas­ter, but it is possible to create a warm, dry crawl space by preventing moisture and air from entering. Follow the good drainage guidelines explained in the sidebar on p. 54.

Dirt floors must be sealed with a sheet of 6-mil plastic that laps up onto the foundation and is fastened against it with mastic. Rigid insulation should be used on foundation walls, eliminating the need for insulation in the joist spaces under the floor. With the help of a heating contractor, you can even supply a crawl space with a small heating duct to help keep it dry. You can create access to the crawl space through a trap door framed in the floor of a closet.

SQUARE

Foundations and Floors

Floors may seem to be the simplest of the challenges facing a new builder, but the importance of establishing a firm, sound, dependable connection between a house, the foundation, and the earth cannot be overstated. Everything rests, quite literally, on the quality of the foundation and fram­ing work done in the first few days or so after the concrete contractor has left. Our first house, in coastal Oregon, had a concrete foundation made from beach sand. Sixty years of wind and rain had washed much of that sand back toward the beach, leaving us with a shaky, tilted floor that wasn’t even bolted to the foundation.

Know the Foundation Fundamentals

Take a deep breath. Having found and purchased a lot, bought or drawn up the plans, obtained the permits, cleared the land, run power to the site, and completed the necessary grading, drainage, and excavation work, you’re finally ready to begin working on the foundation. You’ve already come a long way.

Whenever I think about foundations, I can’t help but recall being told as a child, “You’re on your feet most of the day, so wear good shoes.” A foundation is like a pair of shoes—quality makes all the difference. Walk around all day in poor shoes and your whole body feels lousy. Build a house on a poor founda­tion and the entire house is unstable.

Подпись: STEP BY STEPПодпись: 1 Form and Pour the Footings p. 52 2 Build the Foundation Walls p. 53 3 Backfill around the Foundation p. 54 4 Attach the Sills p. 55 5 Build Midspan Support for Joists p. 60 6 Install the Joists p. 65 7 Install Extra Joists and Blocking p. 69 8 Install the Floor Sheathing p. 71 SQUAREThere are quite a few foundations that can be used for houses. The three major types—slabs, crawl spaces, and full basements—are discussed in the sidebar on pp. 50—51. Because many houses have a crawl-space foundation, we’ll cover the step-by-step process for this type shortly. The main parts of this

Подпись: и їм їм їм и їм їм їм їм їм їм їм їм їм їм їм їм їм їм и їм їм їм їм їм їм їм їм їм їм їм їм їм и їм їм їм їм їм їм їм їм їм їм їм їм їм їм и їм їм їм їм їм їм їм їм їм їм їм їм їм и їм їм їм їм їм їм їм їм і FOUNDATION AND FRAMING SQUAREAll foundations need proper drainage. In addition to installing drainpipe around the footings, make sure that the finished grade slopes away from the house. If gutters and downspouts are installed, use elbows and splash plates to direct runoff away from foundation walls.

SQUARE

foundation are shown in the illustration above. However, if you’re planning to build a house, it’s a good idea to consider all your foundation options. Talk to builders and foundation sub­contractors in your area to find out which foun­dations and special site conditions to consider.

If you’re building a crawl-space foundation, as we did here, find out about the ventilation requirements. In most areas, vents are required in crawl-space foundations. In some areas, codes have been updated to allow for an unvented crawl space (see the sidebar on the facing page).

Clay can cause problems

Local soil conditions have a lot to do with choosing and constructing a foundation. Extra care must be taken when building on clay-rich soils, which exist in many parts of the country. Clay expands when saturated with moisture.

This can exert tremendous pressure on a foundation. I have seen how this expansive action moves footings, cracks slabs, and causes extensive damage to a house. When builders are aware of the potential problems with clay soil, they can take precautions to avoid damaging effects (see the drainage guidelines discussed in the sidebar on p. 52). I have worked on sites where several feet of clay soil were removed and replaced with nonexpansive soil, which was then compacted before the footings were poured.

Foam forms are worth considering

If you haven’t done so already, take a look at the possibilities offered by insulated concrete forms (ICFs). These lightweight foam forms are easy to handle and assemble, and they stay in place to provide wall insulation after the foundation wall is poured (see the sidebar on p. 54). With

DEALING WITH SUPPLIERS AND SCHEDULING DELIVERIES

Estimating lumber and materials for a small, affordable house is fairly simple, but it does take some experience to get it right. If you are building a Habitat house, you can call or e-mail affiliates and ask them to share their lists with you (check the Habitat website for the affiliate in your area). You can also take a set of plans to a local supplier. Most building-supply outlets will create a materials list and give you a bid on what everything will cost. Always get bids from more than one supplier. Just make sure every supplier understands the type and grade of each item.

If you don’t make your own list, take the opportunity to in­spect the plans closely. Get acquainted with the house and all its parts before you start. Remember that a lumber list is only an estimate of materials that will be needed for a particular job. You may need to order a few more items as you build, or
you may need to send some materials back to the supplier. Find out ahead of time whether your suppliers charge a restocking fee for returned materials.

Most builders have materials delivered as needed, rather than all at once. You should do the same. That way, you won’t have to worry as much about storage problems. Also, ask your supplier to stack the lumber load in the order in which it will be used.

Some materials (especially trim, doors, and unpainted siding) should be stored indoors. When storing material out­side, set it on blocks above the ground and cover it with plas­tic to keep it dry. Be specific about where you want the lumber company to drop the wood, and pick a level, accessible loca­tion close to where it will be used. Hauling lumber by hand from any distance is hard, time-consuming work.

Подпись:DEALING WITH SUPPLIERS AND SCHEDULING DELIVERIESDEALING WITH SUPPLIERS AND SCHEDULING DELIVERIESПодпись: ItПодпись: —Подпись: (Подпись: 70]Подпись: /44 VMmПодпись: These hold-downs are attached to long bolts embedded in the concrete. They tie into the house frame and help keep a building on the foundation where it belongs. [Photo by Don Charles Blom] Подпись: Photo courtesy HFHIHabitat

for Humanity"

AN OPPORTUNITY FOR A NEW START

Salvador and Sara Arevalo almost decided not to partici­pate in the Jimmy Carter Work Project when it came to Los Angeles, CA, in 2007.

“We had another engagement," Salvador said, laughing. “But the affiliate urged us to attend."

During the event, the Arevalos (along with 29 other fami­lies) were given the opportunity to build a home for them­selves in just a matter of days. It was a family wish fulfilled.

Before their involvement with Habitat, the Arevalos never be­lieved they would own a home in Los Angeles. The high cost of housing in the city left them with few options.

Until recently they

occupied a one-bedroom fourplex, in urgent need of repair, with their three teenage daughters. Katy, soon to be a fresh­man in college, and Lesly, her youngest sister, slept in bunk beds in the dining room. Laria, 14, slept in a converted storage closet that she lovingly decorated.

When the opportunity arrived to work with Habitat, Salvador, who works in building maintenance, was eager to build his family’s home. Since the house’s completion, Salvador has dedicated himself to customizing and personal­izing the residence and making improvements when necessary.

“We are grateful to everyone who has made it possible for us to realize our dream of owning a house," he said.

Sara, who is quiet and reserved, was quick to answer when asked what advice she would give to someone considering a partnership with Habitat—“I would tell them not to miss the opportunity." —Heather Myers

к

PRESSURE-TREATED LUMBER

In areas where the termites are especially hungry (Hawaii and some southern states), entire house frames can be built of pressure – treated wood. Pressure-treatment technology was developed to repel termites and inhibit rot, and it does so effectively. During the treatment process, a preservative compound is forced under pres­sure into raw lumber, penetrating deeply into each board.

For many years the main ingredient used in treated wood was arsenic. A dangerous poison, arsenic was effective in repelling termites but also harmed the workers who manufactured and used these construction materials. The EPA eventually banned the use of arsenic in PT wood, and suppliers replaced the arsenic with copper and other less harmful chemicals. Copper is what gives PT lumber its distinctive green or brown color. Because copper is quite cor­rosive, nails and metal fasteners had to be redesigned. It’s best to used hot-dipped galvanized nails (rather than regular steel nails) when working with pressure-treated wood. Always check with your supplier to make sure you use nails and metal fasteners that won’t corrode easily.

To avoid injury when handling and cutting PT lumber, it’s impor­tant to follow these safety precautions:

■ Use gloves when working with PT wood.

■ If you handle PT wood with bare hands, wash your hands before eating.

■ Don’t burn scrap PT lumber in your woodstove or anywhere else.

■ When cutting more than a few PT boards, wear a dust mask.

Posts, girders, and beams

Posts are vertical supports for horizontal pieces, which are called girders or beams. These major horizontal members support floor joists. Posts that sit on concrete piers are often made of PT wood.

Joists

Typically spaced 16 in. or 24 in. o. c., joists are installed parallel to each other and support the subfloor and rough plumbing. They span the entire house, running from one outside sill, across any interior girders, to the other

Подпись: Plates and studs are nailed together and raised upright to form a wall.

outside sill. Most often they are made from 2x-dimension lumber (such as 2x8s, 2x10s, or 2 x12s) or from manufactured, wooden I-beam joists.

Floor sheathing

Floors are usually sheathed with 5/8-in.- or 3/4-in.-thick, 4-ft. by 8-ft. sheets of tongue – and-groove plywood or oriented strand board (OSB). Better sheets have their edges treated with paint to inhibit moisture absorption in wet weather.

Wall plates

These are the 2×4 or 2×6 horizontal members that hold together the parts of a wall. Each wall has three plates—one on the bottom and two on the top. The two uppermost plates are called the top plate and the double top (or cap) plate. When framing on a concrete slab, the bottom plate is made of PT wood.

Studs

Studs are the vertical wall members nailed to the plates, and they are typically spaced either 16 in. or 24 in. o. c. The standard, precut stud length in many parts of the country is 92/4 in. That stud, along with three F/2-in.- thick wall plates (one on the bottom and two at the top), creates a framed wall that is 963/4 in. high. That leaves room for /Tin. or 3/8-in. drywall on the ceiling and full 8-ft. sheets on the walls. In addition to solid 2x lumber, you may also encounter finger-jointed studs, which are manufactured from shorter pieces of wood glued end to end. Some houses are being built with metal studs.

PRESSURE-TREATED LUMBERMaterials matter. Builder’s felt, sometimes called tar paper, is rolled over the roof sheathing before as­phalt shingles are installed.

Подпись: Make sure that every window and door has proper flashing and caulking before setting them in place. [Photo by Don Charles Blom]

Headers, trimmers, and cripples

The weight from above a window or door opening is transferred around the hole by a header nailed horizontally between studs. Trimmers nailed to the studs at both ends of the header support the header. Cripples, or jack studs, extend from the top of a header to the top plate, as well as from the bottom plate to the underside of rough windowsills.

Roof trusses

Each of these factory-made assemblies typically consists of a bottom chord (or joist chord), a top chord (rafter or rafter chord), and interior web­bing. Trusses are often engineered to carry the entire weight of a roof’s load, transferring it to the exterior walls. That load can be considerable in snowy parts of the country. Trusses allow roof construction to be done quickly and easily. Most trusses for residential construction are spaced 24 in. o. c.

Fascia and gutter boards

These terms are often used interchangeably, but a gutter board is technically distinct from a fascia board. Both parts are installed over the ends of the rafter tails. A gutter board is nailed directly to the rafter tails, and it is covered by aluminum or vinyl cladding or by a fascia board that serves as the finished exterior’s trim surface. For more details, see Chapter 6.

Roof and wall sheathing

Roofs and walls are usually sheathed with V2-in.- or 5/8-in.-thick OSB. In some parts of the country, exterior walls, along with their gable trusses, are sheathed before they are raised upright. In earthquake and high wind areas, you are often required to sheathe some interior walls to help withstand lateral forces that can tear buildings apart. Take a look at the damage caused by Hurricane Katrina in the Gulf states and you begin to get the picture.

Housewrap and felt paper

Housewrap or felt paper is placed under siding
and shingles to prevent wind and water from entering stud cavities or the attic. You can also use a rain screen behind siding to help prevent moisture from getting trapped in these areas, which can cause mold.

Sealants

Construction adhesives, caulk, and other seal­ants are ever present on job sites. Most of those products come in cylindrical cartridges that fit inside a caulking gun, which is used to apply the caulk or sealant. Construction adhe­sives can be used to bond different materials together—floor sheathing to floor joists, for example. To prevent water leakage, caulks are used to seal around windows and doorframes, at siding joints, and where a bathtub meets the floor. They can be used under wall plates and around pipe holes to block out cold air. Gaps between baseboards and walls or door casings can be filled with caulk before painting. Be sure to buy the right type of caulk. Don’t use a basic latex painter’s caulk around exterior doors and windows, for example. Silicone caulks offer much better protection in these areas.

Подпись:Подпись:PRESSURE-TREATED LUMBERScrews

Drywall screws are the most universally used screws in house construction. But thanks to the popularity of cordless drill-drivers, all kinds of screws are now being used to build houses. Corrosion-resistant screws are available for deck construction and other outdoor applica­tions. Other types of screws are used to install cabinets, built-ins, and hardware. Screws are typically described by head type (main types include flat, round, pan, and hex); length (given in inches); gauge, or shank, diameter (usually between 4 and 10); and typical use (drywall, wood, sheet metal, and so on). Although popular for general-purpose use, drywall screws aren’t strong enough to support heavy loads, such as wall cabinets.

Other fasteners

Toggle bolts, molly bolts, hollow-wall anchors, and other fasteners are used to help secure items, such as wire shelving to drywall panels. When fastening materials to a masonry surface

USING DRILLS

Old drills were made with enclosed trigger guards like those on firearms. Carpenters had their trigger fingers caught and broken from time to time, such as when a drill bit got hung up on a knot in a board and spun suddenly. For safety reasons, workers often used a hacksaw to cut out the trigger guards. These days, manufac­turers have eliminated trigger guards, but that doesn’t mean drills can’t do you harm. To use a drill safely, follow these guidelines:

■ Use clean, sharp bits.

■ Don’t force the drill; let it cut at its own pace.

■ Use a slower speed when drilling harder materials, and coat the bit with wax or silicone to reduce resistance.

■ When drilling thick material, hold the drill with both hands, and use the side handle if the drill comes with one.

■ If you’re drilling a deep hole, pull the bit out of the hole from time to time to clear debris from the bit and the hole.

■ Don’t rely on hand pressure alone to hold the workpiece in which you’re drilling. Instead, clamp the workpiece to a sawhorse or a workbench.

■ Be especially careful when drilling from a ladder. Make sure you have proper balance.

Подпись: New, lightweight tablesaws can be brought to the job site with ease. [Photo by Don Charles Blom] Подпись: carpenters have at least two drills on a job site. A corded drill is best for mixing paint and dry- wall compound and boring holes in concrete, framing lumber, and metal. There are numerous tools out there that can be used to drive screws or drill holes. One of the newer models on the market allows you to drive multiple screws in decking material with no fuss. A cordless impact-driver is another tool that makes driving screws “a walk in the park.” It can set screws with a circular motion or, like a jackhammer, an up-and-down motion that “drives” screws into hard wood or other material. Release the trigger immediately if the bit begins to bind or catch.

USING DRILLS

When you have multiple screws to drive into deck­ing material, try one of these stand-up screw guns.

[Photo by Don Charles Blom]


USING DRILLS

Подпись:Подпись: Many of today's tools are powered by compressed air. Lightweight compressors are easy to move around a job site. [Photo by Don Charles Blom] Подпись: Tool kits, nail bags, and pockets for buckets are available to help keep tools handy and in order. [Photo by Don Charles Blom]

Whether corded or cordless, a drill is usually described by the maximum capacity of its chuck (bit holder). A 3/s-in. model can handle a bit shank diameter of up to 3/s in. For general car­pentry work, buy either a 3/s-in. or a /Tin. drill. Look for a model with a reverse switch (so you can remove screws) and variable speed control.

A good cordless drill will also have a clutch, which makes it easier to drive screws of different sizes. A low clutch setting (1 to 3) is good for driving small screws. Higher settings are used for bigger screws.

Air compressors

For almost sixty years I have been using an air compressor to power the various pneumatic tools used on a job site. The early models took a team of mules to haul around, but many of the compressors we have today can be carried with one arm or have been put on wheels to make maneuvering easier. With the proliferation of air-driven tools, a good air compressor, along with an air hose or two, is a valuable asset. Just make sure workers are given basic safety training and guidelines to avoid injury (see Resources on p. 279).

Accessories for workers

When it comes to tools, work clothes, or tool kits, one size fits all is a thing of the past. These days there are numerous companies (see Resources on p. 279) that offer a good line of work accessories that are tailored for both men and women.

Extension cords

Power tools need adequate power to operate properly, and that means you need good-quality extension cords. The smaller the gauge number marked on the cord, the heavier the wire. The three most common gauges are 12, 14, and 16 (12 is the heaviest). From time to time, I’ve seen carpenters run a circular saw with a 100-ft. 16-gauge extension cord. That’s like watering a lawn with a hose the diameter of a drinking straw. Not much water (or, in the case of an extension cord, electricity) comes through. With

a light extension cord, you risk burning out the motor. To prevent that, always use the shortest cord that will do the job. There’s no need to use a 50-ft. cord if you are working just 15 ft. from an outlet. Here’s a rule you can use for selecting the proper extension cord: Use 16-gauge wire for a 25-ft. (or shorter) cord, 14-gauge wire for a 50-ft. cord, and 12-gauge wire for a 100-ft. cord.

Nominal versus actual size.

Подпись: и їм їм їм и їм їм їм їм їм їм їм їм їм їм їм їм їм їм и їм їм їм їм їм їм їм їм їм їм їм їм їм и їм їм їм їм їм їм їм їм їм їм їм їм їм їм и їм їм їм їм їм їм їм їм їм їм їм їм їм и їм їм їм їм їм їм їм їм і PARTS OF A HOUSE USING DRILLSПодпись: Current issues. Extension cords for builders are designed for outdoor use, with properly sized wires. One good way to store a long cord is to loop it to-gether in a daisy chain.USING DRILLS

Подпись: Proper care of cords is essential. Looping a cord into a daisy chain, or a simple crochet stitch, makes for easy storage (see the photo at left). If a cord is frayed or nicked, repair it. A cord with exposed wires can be extremely dangerous. If that happens, the cord should be cut and rewired with new plugs. You can buy a cord equipped with a built-in ground-fault circuit interrupter (GFCI). In the event of a short, the GFCI automatically shuts off power, preventing electrical shock.

When you shop for lumber, remember the difference between nominal and actual measurements. If you buy a 2×4, you’ll get a IJ/2-in. by 3f2-in. board. If you buy a 2×6, you’ll get a l/^-in. by 5//2-in. board.

Reciprocating saws

Another frequently used tool is the reciprocating saw, also called a sabersaw or a Sawzall®—the name given to Milwaukee’s® popular saw (see the bottom photo on the facing page). This tool allows you to cut in tight places and make curved cuts. Different blades are available for cutting through wood, metal, plaster, and plastic. For general use, I buy 6-in. bimetal blades, which cut through both wood and metal.

Chopsaws

The power-miter saw (generally referred to as a chopsaw) has revolutionized finish carpentry just as the circular saw revolutionized rough­framing carpentry. With a chopsaw, you can make precise square and angled cuts in framing lumber, door and window casings, and base­board trim. These saws are rugged and easy to use. When equipped with a fine blade, they can make glass-smooth cuts.

Sliding compound miter saw

This tool, the sliding compound miter saw, is a trim worker’s dream. It is essentially a chop saw that can cut angles across wide boards. I use it not only to cut baseboards and door casings, but also to cut across wide boards used in closets, blocks, headers, and cripples used in a house frame (see Resources on p. 279).

Lightweight tablesaw

It wasn’t long ago that tablesaws were cumber­some, heavy, and anything but portable. But times have changed. Now an on-site tablesaw can be moved easily by just one or two work­ers. But don’t be fooled by the lightweight label. These saws are well built, accurate, and with reasonable care will last for years (see Resources on p. 279).

Drills

An electric drill is a versatile tool on any job site. It’s capable of boring holes in all sorts of material and can also be used for driving screws and mixing paint or drywall compound. Most

. AVOIDING KICKBACK

When the blade of a circular saw gets pinched by the wood, the power of the motor can force the saw backward—a safety hazard called kickback. In extreme cases, the saw can jump away from the material with the blade still spinning, harming anything in its path. To prevent kickback when using a circular saw, follow these guidelines:

■ Use a sharp, carbide-tipped blade.

■ Cut in a straight line.

■ Let the saw do the cutting—don’t force it. Forcing the cut can cause the blade to bind and kick back.

■ Always provide proper support for the stock. Avoid setups that al­low the material being cut to pinch the blade (see the illustration below).

Подпись: When you are cutting wood, support it properly. Unsupported wood can pinch the blade and cause the saw to kick back.

Подпись: Adjust the cutting depth. Always set the cutting depth so that the saw just barely cuts through the material. [Photo © Tony Mason] Подпись:If a kickback does occur, release the saw trigger immediately and let the blade stop. As long as the blade guard is working properly, there is little danger of injury. Don’t resume cutting until the cause of the kickback is determined and corrected.

. AVOIDING KICKBACK

Not enough support

The stock sags in the middle, pinching the blade.

Not enough support

c

The stock sags at

A

A

both ends, pinching the blade.

hi——————

. AVOIDING KICKBACK

The stock is supported on both sides of the cut, so the blade is not pinched.

Подпись: Use a chopsaw for speed and accuracy. With a chopsaw, it's easy to make precise cuts at different preset angles. This type of saw must be set on a good worktable, with outboard supports for longer boards. [Photo by HFHI/Steffan Hacker] Подпись: A hook can be helpful. Some new saws come with a built-in hook that allows you to hang the saw over a joist or a rafter when you're working up high. A Skyhook accessory is also available to retrofit on saws that lack this convenient feature (see Resources on p. 279). Подпись: The sliding compound miter saw makes short work of anything from 4x header stock to a small piece of door trim. [Photo by Don Charles Blom]

Power Tools

Although power tools can’t replace hand tools, they sure do make construction work easier and more efficient. It can be a real timesaver to not have to drag a cord behind you and yet have a tool with enough power to do a professional job. Nowadays there are numerous cordless tools powered by lithium-ion batteries that would be an asset when constructing a house. These include screwdrivers, reciprocating saws, and even circular saws. For years such tools were de­signed primarily for homeowner use, but today they are used on almost every jobsite. I wouldn’t want to be without them.

Подпись:Circular saws

The circular saw has been around since the 1920s, but it didn’t really catch on until the housing boom began after World War II.

Direct-drive saw. Sometimes referred to as a side­winder saw, a direct-drive saw is a type of circular saw. Its motor is on the side, in line with the blade.

[Photo by HFHI/Will Crocker]

Power Tools

Ж


Power Tools

Power Tools

Подпись: MAKING A PLUNGE CUT Sometimes it's necessary to cut a hole in the middle of a board or a panel. You can do this with your circular saw if you know how to make a plunge cut. (Don't attempt this unless you're an expe-rienced circular-saw user.) Start by leaning the saw forward over the cut line. Rest the front edge of the saw base on the wood, and hold the blade about 1 in. from the surface. Use the lever on the blade guard to lift the guard and expose the blade. Make sure that the blade is aligned over the cut line. Start the saw and use the front edge of the base as the pivot point. Lower the blade into the wood, using both hands to control the saw and complete the cut. When you are finished, turn off the saw and let the blade stop spinning before pulling it out. Another way to make a plunge cut is to loosen the lever that controls the cutting depth and raise the blade completely above the board. Set the saw base in position over the cut line, loosen the depth adjustment lock, and slowly lower the blade into the material. Power Tools

These days, many homeowners have one in the garage. For a builder, this portable power tool is indispensable. The most popular circular saws are designed to hold 71/4-in.-dia. blades. In the eastern part of the United States, most carpen­ters prefer direct-drive saws, often referred to as sidewinders (see the top photo on the facing page). In the West, carpenters mainly use the heavier worm-drive models (see the bottom right photo on the facing page). Check out both to see which one you prefer. Above all, buy quality. Light, low-priced homeowner models aren’t in the same league with professional models.

Here are some tips for using your saw safely and accurately. Some of them apply to other power tools as well. As with any power tool, be sure to study and follow the instructions in the manual.

• Make sure the blade guard works freely before using the tool.

• Use the right blade for the job, and replace a dull blade with a new one. Carbide-tipped blades are best for most wood-cutting work.

• To reduce friction when cutting, apply paste wax to both sides of the blade, or spray it with silicone.

• Adjust the saw’s cutting depth according to the thickness of the material. If you are cutting ‘A-in.-thick material, set the cutting depth at no more than 3/4 in. (see the top photo on p. 36). The less amount of blade that’s exposed, the less potential for injury should something go wrong.

• Always unplug your saw when changing blades and adjusting the cutting depth or angle.

• Make sure the stock is adequately supported. With proper support, the cut won’t bind on the blade, and the cut-off end will fall free.

• To begin a cut, place the saw base on the stock with the blade about 1 in. from the edge of the wood, aligned with the cut line. Hold the saw with both hands, pull the switch, and slowly push the blade into the wood, follow­ing the cut line. Go slowly, guiding the saw, and let it do the work. Eventually, you will

learn to cut with one hand on the saw and the other hand on the material.

• Don’t try to hold a short or small piece with one hand while guiding the saw with the other. Instead, use a clamp to secure the workpiece while you make the cut.

WORKING SAFELY ON A CONSTRUCTION SITE

Подпись: SAVING YOUR BACK WHEN LIFTING A LOAD Подпись: Start off squatting, with your back straight and your knees bent, then grasp the load.Подпись: Begin to lift, keeping your back straight, and gradually straighten your legs.Подпись: Finish with both your back and your knees straight, but don't lock your knees.WORKING SAFELY ON A CONSTRUCTION SITEПодпись: One of the reasons so many carpenters have lower back pain is that they never learned to lift heavy loads properly.

Working on a construction site is not a sunny stroll in the park. There are all kinds of unusual, uncomfort­able, and potentially hazardous conditions you may encounter—uneven ground, troublesome weather, boards with protruding nails, and sloped roof sur­faces that challenge your balance. Learning how to work safely and effectively in a construction environ­ment is just one more skill that you need to acquire, such as hammering a nail or sawing a board. Here are some basic suggestions to keep you safe and productive:

■ Wear good shoes, clothes that fit well, long­sleeved shirts, long pants, a hat with a brim, and sunscreen. (see Resources on p. 279). Leave jewelry at home, and bunch up long hair, so it doesn’t get caught in a power tool.

■ Protect your eyes with safety glasses or goggles when sawing or nailing.

■ Protect your ears. Hearing damage is cumulative and permanent; once you’ve damaged your ears, you can’t undo it. I keep a few sponge earplugs in a 35mm film canister stored in my tool bucket.

■ Protect your lungs with a dust mask.

■ To prevent back injuries, remember to lift with your legs, not your back. If you’ll be working on your knees, wear kneepads.

■ To reduce the risk of tripping or stepping on a nail, keep your work area clean.

■ If you see any nails sticking out of boards, either bend the nails or remove them.

■ Never throw anything off a roof without looking to see whether anyone is below.

■ Don’t drink (or do drugs) while doing construction work.

■ No one under 18 years of age should be permitted on a construction site with hazardous materials.

■ No one under 16 years of age should ever be per­mitted on a construction site.

■ Work with a clear head and pay attention to what

you and others around you are doing. Be especially careful toward the end of the day, when you are physically tired.

■ Pay attention to your inner voice. If you feel that something might be dangerous, ask for help or figure out a better way to do it.

■ Don’t forget to rest and drink plenty of water. Your body can become dehydrated rapidly on a hot, dry day. If you aren’t visiting the Porta Potti® regularly, you aren’t drinking enough water.

■ Keep your tools sharp and clean, take care of them, and treat them well.

■ Take a courseinbasic firstaid.

Подпись: Keep portable power tools accessible. Instead of storing your circular saw on the ground or subfloor, fasten a stick to a stud or sawhorse to keep the tool handy. That way, you won't have to bend over every time you need to make a cut.WORKING SAFELY ON A CONSTRUCTION SITE

you to carry many individual tools. For orga­nizing specialized tools (collections of drill bits, chisels, or screwdrivers, for example), inexpen­sive storage boxes in many sizes are available from supply stores. Label the boxes so you know what’s inside.

Cat’s paws and flat bars

These prying tools really come in handy dur­ing new construction and remodeling work. Your hammer’s claw will generally work fine for removing exposed nails. When a nail is buried, though, a cat’s paw is the tool to use. With a couple of hammer blows, you can sink the cat’s paw into a board, grab the head of a nail, and lever it above the surface. From there, your ham­mer takes over to completely remove the nail.

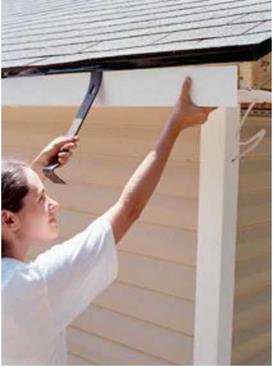
A flat bar can also be used to pull nails, or it can be used as a prybar. In new construction, I often use a flat bar to separate boards that have been temporarily nailed together and to slip aluminum or vinyl trim under a drip edge (see the photo at right).

Cat’s paws and flat bars

Cat’s paws and flat bars

A flat bar has many uses. Here, a volunteer uses a flat bar to help slip a piece of aluminum cladding under the roof’s drip edge.

Tool Carriers

Once you have a few tools, you’ll need to carry them with you as you frame walls and install siding or shingles. It doesn’t work well to carry a measuring tape in your jeans and to fish nails from a shirt pocket. Fifty years ago, when I started working as a carpenter, we wore white carpenter’s overalls with a lot of little pockets for nails and tools. Those soon gave way to cloth aprons, which were replaced by heavy leather aprons with a wide leather belt. Today, nylon pouches seem to be taking over, and for good reason: The best versions are lighter than leather and just as durable. As with tools, the selection of tool belts, pouches, and holders can be confusing. There are good belt and pouch systems for both men and women. Inexpensive versions are available for novice and occasional builders. If you’re serious about construction work, consider some of the tool belt systems that allow you to add pouches and holders as you need them.

For larger items or for tools that are used only occasionally, the traditional carpenter’s toolbox has given way to the carpenter’s tool bucket (see the photo at left). This is just a 5-gal. bucket fitted with a bag insert that allows