Seasoning the Timbers
How long to air-dry or season the timbers before use is a much-debated question. The best answer I have encountered is from contemporary timber framer and colleague Steve Chappell in his book A Timber Framers Workshop, listed in the Bibliography. Steve uses the term “curing” to describe the early stages of the seasoning process. He describes this initial phase:
Once the tree dies and is milled, the wood fibers begin to relax and take on their natural shape. There is usually an immediate reaction to being milled in the form of crowning, warping, or twisting, resulting from the inherent tension in the wood, but no shrinkage will occur until all of the free water (moisture in the cell cavities), and the bound water (moisture in the cell walls) begins to leave. (Chappell, 1998, p. 139)
Chappell says that 90 percent of these deformations due to natural stresses being relaxed will take place in the first six months, but adds that “the first eight to twelve weeks is the most rapid curing stage” and that “it is during these early stages that the most dramatic changes will take place.” (Chappell, pp. 139-140) My own experience with the new heavy timbers we used for our new Earthwood addition (Chapter 5) bears this out. I paid a little more for early delivery of the timbers, and the heaviest ones managed to get ten to twelve weeks of excellent drying conditions, a big plus. The white pine timbers were lighter to handle, kept their straightness, and shrunk only marginally on their breadth and width.
I used to think — I suppose I read it somewhere — that the old-time timber merchants would store wood for years to supply builders with dry timbers. Chappell says otherwise, that builders were “more concerned with properly curing their timbers and allowing them to season for as long as was practicable.” Emphasis mine.
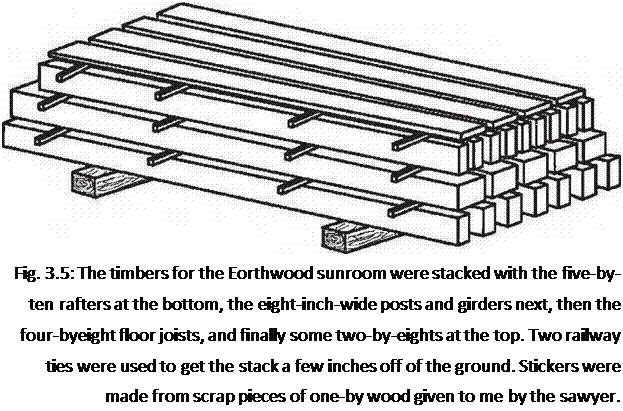
To minimize twisting and other seasoning defects, get your timbers home from the sawmill as soon as possible after they are cut, and stack them in good parallel courses, with one-inch wooden stickers between the courses. Choose a flat, well-drained site without vegetation. (Mow the grass as needed.) If the timbers are already showing signs of mold when you get them to your site, you should lay them out individually in the sun for a few days to kill the fungus.
Wood rot, incidentally, is caused by fungi, which use the cellulose in wood as a food. But fungi also need a constant damp condition. If moisture content in wood is below about 18 percent, the fungi will not flourish, although the spores might remain alive, just waiting for more favorable times. This is why proper stacking of wood is so dependent on good ventilation, which is an excellent preventative to rot. This is also why exposed beams in a building are so resistant to fungi and rot: they enjoy superb ventilation. But back to the stacking.
Have a good quantity of dry stickers, which are lengths of regularly – dimensioned scrap wood, to place laterally between courses. They should be at least an inch thick to prevent mold, and at least three stickers should be used per course of wood with timbers up to ten feet long, and four or more with longer timbers. Each course in the stack should be made with timbers of the same vertical dimension. A tall stack is preferable to a wide stack, because the extra weight of the wood acts as a clamp to help minimize any twisting of the wood during the curing process. And put the timbers that you are going to use first on the top of the pile, not the bottom!
 “Sticker burn” or discoloration can occur where the stickers are placed. If you care about this, get a friend to help you restack the pile, top to bottom, twice during the curing, which, again, puts the first needed timbers on top. Move the stickers a few inches so as not to exacerbate the sticker burn. If you are planning on sanding all the timbers anyway, sticker burn is of less consequence.
I conclude this chapter with a picture of the way I stacked my timbers for our Earthwood sunroom project.


Leave a reply