WORKING WITH MDF
If you want a cost-effective, easily worked material for plain-profile trim, MDF (medium-density fiberboard) is hard to beat. And you can add visual interest by installing cove, bullnose, quarter – round or other simple molding along MDF’s plain edges.
Advantages. MDF cuts and shapes beautifully. For smooth edge cuts, use a 60-tooth 10-in. blade. Because it has no grain, MDF crosscuts and rips equally well, and its edges can be routed as well, although most MDF trim is simply butt joined. (No need for biscuits to hold the joints closed.) Use a pneumatic nailer to attach it; MDF won’t split. Sand it with 150-grit sandpaper and prime with an oil-based primer (latex roughens the surface). However, MDF does have quirks you need to work around.
Disadvantages. MDF is heavy (a 14-in. sheet weighs about 100 lb.); lighter versions cost more. It’s dusty to cut and shape. As noted in the tip above right, its edges suck moisture. In fact, MDF can swell from ambient moisture, so seal it immediately after cutting or shaping it. Seal the edges with two coats of shellac-based primer. Then
paint all six sides of the panels with an oil-based primer. Perhaps MDF’s most annoying quirk is its tendency to mushroom around nail heads: MDF is so dense that it doesn’t compress when you nail it; fiber near the nail just bulges up. After setting the nail heads, use a Sandvik carbide scraper to scrape down bumps, and then prime it.
Because of MDF’s tendency to wick moisture, it’s a poor choice for bathroom trim or window installations where condensation is common— no matter how well it’s sealed. In those locations, go with wood instead.
Though many old-house owners prefer wood molding, its supply and quality have been dwindling for decades, leading to a run on third-world forests—now being cut down at an alarming rate. Whereas polymer moldings (especially polyurethane) are available in most traditional architectural styles, from simple colonial to elaborate Victorian.
Once installed and painted, polymer moldings are virtually indistinguishable from wood trim. The following sections note some of the unique features.
Stability. Unlike wood, polymer molding won’t warp, split, rot, or get eaten by termites.
Although it does expand slightly (3з8 in. for a 12-ft. piece) in a heated room, special corner pieces “float” over section ends, allowing them to slide freely as they expand. Polymer molding has no grain, so there is no built-in bias to twist one way or the other; there are no splits, cracks, or knots.


 Quick installation. Synthetic moldings are less labor intensive. Whereas complex wood moldings are built up piece by piece and their joints painstakingly matched, synthetics come out of the box ready to install. Most polymer moldings are glued up with a compatible adhesive caulk, such as polyurethane or latex acrylic, and tacked up with finish nails or trim-head screws, which are needed for support only till the glue sets. Pieces are so light, in fact, that you can install them single-handedly.
Easy working and finishing. Most polymers can be trimmed like soft pine, using a 12-TPI (teeth per inch) to 13-TPI saw in a miter box. There’s no need for fancy joinery because most systems have corner pieces that cover joints. Touch up holes with plastic wood filler, and caulk field joints on long runs. You also may need a bead of caulk where straight lengths of molding meet existing surfaces that are irregular.
Polymer molding is typically primed white in the factory and could be installed as is, but most homeowners paint it. You paint smooth-surfaced urethanes just like standard wood trim. Some products can be stained, but that gets into the iffy territory of making plastic look like wood.
Using quality tools and materials matters but not as much as the skill and judgment of the renovator. This section of tips will help hone your skills in measuring, cutting, and attaching trim.
Accurate measurements are crucial because trim is pricey, and even small discrepancies will stand out. In the following paragraphs you’ll find a few new twists on the old chestnut "Measure twice and cut once.”
Use a sharp point to mark stock. A stubby lumberyard pencil is fine for marking framing lumber. But because the margin of error is small on trim, use a sharp pencil to mark precisely. A utility knife leaves an even thinner line, though it’s more difficult to see.
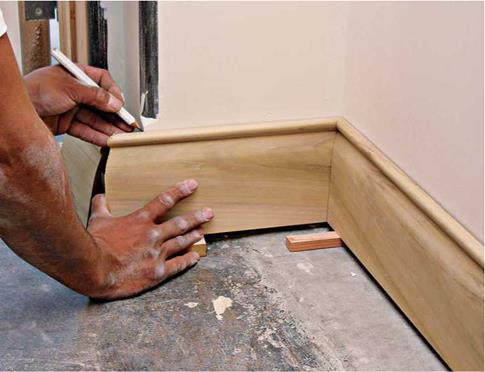
Mark trim in place, if possible. It’s almost always more accurate than taking a tape reading and transferring it to stock, especially if your memory’s bad.
Change directions. If you normally measure left to right, double-check your figures by changing direction and measuring right to left.
Use templates instead of remeasuring. When you need to cut many pieces the same length, carefully cut one, check it in position to make sure it’s accurate, and use that piece to mark the cutline on others. You can also clamp a template to a bench or saw table, to act as a stop block. As you cut successive pieces, simply butt a square – cut end against the block, and the blade will cut each in exactly the same place.
When in doubt, go long. If you’re not quite sure of the exact measurement and don’t want to climb back up the ladder to recheck, cut the piece a little long. You can always make a long board shorter, but reversing the process is quite a trick.
Xmarks the scrap. As you mark cut-lines, pencil a prominent X on the scrap ends of boards. This habit will sooner or later help you avoid wasting trim because you mistook the scrap end for the measured end.


Leave a reply