The Science of Nailing Clapboards
Even though clapboard nailing isn’t rocket science, four carpenters will give you five opinions on how to do it. Here’s what you need to know:
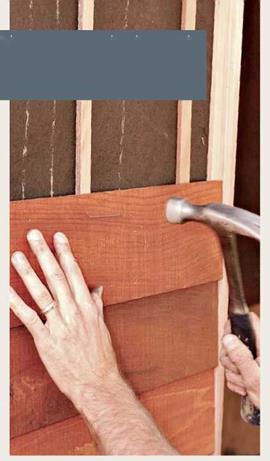
► Place clapboard nails roughly l1/ in. from the bottom so they don’t enter the tip of the clapboard underneath, especially if you’re installing 1×8 clapboards or wider. Wide clapboards are particularly likely to split if they are inadvertently nailed at top and bottom.
► Nail clapboards to stud centers. For guidance, snap vertical chalklines on the building paper over the stud centers; offset the clapboard butt joints by at least 32 in.
Lined-up nails look better, especially if you’re using a clear finish.
► Carpenters set nails; painters fill and paint them. Setting nails makes painters cranky, and if there are 1,000 to set, painters will miss some.

In humid regions where housewrap and back – primed siding are not enough to prevent rotted siding, some builders have retrofitted rain-screen walls to remedy paint failure and soaked sheathing. Basically, rain-screen walls employ furring strips to space clapboards out from the building-paper membrane, allowing air to circulate freely behind the siding and dry it out. The reasoning is sound, and field reports are encouraging.
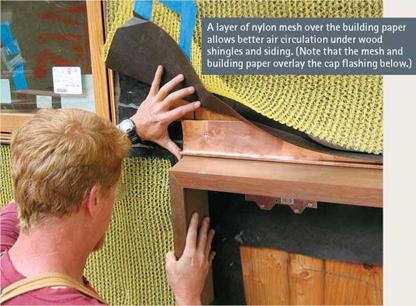
As sensible as this solution is, it’s not for every renovation. Rain screens require careful detailing and a skillful crew. For example, if furring strips raise the siding roughly 3/ in., existing trim needs to be oversize already (5/4 stock) or built up to compensate for the increased thickness of siding layers. Another option: Home Slicker®, or CedarBreather, a thin layer of nylon mesh, raises siding off the building paper and doesn’t need furring strips.
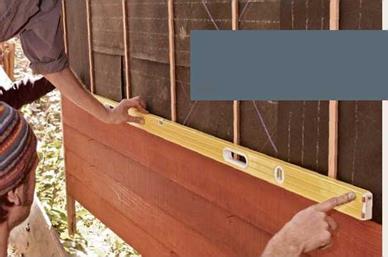
As with any horizontal siding, level each course of clapboards. Note that the corner board is installed long; it will be trimmed flush with the bottom courses of siding after the two adjacent walls have been sided.
Rain-screen walls allow air to circulate behind the siding, thereby allowing its back face to dry thoroughly. Here, thin wood furring strips raise the siding above the building paper; each strip is centered over a stud.

Stuccoing a whole house requires skills that take years to learn, but stucco repairs are well within the ken of a diligent novice. If you spend a few hours watching a stucco job in your neighborhood, you’ll pick up useful pointers.
A basic description. Stucco is a cementitious mix applied in several layers to a wire-lath base over wood-frame construction or to a masonry surface such as brick, block, or structural tile. Like plaster, stucco is usually applied in three coats: (1) a base (or scratch) coat approximately h in. thick, scored horizontally to help the next coat adhere; (2) a brown coat about % in. thick; and (3) a finish coat (called a dash coat by old – timers) % in. to 14 in. thick. For repair work and masonry-substrate work, two-coat stucco is common.
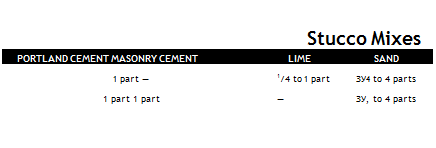
The mix. The mix always contains Portland cement and sand, but it varies according to the amount of lime, pigment, bonders, and other agents, which are described in the following text. See "Stucco Mixes,” below, for standard mixes.
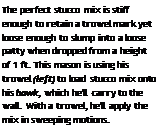
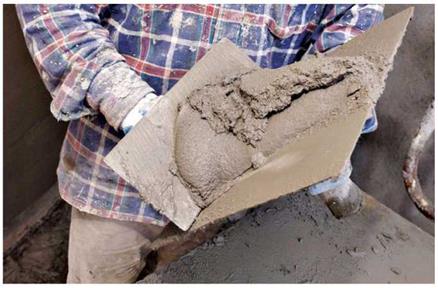
The consistency of a mix is easy to recognize but hard to describe. When you cut it with a shovel or a trowel, it should be stiff enough to retain the cut mark yet loose enough so it slumps
into a loose patty when dropped from a height of 1 ft. It should never be runny.
Building paper. Stucco is not waterproof. In fact, unpainted stucco will absorb moisture and wick it to the building paper or sheathing underneath. Always assume that moisture will be present under stucco, and apply your building paper accordingly.
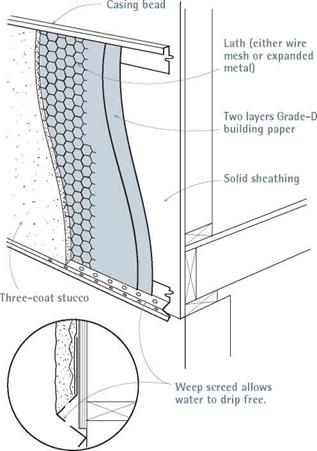
Basically, you want to cover the underlying sheathing with two layers of building paper before attaching the metal lath. Two layers of Grade D building paper will satisfy most codes, but you’re better off with two layers of a fiberglass-reinforced paper such as Super Jumbo Tex 60 Minute. Although 60-minute paper costs more, it’s far more durable. Typically, the stucco sticks to the first layer of paper, exposing it to repeated soakings till it largely disintegrates; the second layer is really the only water-resistant one, so you want it to be as durable as possible.
Take care not to tear the existing paper around the edges of the patch. Tuck the new paper under the old at the top of the patch, overlapping old paper at the sides and bottom of the patch. If the old paper is not intact or the shape of the patch precludes an easy fit, use pieces of reinforced flashing paper as "shingles,” slipping them up and under the existing stucco and paper and over the new. Caulk new paper to old at the edges to help keep water out.
Lath. Metal lath reinforces stucco so it’s less likely to crack and also mechanically ties the stucco to the building. Lath is a general term; it encompasses wire mesh or stucco netting (which looks like chicken wire) and expanded metal lath (heavy, wavy-textured sheets). When nailing up wire mesh, use galvanized furring nails with a furring "button” that goes under the mesh. When you drive these nails in, you thus pinch the wire mesh between the nail head and the button, creating a space behind the mesh, into which the scratch coat oozes, hardens, and keys. Note: Don’t use aluminum nails, because cement corrodes them. Use about 20 nails or staples per square yard of lath, spacing nails at least every 6 in. Overlap mesh at least 2 in. on vertical joints, and extend it around corners at least 6 in.
Expanded metal lath is a thicker, stronger lath used in situations requiring greater strength—for example, to cover soffits, where you’re fighting gravity while applying stucco. That is, expanded metal lath won’t sag. It typically comes in 2-ft. by 8-ft. sheets, is somewhat more work to install, and costs more. Expanded metal lath is stapled or nailed up; no need for furring nails because it’s self-furring.
Base coat. Here’s how to apply the base (scratch) coat:
1. Cover the sheathing with building paper and attach the lath.
2. Establish screed strips, which are guides for the stucco’s final surface thickness. Screeds can be existing window edges, corner boards, or strips manufactured for this purpose.
3. Mix and trowel on a thick first coat, pressing it to the lath.
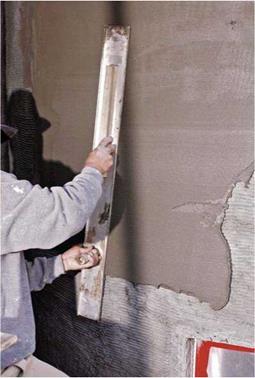
4. When the mud has set somewhat, screed it (meaning get it to a relatively uniform thickness) using screed strips as thickness guides.
5. Even out the surface further with a wood – or rubber-surfaced float.
6. Press your fingertips lightly against the surface; when it is dry enough that your fingers no longer sink in, steel trowel the surface. Steel troweling compacts the material, setting it well in the lath and driving out air pockets.
7. Scratch the surface horizontally.
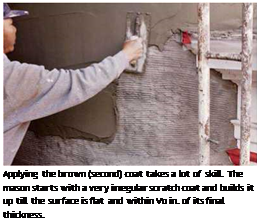
Brown coat. Installing the brown (second) coat requires the most skill, care, and time because this stage flattens the surface and builds up the stucco to within Z in. of its final thickness.
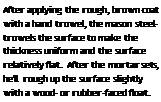
To apply the brown coat, trowel on the stucco, screed it to a relatively uniform thickness, float the surface further, and steel-trowel to improve the uniformity. Then roughen the surface slightly with a wood or rubber float. As the stucco sets up, you will be able to work it more vigorously to achieve an even, sanded texture that will allow the finish texture coat to grab and bond. Do not leave the brown coat with a smooth, hard – troweled surface. Otherwise, the finish coat won’t stick well.
Finish coat. The finish coat is about!/ in. thick, and textured to match the rest of the building.
![]()
![]()

When attempting to match an existing texture, you may need to experiment. If at first you don’t achieve a good match, scrape off the mud and try again until you find a technique that works. Textures are discussed at the end of this stuccoing section.
Stucco trim. If doors or windows in stucco walls are cased with wood trim, flash their head casings with self-adhering flexible flashing. Metal windows in stucco usually have no casing to dam up water and so need no head flashing; metal windows usually have an integral nailing flange that serves as flashing after being caulked. If you need to cut back stucco siding to repair rot or install a new window, install flexible flashing over the head casing, and install fiberglass-reinforced paper along the sides and under the sill.
Helpful materials. The following materials are particularly useful for repair work and are available from any masonry supplier.
► Weep screed is a metal strip nailed to the base of exterior walls, providing a straight edge to which you can screed stucco. Because it is perforated, it allows moisture to "weep" or migrate free from the masonry surface, thus allowing it to dry thoroughly after a rain.
Weep screeds are an easy way to make the bottom edge of stucco look crisp and clean.
And because the weight of the stucco flattens the screed down against the top of a foundation, the screed provides a positive seal against termites and other pests. (Stucco’s tendency to retain moisture makes rot and insect infestation particular problems.) Weep screed is also a good solution for the frequently rotted intersection of stucco walls and porch floors.
Weep screed isn’t difficult to retrofit, but you’ll need to cut away the base of walls 6 in. to 9 in. high in order to flash the upper edge of
g STUCCO PROBLEMS
the screed strip properly. Cut the screed with aviation snips, and fasten it with large-head 8d galvanized nails.
► Wire corners are preformed corners (also called corner aid) that can be fastened loosely over the wire lath with 6d galvanized nails.
Set the corner to the finished edge, taking care to keep the line straight and either plumb or level.
► Latex bonders resemble white wood glue. They are either painted into areas to be patched or mixed into batches of stucco and troweled onto walls. To ensure that the mixture is distributed uniformly, stir the bonder into water before mixing the liquid with the dry ingredients. Reduce the amount of water accordingly, as recommended by the manufacturer.
To ensure that a patch will adhere well, brush bonder full strength all around the edges of the hole or crack you’ll fill with new stucco. Merely applying patch stucco without bonder creates a "cold joint," which is likely to fracture. In most cases, you must apply new stucco before the bonder dries; otherwise, the joint won’t be as strong, although products such as Thorobond® and Weldcrete® will reemulsify when moistened by the next stucco coat.
► Prepackaged stucco mix is helpful because it eliminates worry about correct proportions among sand, cement, and plasticizing agents. However, you will need to add bonder to the mix.
► Color-coat pigment (also known as LaHabra™ color or permanent color top coat), is a pigmented finish coat, available in a limited range of colors. Its principal advantage is its ease of mixing and its depth of color, which is as deep as the finish layer. But precolored top coats usually aren’t of much use to renovators because their colors aren’t likely to match older colors on a house. Yet, if a house is already painted white, white pigmented stucco will require fewer coats of paint to blend in.
► Masonry paint and primer, which is alkali resistant, can be used on any new masonry surface. You should still wait at least 2 weeks or 3 weeks for the stucco to "cool off" before painting it. (Follow the manufacturer’s recommended wait times.) Use two coats of primer and two coats of finish paint.
The repair. Before repairing damaged areas, first diagnose why the stucco failed. Then determine the extent of the damage by pressing your palms firmly on both sides of the hole or crack. Springy areas should be removed. Continue pressing till you feel stucco that’s solidly
![]()
attached. When removing damaged areas, be deliberate and avoid disturbing surrounding intact stucco. Avoid damaging existing lath so you can attach new lath to it. Also avoid ripping the old building paper if possible. Safety note: Whether removing old stucco or mixing new, wear eye protection, heavy leather gloves, and at least a paper dust mask.
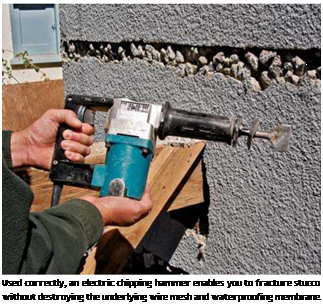
You can use a hammer and a cold chisel to remove a small section of damaged stucco. But for larger jobs, rent an electric chipping hammer with a chisel bit. Important: The bit should just fracture the stucco, not cut through it. Ideally, the underlying wire mesh and building paper will remain undamaged.
Let’s say you’re removing stucco to expose a rotted mudsill. Using a chipping hammer, fracture the stucco surface in two roughly parallel lines. On the first pass, delineate the top of the stucco to be removed. Then make a second pass, 6 in. lower. Basically, you’ll eventually demolish all the stucco below the top cut-line and restucco it after you replace the mudsill. But if you carefully remove the top 6 in. of the damaged stucco, you’ll preserve the wire mesh in that section, giving you something to tie the new mesh and stucco to.
Cut through the wire mesh exposed by the second pass, insert a pry bar under the stucco, and pry up to detach the stucco from the sheathing. Because the first pass of the chipping hammer separates damaged stucco from intact stucco, prying up this 6-in. corridor of stucco will not disturb the solid areas above it.
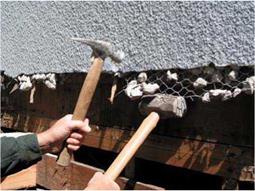
Now the strenuous work begins. Using a mason’s hammer or a beat-up framing hammer, carefully pulverize the corridor of pried-up stucco.
Stucco is hard stuff, so whacking it in place with a hammer is more likely to drive it into the wood sheathing than to pulverize it. However, if you pry up the stucco slightly, you can slide a hand sledge under it to serve as an anvil. Then, between a hammer and a hard place, the stucco will shatter nicely. After you’ve removed all old chunks of stucco, you’ll have a 6-in.-wide section of unencumbered wire mesh and, ideally, a layer of largely intact building paper under that. Once you’ve replaced the rotted framing (and sheathing), insert new paper, tie new mesh to the old—just twist the wire ends together—and nail both to the sheathing. Now you’re ready to apply the new scratch coat.
If only the finish coat is cracked, wire brush and wet the brown coat, apply fresh bonding liquid, and trowel in a new finish coat. But if the cracks are deeper, the techniques for repair are much the same as those for patches, except that you need to undercut the cracks. That is, use a cold chisel to widen the bottom of each crack. This helps key in (hold) the new stucco. Chip away no more than you must for a good mechanical attachment. Then brush the prepared crack well with bonding liquid.
Texturing and finishing. To disguise new stucco patches, it’s often necessary to match the texture of the surrounding wall. Before texturing the finish coat, steel-trowel it smooth and let it set about a half hour—although the waiting time depends on temperature and humidity. Cooler and more humid conditions delay drying. Stucco allowed to cure slowly is far stronger than fast – cured stucco. So, after applying the finish coat, use a hose set on a fine spray to keep the stucco
|
To remove stubborn chunks of old stucco from the wire mesh, pry up the mesh enough to slide the head of a hand sledge underneath so it can serve as an anvil. Hammered stucco will then pulverize. Wear eye protection and a paper respirator mask. |
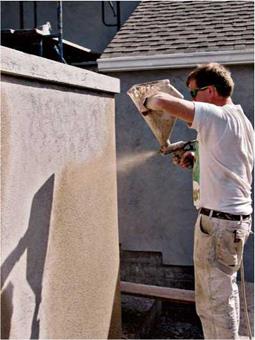
damp for 3 days. Here are descriptions of the three common textures:
► Stippled. For this effect you’ll need rubber gloves, an open-cell sponge float like those used to spread grout in tiling, a 5-gal. bucket, and lots of clean water.
After dampening the sponge float, press it into the partially set finish coat and quickly lift the float straight back from the wall. As you lift the float, it will lift a bit of the stucco material and so create a stippled texture looking somewhere between pebbly and pointy. Repeat this process over the entire surface of the patch, feathering it onto surrounding (old) areas as well, to blend the patch in.
Rinse the float often. Otherwise, its cells will pack with stucco, and the float won’t raise the desired little points when you lift it. Equally important, the sponge should be damp and not wet. If you want a grosser texture than the float provides, use a large open-cell natural sponge. If you notice that the new finish is more pointy than the old surrounding stucco, that’s probably because the old finish has been softened by many layers of paint. To improve the match, knock the new texture down a little by lightly skimming it with a steel trowel.
► Swirled. Screed (level) the patch’s finish coat to the surrounding areas, and feather it in. After you’ve made the patch fairly flat, comb it gently with a wet, stiff-bristled brush. For best results, use a light touch and rinse often; otherwise you’ll drag globs of stucco out of the hole. By varying the pressure on the brush, you can change the texture.
► Spanish stucco or skip troweled. Visually, this texture looks rather like flocks of amoebas or clouds. To achieve this look, screed off the patch so it’s just Иб in. below the level of surrounding areas. Then, using a steel trowel, scoop small amounts of stucco off a mortarboard and, with a flick of the wrist, throw flecks at the wall. Skim the flecks with a swimming pool trowel because its rounded edges are less likely to gouge the stucco as you flatten the flecks slightly.
Ideally, this will give you an irregular pattern of miniature mesas, matching that of the original surface. Another approach is to use a
wet, sandy mix and load it onto your steel trowel unevenly. (Beforehand, coat the hole well with bonder so the new material adheres well.) Again, using a swimming pool towel, you’ll see the material "skipping" over the sand particles, leaving flattened patches of texture and gaps. To get the right texture, you’ll need to experiment with trowel pressure, mix stiffness, and wrist movement.


Leave a reply