TAPING AND FINISHING
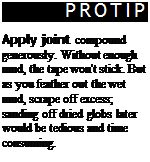
To finish drywall, seal the panel joints with tape or cornerbead, then cover them with joint compound. Typically, three coats of compound are applied in successively wider coats and sanded after each application. The first coat, usually a high-strength taping compound, embeds the tape. The second coat should be a thin layer of topping compound or all-purpose compound that you feather out to hide the joints. With the third coat, you feather out the compound farther, creating a smooth, finished surface. (See "Joint Compounds,” on p. 358, for more about these materials.)
First coat. Fill nail holes or screw dimples in an X pattern: One diagonal knife stroke applies the compound, and the other stroke removes the excess.
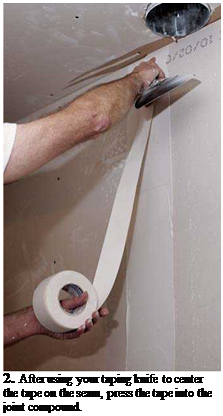
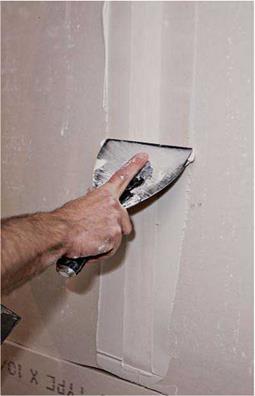
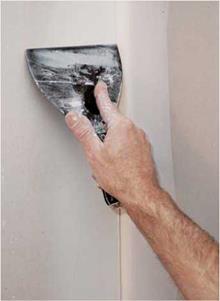
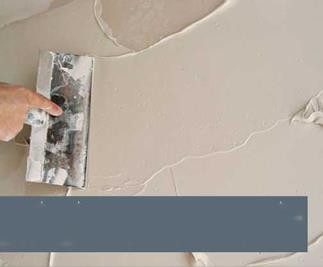
If you use paper tape on the joints, apply a swath of taping compound about 4 in. wide down the center of the joint. Press the tape into the 1. Before applying paper tape, cover the seam
center of the joint with a 6-in. taping knife. Then with an generous bed of joint compound apply compound over the tape, bearing down so you remove the excess.
If you use self-sticking mesh tape, stick it directly over the joint and apply the bedding compound over it. In other words, don’t apply a bed of compound first. Mesh tape must be bedded in setting-type compound, as explained earlier in this chapter.
All that raw drywall can seem a bit overwhelming, so here’s a taping and mudding sequence that starts easy, so you can become comfortable with the tools and materials:
► Screw and nail holes
► Bevel-edge joints (the long edges of panels)
► Butt-edge joints
► Outside corners
► Inside corners.
![]()

 Have a pail of clean water and a sponge handy so you can rinse your taping knives periodically. They glide better if they’re clean. Keep the job site clean, too: If you drop a glob of compound on the floor, scrape it up and discard it so you don’t track it around the house.
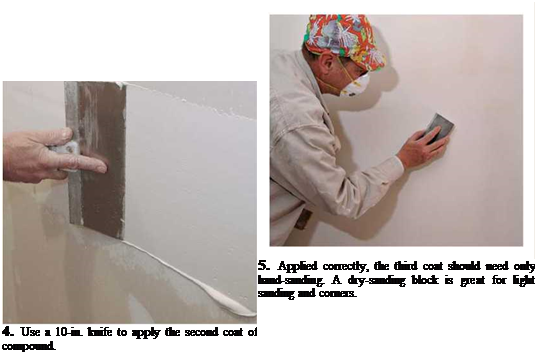 |

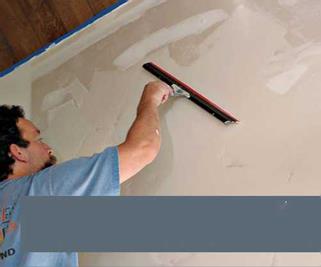
 a 10-in.-wide taping joint knife and feather out the seams roughly 8 in. to 10 in. wide. After applying the compound, smooth it out with an even wider blade—say, a 14-in. trowel.
As you’ll learn when working with joint compound, the lower the angle of the blade and the less pressure, the easier it is to smooth and feather (spread out) the mud. The greater the angle and pressure, the more compound you’ll remove.
This is easier to do than explain. Because butt – end joints are not beveled, they’ll mound slightly at the center of the seam. That’s okay. Use a 10-in. taping knife to build up the compound on both sides of the joint, feather out the edges, and then smooth the center. Consequently, butt-end joints may need to be wider than bevel-edge joints.
You may often need to feather butt-end joints 16 in. to 20 in. wide.
When this second coat is dry, sand with 150-grit to 220-grit paper. A pole sander will extend your reach and enable you to sand longer without tiring, but don’t sand too aggressively or you’ll abrade the paper face or expose the tape. Easy does it.
Third coat. The third coat is the last chance to feather out the edges, so use a premixed, allpurpose, drying-type compound, which is easy to thin out and sand because it has a fine consistency and dries quickly. Although premixed compound will be the right consistency, it’s okay to add a little water to thin it even more.
Because the third coat is only slightly wider (2 in.) than the second coat, you’ll be applying a relatively small amount of compound. Use a 12-in. trowel, with a light touch. Some pros thin this coat enough to apply it with a roller, and then smooth it with a trowel, so there are no trowel marks when they’re done.

![]()


Hand-sand the final coat, using fine, 220-grit sandpaper or a very fine sanding block. Shining a strong light on surfaces will highlight the imperfections you need to sand.
Wrap up. If you intend to texture the surfaces, the third coat doesn’t need to be mirror smooth. Even so, don’t scrimp on the second coat, or else the joints may be visible through the texture
To give yourself the greatest number of decorating options in the future, paint the finished drywall surface with a coat of flat, oil-based primer. It will seal the paper face of the drywall and provide an excellent base for any kind of paint or wall covering.
To keep solutions concise, let’s divide drywall repairs into four groups: nail pops and surface blemishes; fist-size holes through the drywall; larger holes; and discolored, crumbling, or moldy drywall. Any repair patches should be the same thickness as the damaged drywall.
Popped nails and screws are generally a quick fix: Drive another nail or screw 1 h in. away from the popped one to secure the drywall. If it’s a popped screw, remove it and fill the hole. Cover both the old hole and the new screw with at least two coats of joint compound. If it’s a popped nail, don’t try to remove it; drive it slightly deeper to dimple the drywall.
When a piece of drywall tape lifts, pull gently until you reach a section that’s still well stuck. Use a utility knife to cut free the loose tape, cover the exposed seams with self-sticking mesh tape, and apply two or three coats of compound—sanding lightly after each. Drywall repair kits with precut patches are available at most home centers.
To repair drywall cracks, cut back the edges of the crack slightly to remove crumbly gypsum and provide a good depression for a new filling of joint compound. Any time the paper face of dry – wall is damaged, cover the damaged area with self-adhering fiberglass mesh tape. Then apply three coats of joint compound. Because the repair area is small, it doesn’t matter what type of compound you use, though setting-type compounds are preferred.
Small holes in drywall are often caused by doorknobs, furniture, or removed electrical outlet boxes. Clean up the edge of the hole so the surface is flat. Then cover the hole with selfadhering fiberglass mesh tape. (Better drywall repair kits have metal-and-fiberglass mesh tape.) Use a light touch when applying the first coat of joint compound, pushing the mud through the tape, but don’t press so hard that you dislodge the mesh.
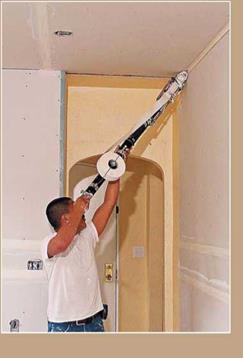
Mechanical drywall taping tools are commonly referred to as Bazooka® tools, after a popular brand, and they can be rented, usually for 2 weeks at a stretch. The suite of tools includes a taper that applies tape and compound simultaneously, as well as finishing tools, various head attachments, and flat boxes for taping seams.
These tools are great for larger jobs, creating uniform, flat surfaces that need little sanding. "You can put tape and mud up almost as fast as you can run," notes one pro. Most rental companies supply a video on how to use these tools, but taking a class in addition isn’t a bad idea.
Give the repair three coats of compound, feathering out the edges as you go. Take it easy when sanding. Especially after the first coat, the tape frays easily. By the way, there are precut drywall patches for electrical outlet boxes, which save time.
Large holes should be cut back till you reach solid drywall. Because mesh tape and compound will probably sag if the hole is much wider than 4 in., holes larger than that should be filled with a patch of drywall roughly the size of the damaged area. These patches need to be backed with something solid, so they’ll stay put.
The easiest backing is a couple of furring strips cut about 8 in. longer than the width of the hole and placed on both sides of the hole. To install each furring strip, slide it into the hole and, while holding it in place with one hand, screw through the drywall into the wood. Screws will pull the furring strips tight to the back of the drywall. Then cut the drywall patch, place it in the cutout area, and screw it to the strapping.
Cover the edges of the drywall patch with selfadhering mesh tape, fill the screw holes, and apply joint compound—three coats in all. Here, a setting-type compound, such as Durabond® 90, is a good bet because it dries quickly and is unlikely to sag. The more skillfully you feather the compound, the less visible the patch will be.
For holes larger than 8 in., cut back to the centers of the nearest studs. Although you should
have no problem screwing a replacement piece to the studs, be sure to back the top and the bottom of the new piece. The best way to install backing is to screw drywall gussets (supports) to the back of the existing drywall. Then position the replacement piece in the hole and screw it to the gussets, using drywall screws, of course.
Discolored, crumbling, or moldy drywall is
caused by exterior leaks or excessive interior moisture. Be sure to attend to those causes before repairing the drywall. Excessive moisture is often due to inadequate ventilation, which is especially common in kitchens and baths. Leaks around windows and doors are often caused by inadequate flashing over openings.
If the drywall is discolored but solid, and if you’ve remedied the moisture source, wash the area with soap and water, allow it to dry thoroughly, and prime it with white pigmented shellac or some other stain-resistant primer. The same solution works for minor mold on sound drywall.
However, if there’s widespread mold and the drywall’s crumbling, there’s probably extensive mold growing inside the walls. You’ll need to rip
out the drywall and correct the moisture problems before replacing finish surfaces. In extreme cases, you’ll need to replace the framing. Chapter 14 covers mold abatement at greater length.
This section is limited to plaster repairs because applying plaster takes years to master. The tools needed for plaster repair are much the same as those needed for drywall repair: a screw gun or cordless drill; 6-in. and 12-in. taping knives; a mason’s hawk; and a respirator mask, if you’ll be removing or cutting into plaster. There’s a lot of grit, so wear goggles, too. The tools and techniques for plaster are similar those needed for stucco, discussed in Chapter 7.
Traditional plastering has several steps:
1. Nail the lath to the framing.
2. Trowel a scratch coat of plaster onto the lath. The wet plaster of this coat oozes through


Leave a reply