Space-Saving Walls
To conserve space, builders often attach 1×3 furring strips to basement walls. These strips help secure insulation and provide a base for attaching drywall. But furring strips are viable only if the foundation walls are dry and relatively plumb and flat. If foundation walls are lumpy and off-plumb, a stud wall erected inside the foundation is the only way to create a flat plane for finish materials.
 Fortunately, not all stud walls guzzle space. Lightweight steel studs are only 15/ in. deep; but, as noted in Chapter 4, they can be quirky to work with. The third option, flat-framing, is a winner: Rotate 2×4 studs 90° so that their broad side faces the foundation wall and use 2×2 plates at top and bottom. Because modern 2x4s are actually 1V2 in. by 31/ in., a flat-framed wall is only 11/ in. deep, and the 3V2-in. faces give you plenty of surface for screwing on drywall. Besides, unlike skimpy furring strips, 2x4s won’t split.
 |
Where winters are less severe, it’s
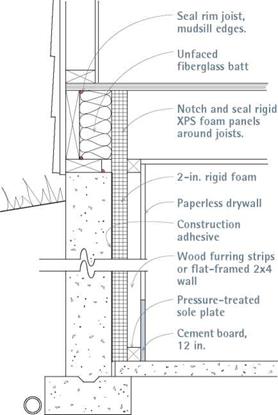
In cold climates, avoid thermal breaks by butting rigid-insulation panels together and sealing seams with builder’s tape.
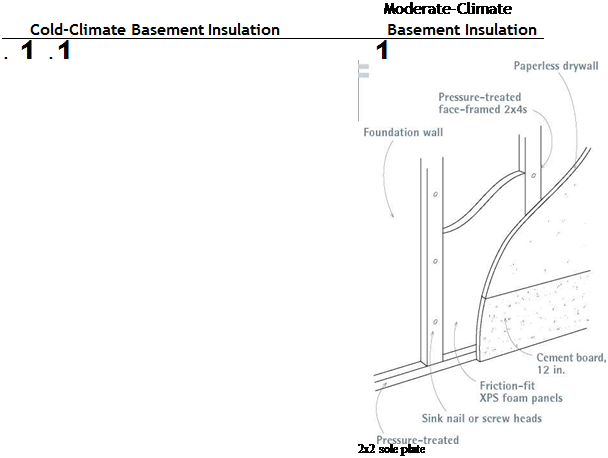
acceptable to have thermal breaks between insulation panels. Use power – actuated nails or concrete screws to attach furring strips directly to masonry walls. See the wall-top details shown in the drawing at left.
BEFORE AND AFTER: THE FURNACE
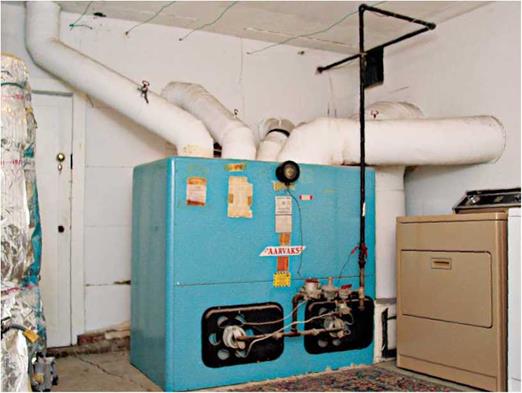
This old 1930-era forced-hot-air system has asbestos-insulated ducts and a gas burner that guzzled fuel in the dead of winter.
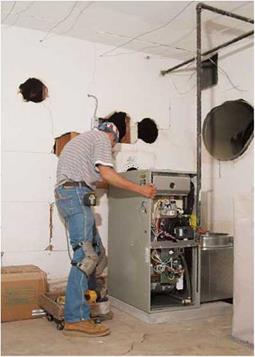
The induced-draft, condensing gas furnace that replaced the old one (above) is much smaller (note the duct holes of the old furnace) and achieved 95 percent fuel efficiency.
also acceptable in sub floor areas but, as noted earlier, open-cell foams are more permeable and will allow moisture to migrate.
Mold grows on paper-faced drywall, so don’t use it in basements. Instead, use paperless drywall such as Fiberock®, Humitek™, and DensArmor™. Cement board, such as WonderBoard® and HardiBacker®, is completely impervious to water, but it is expensive and requires more work to install. Consider running a 12-in. band of cement board along the bottom of the walls to prevent moisture absorption through the basement floors, and then use something less expensive above it, as shown in the drawings on the facing page.
Cold climates. In cold climates, basement wall insulation should be continuous; in other words, there should be no thermal breaks. To achieve this continuity, use construction adhesive to adhere XPS panels directly to the foundation or to a vapor barrier adhered to the walls, if required by code. To find an adhesive that’s chemically compatible with rigid-foam panels, read the product literature for both materials. As you install the panels, butt their edges tightly together and cover the joints with builder’s tape.
If space is tight in the basement, flat-frame a 2×4 wall 16-in. on center, with 2×2 top and bottom plates. Use a powder-actuated nailer or concrete screws to secure the bottom plate to a concrete floor. (Wear ear and eye protection.) Use wood screws to attach the top plate to the first-floor joists or, where joists run parallel, to 2×4 nailers inserted between the floor joists and rim joists. (Predrill holes for the concrete screws.)
Installing 2-in. panels of XPS will yield an R-10 rating. In very cold climates, you might want add 1 f2-in. panels between the studs of the new 2×4 wall as well, creating a composite rating of R-17.5 for the two layers.
Moderate climates. In moderate climates, thermal breaks in the basement walls are acceptable. So you can attach vertical furring strips directly to the masonry walls, using powder-actuated nails or concrete screws, and then place foam panels between the strips. Use pressure-treated wood. Because conventional 1×3 furring strips are only 14 in. thick, use 2x2s or 2x4s on-face instead, spacing them 16 in. on center. If there’s a possibility that they could wick moisture from the basement floor, keep the furring strips 1 h in. above floors.


Leave a reply