LAYING OUT WOOD SHINGLES AND CLAPBOARDS
For clapboards and shingles, the two most important parts of the layout are establishing level for the bottom course and varying the exposure of subsequent courses so that they align with door or window trim, if possible. If a leveled water table has already been installed, skip the next section.
Establishing level. If there’s no water table on the house (see p. 132), the bottom of the first course of siding typically overhangs the sheathing by % in. to 1 in. Because the bottom edge of sheathing is seldom level, use a laser level or a water level to establish a level base line. Simple tripod-mounted laser levels are relatively inexpensive and offer quick layout over long distances without needing a helper. When set up correctly, they’re also quite accurate, usually within Уз in. in 100 ft.
Lay out the front of the building first. Pencil in an appropriate siding overhang on one corner board. Then, using the level, transfer that mark to all the other corner boards. When you’re done, use a combination square to draw light lines through your pencil marks, across the faces of the corner boards. These lines indicate cut-off lines for the corner boards and the bottom of the first course of siding. To align that first course of siding, stretch a chalkline through the marks and snap it onto the building paper. Or, if you’ve used housewrap, which won’t chalk well, drive a nail into a pencil line at each corner and stretch a taut line between them. Place clapboards or shingle butts slightly above, but not touching, the line so it won’t be distorted.


 Varying subsequent courses. By aligning siding courses to window and door trim, you can minimize funky-looking notch cuts at door and window


corners. (But when installing wide-board siding, notch cuts are sometimes unavoidable.) Achieve these alignments by increasing or decreasing the exposure of individual courses. Of course, there are physical restrictions. For example, clapboards must overlap at least 1 in. But as long as exposure adjustments are no more than ‘/ in. between courses, they’ll look evenly spaced.
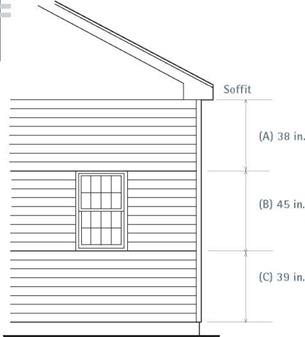
The following steps refer to the illustration above:
1. Measure the full height of the wall, from the cutoff at the base of a corner board to the underside of the soffit. Let’s say the height is 10 ft. 2 in. (for calculation purposes, 122 in.). Because shingle exposures are customarily 5 in., that wall will have roughly 24 courses.
2. The wall has three windows and a door. Fortunately, their head casings happen to align 84 in. above the base line. This creates three separate areas for which shingle exposures need to be adjusted, as shown in the drawing: (A) from the top of head casings to the soffit, 38 in.; (B) from the top of the window head casing to the bottom of sills, 45 in.; and (C) from the bottom of windowsills to the base line, 39 in. Total: 122 in.
3. Calculating exposure adjustments is easy. Round off each measurement to the nearest increment of 5 in. Then increase or decrease the shingle exposure accordingly. Thus area A yields a 4%-in. exposure (38^8 = 4%); area B is exactly 5 in. (45^9); and area C is roughly 418 in.
The easiest way to keep track of such measurements and adjustments is by penciling them onto a story pole, a long straight board (a 1×2 is fine) whose length equals the distance between the top of the water table (if any) to the underside of the soffit or frieze. First mark the tops and bottoms of window and door casings onto the story pole, then the adjusted course heights between.
As you work around the house, align the bottom of the story pole to each corner board and transfer marks from the pole to each board. If the house has windows set at varying heights, story – pole marks will better align with casing on some walls than on others; give precedence to the house’s most prominent facade. Where courses just won’t line up with casing joints, notch the siding around them.


Leave a reply