GENERAL CUTTING
Tight trim joints require accurate layouts, sharp saws, and consistent methods.
Recuts are a fact of life. If you’re filling and painting trim, slight gaps are acceptable. But if you’re using a clear finish, joints must be tight. Before you start cutting trim, always check the accuracy of power-saw miter-stop settings by cutting a few joints from scrap. Then cut stock a hair long so that you can recut joints till they’re right.
Cut lines consistently. It doesn’t matter whether your sawblade cuts through the middle of a cut line or just past it. What matters is that your method is consistent. For example, moving the width of a saw kerf to one side of the line or the
 other can make the difference between tight and open joints. Some pros prefer to just “kiss” the inside of the cut-line with the saw kerf so that the line stays on the board.
Keep tools sharp. This applies to saws, chisels, planes, and utility knifes. Whenever a blade becomes fouled with resin or glue, wipe it clean immediately with solvent. A sharp tool is easier to push and thus less likely to move the stock you’re cutting. Likewise, a clean power-saw blade is less likely to bind or scorch wood.
Handsaws usually cut on the push stroke.
Start handsaw cuts with gentle pull strokes, but once the kerf is established along the cut-line, emphasize push strokes. (Western saw teeth are set so that they cut more on the push stroke, whereas Japanese saws cut more on the pull stroke.) As you continue the cut, keep your elbow behind the saw, which will help you push the saw straight and follow the cut-line.

![]()

 |
 |
use an outfeed roller or a sawhorse to support the far end of long pieces so they don’t bow or flap as you try to cut them.
 cially if it’s 5 in. or 6 in. wide, faking a miter joint will look terrible. So if a frame is out of square, take the time to cut and recut joints as necessary so that they bisect the frame’s angle.
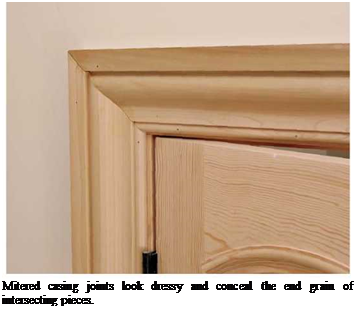
There are two good reasons to use miters. First, mitering aligns the profiles of moldings so that bead lines and other details join neatly along the joint and sweep uninterrupted around the corner. Second, although flat trim allows you to butt or miter joints at corners, with butt joints you would see the rough end grain of one of the adjoining boards. Even if you sand down the roughness, end grain soaks up extra paint or stain and so often looks noticeably different from adjacent surfaces.
|
|
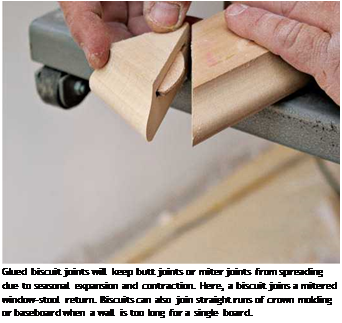
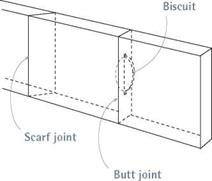
When a wall is too long for a single piece of trim, you can splice pieces by beveling their ends at a 60° angle and overlapping them (called a scarf joint), or by butt joining them and using a biscuit to hold the joint together. If boards shrink, gaps will be less noticeable in a scarf joint because you’ll see wood, rather than space, as the overlap separates. In general, scarf joints are better suited to flat stock, whereas shaped molding will display a shorter joint line if butted together.
(Viewed head-on, the joint is a thin, straight line.)
Position splices over stud centers so you can nail board ends securely to prevent cupping. Where that’s not possible, say, where a baseboard butts to door casing, nail the bottom of the baseboard to the wall sole plate, and angle-nail the top of the baseboard to the edge of the casing. Predrill the trim or snip the nail points to minimize splits.
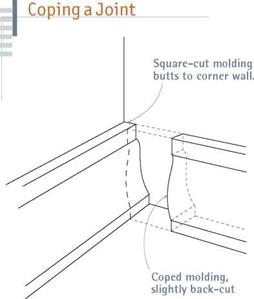
All wood trim shrinks somewhat. Where beveled boards overlap, gaps aren’t as noticeable, but shrinkage on some joints—mitered inside corners, in particular—are glaringly obvious because you can see right into the joint. For this reason, carpenters cope such joints so that their meshing profiles disguise shrinkage. Basically, a coped joint is a butt joint, with the end of one board
|
|
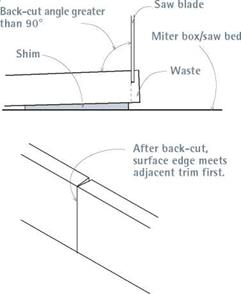
A coped joint is first mitered, then back-cut along the profile left by the miter so that the leading edge of the trim hits the adjacent trim first. That thinner, leading edge can be easily shaved to fit tightly.


Leave a reply