From Preliminary Designs to Working Drawings
 The easiest way to envision change is to draw it. For this, tape tracing paper over the floor plans you drew earlier and start rearranging rooms. Because you drew your floor plans to scale, your overlay drawings will likely be reasonably accurate. If you’re unsure about the dimensions of a room, a fixture, or a piece of furniture, measure again. Also measure the space you’ll need to open and pass through doors, pull chairs away from a
|
|
|
|
|
|
|
|
|
|
![]()


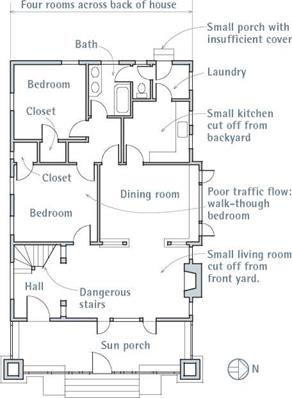
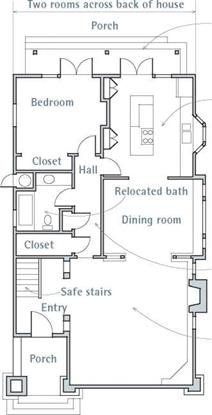
FLOOR PLAN: BEFORE FLOOR PLAN: AFTER
The original floor plan presented a pleasant face to the After weighing a number of floor plans, the architect
street, but the back of the house was a hodge-podge of settled on the design that solved the most problems.
doors, dead spaces, and tiny rooms.


table, or remove food from the oven. Have fun, but be realistic: Don’t try to fit too much into a small space.
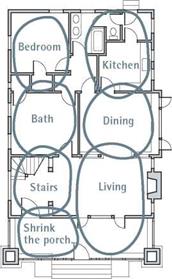
Whether you draw "bubble diagrams” to indicate room usage or arrows to show traffic flow between areas, create optional arrangements, including some you at first might not think you’ll like, for they might suggest possibilities you otherwise might not have considered. Think creatively, "outside the box,” as they say. On paper, it’s easy to move rooms to different locations. Analyze the trade-offs between one floor plan and another. In general, the more problems a design solves, the better. Feel free to borrow features from one plan and graft them onto another. Considering different designs also helps you decide your priorities.
Some layouts will dictate themselves—such as dining rooms next to kitchens with lavatory nearby—but most are fluid and all should be based on common sense. Put bedrooms away from noisy rooms and busy streets, if possible.
When visiting the bathroom in the middle of the night, you shouldn’t need to pass through another bedroom or a public room. Don’t forget to include closets in or near each bedroom, and a closet by the front door.
Design with nature. If your kitchen faces east, you can enjoy morning sun with breakfast. A living room on a westerly wall gives a view of the sunset. North-facing bedrooms will be cooler at night.
Glazing along a south wall can provide a substantial amount of free solar heat in colder months but may require awnings or heat-reducing window films in warmer months. If you live in the Sun Belt, where heat gain is less desirable, try to exploit prevailing breezes and to provide sufficient overhangs along south-facing walls.
In this regard, many states regulate the energy budget for houses and additions by controlling the amount and type of glazing allowed and by requiring energy-performance standards for other building components.
 Other ways to look at things. In order to see how your floor plan will translate into a threedimensional structure, either draw elevations or build a model of the existing house with the proposed changes. Until you have drawn elevations or built a model, you can’t be sure your design will work, especially if you are expanding the envelope of the house.
If you’re dexterous, make a model of cardboard; most art-supply stores stock the necessary materials. Using a scale of ’/2 in. = 1 ft., draw floor plans and an elevation for each face onto the cardboard, cut them out with a utility knife, tape them together, and install a roof.


Leave a reply