FIXTURES, AND SWITCHES
Although all UL-rated fixtures, switches, and receptacles will satisfy electrical codes, better – quality devices will last longer. Heavy-duty receptacles, for example, have nylon faces rather than plastic and metal support yokes that reinforce the back of the receptacle.
Receptacles. Most household receptacles are rated for 15-amp circuits and wired with 14AWG or 12AWG wire. The NEC specifies 20-amp protection for kitchen appliance, garage, and workshop circuits.
|
The NEC specifies GFCI protection for many locations, including bathroom, outdoor, and kitchen counter receptacles, so there are also 15-amp and 20-amp GFCI receptacles. In addition, you can obtain various kinds of specialty 15-amp receptacles, including childproof models that require an adult’s grip to uncover them, weatherproof receptacles that combine cover and receptacle in an integral unit, recessed receptacles in which clock wires can be hidden, covered floor receptacles, and many more. In addition, there are receptacles specifically matched to the plugs of 30-, 40-, or 50-amp appliances. Your electrical supplier can tell you what’s available. |
|
PROTIP When cleaning touch-pad dimmers, wipe with only a clean soft rag, a damp sponge, or a cleaner recommended by the manufacturer. Touch pads are so sensitive that the wrong spray – on cleaner can make them go haywire, causing lights to cycle wildly up and down! 1111 |
|
Fixtures. Lighting fixtures vary greatly, from elaborate multibulb configurations to simple pull-chain porcelain fixtures. Most attach to a ceiling outlet box with two machine screws. Branch-circuit wires attach directly to two screws on the fixture (white wire to silver screw, black to gold screw) or, more commonly, to two color – coded lead wires from the fixture. Metal fixture boxes must be grounded. Switches. Switches come in a variety of configurations. They include single pole, which control lights from a single location; three-way, which control lights from two locations; four-way, which control lights from three locations; rheostats (dimmer switches), which dim and brighten lights gradually; touch-pad dimmers, which respond to finger pressure rather than a mechanical switch; pilot-light combos, whose small bulbs shine when an attic or basement light is still on; switch-receptacle combos; programmable switches; and space-saver switches. Before installing any of the more exotic switches, make sure switch amperage matches that of the load (electrical demand of an appliance or piece of equipment) you’re feeding. And never run appliances or tools on a rheostat- controlled outlet. Rheostats vary voltage, and without full voltage, appliance or tool motors can burn out. As noted earlier, electricians distinguish between new work and old work (remodel) jobs, regardless of the age of the building or the extent of the upgrade. New work means that framing is exposed, so you can attach boxes to studs or ceiling joists and easily drill holes for cable; whereas remodel wiring usually entails mounting cut-in boxes to finish surfaces and fishing cable through walls or floors to add outlets to existing circuits. Certainly, the two approaches have a lot in common. But to avoid repetition, the following |
|
ЙІ і |
|
LEVITON I |
|
21 |
|
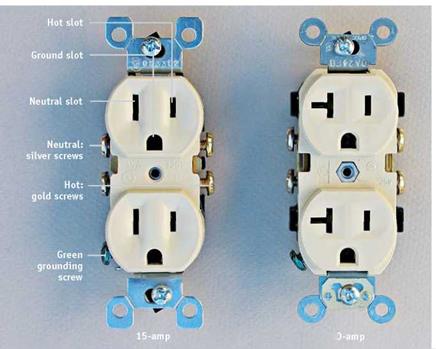
The 20-amp receptacle (at right) has a horizontal slot so it can receive a special 20-amp plug in addition to standard 15-amp plugs. Unlike 20-amp receptacles, 15-amp receptacles cannot receive 20-amp plugs. Thus 20-amp receptacles cannot be used on 15-amp circuits.
FIXTURES AND RECEPTACLES |
|
Fixtures and receptacles are polarized, so they fit together only one way. On a correctly wired light fixture, the neutral wire of the lamp cord connects to the silver screw shell (where the bulb screws in); whereas the hot wire connects to a brass tab inside the bottom of the screw shell. Should you inadvertently touch the side of the screw shell, there’s no harm done. Whereas, if you reverse the order in which wires are attached-known as reversing the polarity—the outside of the screw shell becomes hot (energized) and could shock someone changing a bulb. Receptacles and plugs are also polarized. A receptacle’s gold screw terminal connects to hot wires and, internally, to the hot (narrow) prong of a polarized plug. The receptacle’s silver screw terminal connects to neutral wires and, internally, to the neutral (wide) prong of a polarized plug. Finally, the green ground screw connects to the ground wire and the U-shaped grounding prong of the plug. |


sections discuss their common elements in the context of new work and then examine the specifics of remodel wiring. Assume that nonmetallic cable (Romex) is being installed. Brief sections on installing MC cable and conduit will follow.
Electricians further divide installations into rough-in and finish phases. After the rough-in, there’s always an inspection by an authority having jurisdiction (AHJ). The following sequences are greatly oversimplified.
Rough-in phase.
1. Locate and mount boxes.
2 Drill holes, and run cable.
3. Feed cables into boxes, staple cables to studs, and clamp cables to boxes.
4. Remove the sheathing of cables inside boxes, group like wires and cut them to equal length, join ground wires, and fold all wires into the boxes.
Finish phase. The finish, or trim, phase takes place after a rough inspection has been signed off by the AHJ and the finish surfaces have been installed and painted.
1. Strip insulated wire ends, and then splice them together—black to black, white to white. Leave switch hot wires unspliced.
2. Attach wires to receptacles, fixtures, and switches.
3. Push wired devices into the boxes, and screw the devices to the boxes.
4. Screw on the cover plates.


Leave a reply