Finish Carpentry
After framing and
wires, insulating, and hanging drywall, it’s time to install interior trim. Somewhat like a picture frame, trim is decorative. But it’s also functional, concealing gaps and rough edges where walls meet floors, ceilings, doors, and windows. Although finish carpentry is not as fundamental as structural framing or foundation work, it completes the picture, and often makes or breaks a renovation project.
Interior trim is often called casing, or molding if its face is shaped. Trim helps establish the character of a room, so it’s wise to respect existing trim when replacing or supplementing it. Carefully remove and save existing molding if it’s in decent condition. If that type is no longer available, try to locate new molding with a similar feeling. Or you might be able to combine and overlap stock moldings to create a more complex and interesting look. Another choice is using pre
fab, high-relief synthetics that duplicate large – scale moldings not available in wood today.
Many woodworkers and carpenters can re-create old trims. A homeowner who’s good with a router and can find the right bits may be able to do the same.
Finally, see Chapter 13, for concise advice on choosing and installing counters, cabinets, and fixtures appropriate to those rooms. For guidance on installing door and window hardware, read Chapter 6.
Most of the tools for finish carpentry are presented in the basic collection discussed in Chapter 3, though upcoming sections address a few specialty tools. Still, by and large, successful trimwork depends more on the hands behind the tools than on the tools themselves. Also, when working with power tools and striking tools, safety glasses are
|

 STANtXV
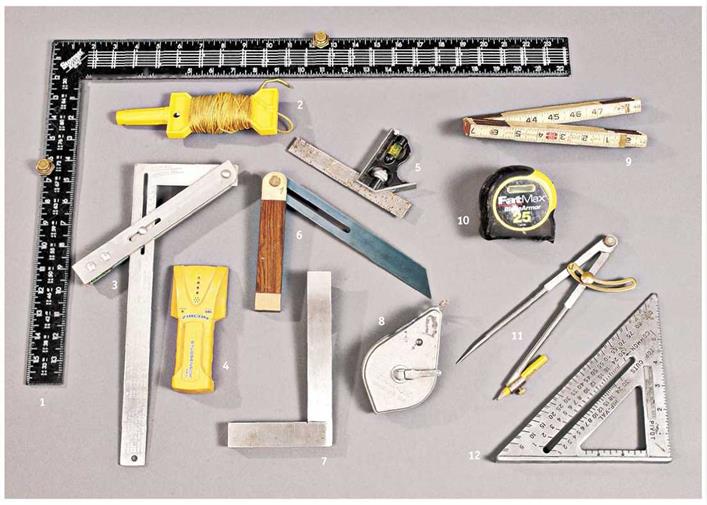
Measuring and layout tools. 1, Framing square; 2, string; 3, adjustable square; 4, stud-finder; 5, combination square; 6, adjustable bevel; 7, steel try square; 8, chalkline; 9, folding rule with sliding extension; 10, tape measure;
11, compass; 12, Swanson Speed Square.

a must, especially when joinery requires close work at eye level.


Leave a reply