Energy Conservation and Air Quality
Controlling the
ture, and heat determines how comfortable, affordable, and durable a house will be. In the old days, houses were often drafty and cold, but because energy was cheap homeowners could compensate by throwing another log into the woodstove or by cranking up the thermostat. All that changed in the 1970s, when energy costs went through the roof. . . literally, in houses with uninsulated attics. In response, builders yanked fuel-guzzling furnaces and replaced leaky doors and windows with tight, factory-built ones. They also caulked gaps; installed weatherstripping; and insulated walls, floors, and ceilings to block drafts (infiltration) and slow the escape of conditioned air (exfiltration). This insulated layer between inside and outside air is called the thermal envelope.
Although tightening the thermal envelope saved energy, it spawned a whole new set of problems, including excessive interior moisture, peeling paint, moldy walls, rotted studs, and a buildup of pollutants that were never a problem when windows rattled and the wind blew free. In many houses, furnaces no longer had enough incoming air to burn fuel or vent exhausts effi ciently. In some super-tight houses today, turning on a bathroom fan or a range hood can even create enough negative pressure to pull exhaust gases back down the chimney (back-drafting) and suck mold spores up from dank crawl spaces.
Fortunately, this chapter can help you control the flow of air, moisture, and heat while balancing comfort, costs, and health concerns. Because HVAC (heating, ventilation and air conditioning) systems have become incredibility sensitive and complex, installing and adjusting them is best left to HVAC specialists. If you want information on designing and constructing energy-efficient houses, consult Joe Lstiburek’s Builder’s Guide to Mixed Climates or Builder’s Guide to Cold Climates (both The Taunton Press).
Retaining conditioned air is tricky, even in well – insulated houses. As air is heated, it rises and expands, pushing against the inside of the thermal envelope. If it finds holes or gaps in the envelope, it escapes. Likewise, winter winds can drive cold air into a building. In new construction, airflow retarders such as housewrap are installed in large sheets on exterior walls before the siding is put on. Or inside walls are insulated and covered with polyethylene vapor barriers before the dry-
wall goes up. However, where siding and drywall are already in place, sealing air leaks is largely a piecemeal affair of locating and caulking leaks, one gap or hole at a time.
Professionals use powerful blower-doors to depressurize interiors and thereby draw-in huge volumes of air to help locate leaks. But during the heating season, you can find most leaks yourself with a wetted finger, a smoking incense stick, and common sense. Begin by running your hand around window and door frames and along room
corners. If your house has leaks, you’ll feel drafts, especially if it’s cold and windy outside. The incense smoke will also show where warm air is leaving the building. But common sense is the best detector.
![]()

 |
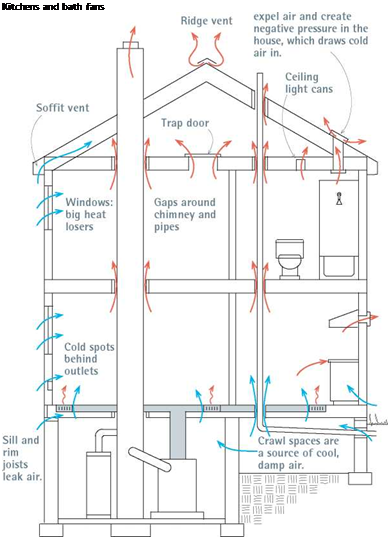
Heated air rises, so start your detective work in the attic. If it’s uninsulated, you’ll see plumbing ducts, electrical cables, recessed lighting cans, heating and fan ducts, chimneys, and a host of other penetrations in the attic floor through which heated air is escaping. If there’s an old
plaster ceiling below, there may also be a lot of heat loss through cracks. Especially note bath – or kitchen-fan vents that terminate in the attic. They should be vented outside, rather than into the attic, because the moist air they pump into an attic can condense there, soaking insulation, framing, and drywall—creating a paradise for mold and rot (see the photo on p. 12).
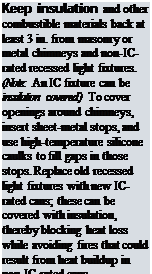
After investigating the attic, go downstairs and examine ceilings for cracks, cold spots, and mold. Frequently, corners on exterior walls will be cold because insulation stops short of framing. Or insulation may have slumped at the tops of walls. Continue down the walls, noting drafts or gaps around windows and doors—especially under doors—and cold spots around electrical receptacles and switches on exterior walls. Common walls between houses and attached garages are frequently underinsulated, and openings there can allow car exhaust and volatile fumes to infiltrate living spaces. Check local building codes: Most require fire-resistant drywall and firestopping caulks on common walls with garages.
Finally, inspect basements and crawl spaces. Caulk gaps between framing and foundations, and use rigid-foam panels to insulate basement walls. Conventional wisdom long held that outside air should circulate freely through dirt – floored crawl spaces. But as house envelopes grew tighter, scientists determined that the normal pressurization of heated air and negative
pressures from exhaust fans routinely pull moist, often mold-laden crawl space air up into living areas. Consequently, engineers now recommend sealing, insulating, and conditioning crawl spaces, especially in hot, humid regions, as explained later in this chapter.
![]()

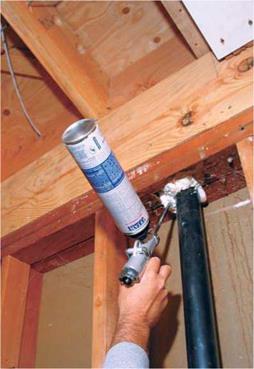
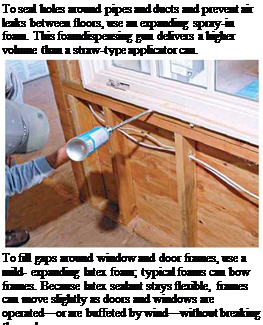
 Polyurethane sealants are the best bet for filling gaps around door and window frames, electrical cable, water pipes, and plumbing vents. These sealants are typically expanding spray-in foams,

DIFFERENT JOBS, DIFFERENT FOAMS
 PRO"ГIP
If the attic is insulated, you’ll need to put on gloves and a face mask and move that insulation before you can seal openings in the attic floor. But don’t merely cuss those batts; examine them. Fiberglass batting actually filters dirty air, so look for blackened areas on the undersides of batts, where heated air has blown through ceiling cracks into the attic.
1111

![]()

available in 12-oz. to 33-oz. aerosol cans with straw-type applicators for incidental home use. Contractors often use screw-on cans designed for dispenser guns. High-volume pros attach 10-lb. to 16-lb. disposable cylinders to pneumatic dispensers.
Foams vary in many ways, including durability, temperature ranges, curing times, fire resistance and—most notably—expandability. Read the product literature carefully. As handy as foams with 700 percent expansion would be to fill large gaps, they could buckle door frames badly. To seal gaps around doors and windows, instead select a low-pressure or mild-expanding foam sealant. Expandable latex polymer foams are gaining popularity because, like latex caulk, they clean up with soap and water before they’ve cured.
Because gaps between foundations and framing can involve high humidity, great temperature shifts, and dissimilar materials, acrylic latex or silicone caulks may be more appropriate to seal air leaks in basements and crawl spaces. If gaps are wider than й in., stuff foam backer rod into the gaps before caulking. Important: If the house has mouse or rat problems, stuff larger holes or cracks with й-in. galvanized mesh before spraying foam into gaps. Rodents will chew through foam, so place the mesh toward the house exterior.
If you find holes too big for expandable foams, stuff plastic garbage bags full of insulation and jam the bags into the openings. Or cover the opening with a sheet of rigid-foam insulation or a piece of plywood, and seal the edges with spray-on foam. Don’t forget uninsulated attic hatch covers: Use construction adhesive to glue a 3-in.-thick piece of Styrofoam®
(or two 2-in.-thick panels) to the upper face of the hatch.


Leave a reply