Construction

T

his book has been enriched immeasurably by the contributions of professional architects, contractors, and engineers throughout the country. The first edition was reviewed in its entirety by the following architects and builders: Edward Allen, South Natick, MA; Judith Capen, Washington, DC; Steve Kearns, Ketchum, ID; Scott McBride, Sperryville, VA; Jud Peake, Oakland,

CA; Dan Rockhill, LeCompton, KS; Joel Schwartz, Princeton, NJ; Stephen Suddarth, Miami Beach,

FL; Blaine Young, Santa Fe, NM.

In addition, portions of the second edition were reviewed by: Edward Allen, South Natick, MA; John Carmody, Minneapolis, MN; Walter Grondzik, Talla­hassee, FL; Christine Theodoropolous, Eugene, OR.

This third edition was reviewed in part by the following: Edward Allen, FAIA, South Natick, MA; Chris Anderson, Contractor, Eugene, OR; Chris Brandt, P. E., Weyerhauser/iLevel; Donald Corner, Professor, University of Oregon; Tom McClain,

P. E., Simpson Strong-Tie; James McDonald, Contractor, Eugene, OR; Hal Pfeifer, P. E., Eugene, OR; Joe Johnson, Architect, Portland, OR.

The participation of all these reviewers has made the book significantly more comprehensive and the process of writing it more enjoyable.

It has been almost 20 years since the first edition was originally conceived. My gratitude to those who helped to formulate and develop that first effort persists because the importance of their contribution has only increased with the passing of time:

Paul Bertorelli, for helping to define the scope of the book and the method of producing it; Joanne Bouknight, for patient and skillful editing with just the right touch of humor; David Edrington, my architectural partner, for his patience and understanding; Dee Etwiler, my wife, for her research assistance, her loving support, and her patience; Lloyd Kahn, for inspiration and support for this project long before it was realized; Chuck Miller, for listening to my ideas and suggesting the project to the publishers in the first place; Don Peting, for valuable assistance in articulating my thoughts about structural relationships in early chapters; Scott Wolf, for insightful assistance with the format and for putting as much energy into rendering the original drawings as humanly possible.

And for the second edition, I remain grateful to: Steve Culpepper, for his unwavering belief in the importance of the Graphic Guide series and his deft facilitation of the second edition; Jennifer Renjilian Morris, my editor, for gracious management and astute tuning of the writing; David McClean, my assistant, for helpful suggestions about and multiple drafts of most of the new drawings; Anthony Baron, for skillful rendering of the new drawings in the style of the originals.

The production of this third edition has benefited greatly from the existence of the first two editions as well as from the digital revolution. Whereas for previous editions I have thanked long lists of people who contributed in numerous invaluable ways, this time around the work that did not fall to me directly was very graciously and efficiently managed at the publishers. For this I thank Peter Chapman, Senior Editor, and assistant editor, Courtney Jordan. Peter, of course, was also responsible for working with me to define the scope and focus of this edition, a task for which I am very grateful. Lastly, I need to thank my colleagues and especially my family for enduring unpredictable behavior and schedules on my part during the development of this volume.

FROM GERMANY TO…OR SMA ALL OVER THE WORLD

Until the beginning of the 1980s, SMA was essentially known only in Germany. Its application in other European countries was limited in scope. Scandinavian states where studded tires used were the quickest to adopt the SMA concept; for example, in Sweden a few sections of roads had been paved with SMA by 1974 European Asphalt Pavement Association (EAPA, 1998). In Poland, which at that time was behind the Iron Curtain, concepts in West German publications were officially dis­allowed. Despite that, the Polish road administration permitted the first road sec­tion of an SMA-like mixture to be placed within its borders in 1969 (Jablotiski, 2000). Very positive results of that trial made the Polish Central Authority of Public Roads inclined to draft a standard (ZN-71/MK-CZDP-3), which was put into prac­tice in 1971. After forschungsgesellschaft fur straPen-und verkehrswesen (Germany)
(FGSV) published the first German technical standard for SMA (ZTV bit-StB 84), the mix became more popular and several European countries started to test the SMA mix. Now, virtually all European countries use SMA or, like France, nation­ally standardized mixtures conceptually similar to SMA.

The significant growth of the SMA application started in the early 1990s outside of Europe. This growth was certainly boosted by its popularity in the United States, and research on developing an American method of designing an SMA mix com­menced (see Chapter 7). Popularization of SMA in North America led to the release of SMA guidelines in other countries such as Australia, New Zealand, and China. During the last 20 years, SMA has become a global mix, and thus it may be seen almost everywhere where mineral-asphalt layers are applied.

The Concept of Stone Matrix Asphalt

For more than two decades, stone matrix asphalt (SMA), called stone mastic asphalt in Europe, has been taking over the global asphalt paving market at a remarkably high speed. Its fast-growing popularity has been surprising to many people. Although asphalt concrete may have appeared to be the indisputable leading choice for an asphalt layer, increasing vehicle axle loads have forced the application of new and better solutions.

The SMA mix, or Splittmastixasphalt in German, has been known since the mid – 1960s. Dr. Zichner, a German engineer and manager of the Central Laboratory for Road Construction at the Strabag Bau AG, was its inventor. It was an attempt to solve the problem of the damage to wearing courses caused by studded tires. The trend in wearing course mixtures at that time in Germany was to use Gussasphalt (i. e., mastic asphalt) and an asphalt concrete with a low content of coarse aggregates. These types of surfaces were subject to fast wearing by vehicles equipped with stud­ded tires. Both components, the mastic and the fine aggregates, were too weak to provide the mixture with suitable durability. Due to the high cost of pavement reha­bilitation, strong demand for a new surface mix that could withstand studded tires was created. This was the impetus for Dr. Zichner’s work.

When we try to picture ourselves in Dr. Zichner’s situation, we would face—as he did—the task of designing an asphalt mixture that is resistant to wearing caused by studs and also is durable enough to have a long service life. He stated that coarse aggregate grains resistant to dynamic fragmentation, or crushing, were those that might guarantee the right wearing resistance. Thus they had to be the major com­ponents of prepared mixes to provide the needed wear resistance, whereas a high content of mastic and binder would produce a long service life. So the early idea for SMA consisted of creating a very strong aggregate skeleton of coarse aggregates and filling the spaces between them with mastic (i. e., a mix of binder, filler, and sand). That type of composition of an aggregate blend is typically called a gap-graded mineral mixture.

Initial trial attempts to construct the new mix consisted of spreading a hot mastic layer followed by spreading high-quality coarse aggregates over the mastic, then compacting the surface (with a road roller). The ratio of mastic to coarse aggregates
(by weight) was 30:70. The mastic was made up of 25% B80 or B65 binder,* 35% filler, and 40% crushed sand (RETTENMAIER, 2009a). Based on experiments with such a composition, Dr. Zichner drew up a recipe for production of the mixture in an asphalt plant. The approximate composition of the first large scale production mix was as follows (RETTENMAIER, 2009a):

Подпись: ~70% (m/m) ~12% (m/m) ~10.5% (m/m) ~7.5% (m/m)5/8 mm coarse aggregates 0/2 mm crushed sand Filler

B80 (B65) binder

As we can see, there was none of the 2/5 mm aggregate in that mix that was typically used in other mix types; the absence of this size fraction produces a gap grading, as we shall see later (in Chapter 2).

Then the problem of draining-off the binder from the aggregate was encountered; with such a high binder content and few fines to hold the binder in the mix, the binder tended to flow off the coarse aggregate particles. It was acknowledged, after labora­tory tests, that an additive of asbestos fibers would be a good drainage inhibitor (so – called stabilizer). Such a designed mix could be produced, transported, and laid in a traditional way (RETTENMAIER, 2009a).

The mixes were named by Dr. Zichner in 1968 as follows (Zichner, 1972):

• MASTIMAC—the name referring to mixes for layers 2-3 cm thick,

• MASTIPHALT— the name referring to mixes for layers thicker than

3 cm.

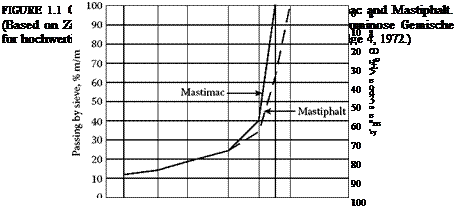
Early road sections of MASTIMAC were used on internal roads of asphalt plants belonging to the Strabag/Deutag Consortium, enabling them to gain experience with the new mixture. Eventually a public road was paved with the MASTIMAC mix on July 30, 1968, in Wilhelmshaven, Germany, on Freiligrath Strabe. The result was so encouraging that some other sections were paved with MASTIMAC soon afterward (RETTENMAIER, 2009b). Gradation curves of the new mixtures (Figure 1.1) were presented in a German publication (Zichner, 1972).

The stone mastic composition and its laydown were patented by Dr. Zichner in Germany, the United States, Sweden, France, and Luxembourg.[1] [2]‘ It is interesting how the inventor described his ideas in the U. S. patent text (Zichner, 1971):

the gravel size mixtures are composed…so that the percentage of the coarser size is greater than that of the smaller size. In this manner a relatively great interstitial volume is achieved in the gravel mix on the one hand, and on the other hand a good interfitting

Подпись: Coarse aggregatesimage3
image4Mastic on grains

Pavement

FIGURE 1.2 First stage of the mix performance according to U. S. patent No. 3797951— after laying.

of the individual pieces [of] gravel is assured….The quantity and fluidity of the mas­tic is such that during and after the compacting, the mastic flows into the interstices between the stones forming the wearing course as aforesaid, and which the volume of the mastic is less than the interstitial volume of the stones..

In that patent, the approximate percentage of the mix composition was defined as 70% coarse aggregates, 12% filler, 8% binder, and 10% crushed sand. It was also indicated that stabilizing additives may be needed as well. As the reader can see, the mixture described above is similar to the contemporary understanding of an SMA mixture (Figures 1.2 and 1.3).

Подпись: Mastic between grains Coarse aSSreSates Pavement FIGURE 1.3 Second stage of the mix performance according to U.S. patent No. 3797951— after finishing.

Today it is generally admitted that the idea of SMA has changed little since its inception. What is SMA today? We can agree on its definition here; SMA is an asphalt mixture containing a gap-graded aggregate mixture, with high contents of coarse aggregate fractions, filler, and binder. Most often a stabilizing additive (drainage inhibitor), which prevents the draindown of the binder from the aggregate, is needed.

Although SMA mix was originally intended only for wearing courses, in some countries it is also applied in binder (intermediate) courses (see Chapter 13). Polymer modified binders were not commonly available in the 1960s and 1970s, so only conventional binders were used. Although the binders were quite soft, it was soon noticed that SMA layers were very durable, and their rut resistance became espe­cially evident.

The SMA mix was not forgotten in 1975 when a ban on the use of studded tires was introduced in Germany (Bellin, 1997). The concept of SMA turned out to be good not only for that kind of damage but also for rutting resistance and durability. Today SMA is regarded as an ideal mixture for heavy-duty asphalt pavements that require the highest resistance to damage and a very long service life. It is a practi­cally synonymous with resistance to rutting.

Some Words on Terminology

Krzysztof Btazejowski, a graduate of the Civil Engineering Department of the Warsaw University of Technology, Poland, completed his PhD dissertation at the Kielce Technical University, Poland. Since 1992 he has been working as a research engineer for the Road and Bridge Research Institute in Warsaw, Poland, and then in research departments of various companies that manufacture such products as road binders, aggregates, and concrete. He is also the author of a series of publications on asphalt surfacing. In addition, Dr. Blazejowski remains active in standardization and train­ing. When he is not involved in writing or research, Dr. Blazejowski spends time as a mountain guide.

Due to differences in terminology, chiefly between the United States and European countries, some assumptions were made. The universal term binder was used in the book instead of the U. S. term asphalt cement or the European bitumen. That decision has carried with it a change in the name from a binder course to an inter­mediate course.

Labeling mixtures according to the SMA 0/D system were used throughout the book where D denotes the nominal maximum particle size in a mixture. In Europe, marking SMA D (without ‘0/’) is grounded in the standard EN 13108-5 and has been in use since 2006. Also, aggregate blends are labeled according to a similar system as d/D where d and D are the lower and upper limits of aggregate fraction, respec­tively; for example, a coarse aggregate 8/12.5 mm means aggregates with grains of size between sieves 8.0 and 12.5 mm with a permissible amount of oversizes and undersizes.

The abbreviations m/m and v/v refer to ratios by mass and volume, respectively. The abbreviation PMB means polymer modified binder.

GENERAL TRADE MATHEMATICS

T

his book is your ticket to smooth sailing when it comes to doing the math for plumbing and pipe fitting. Most of the work is already done for you when you consult the many tables and references contained in these pages. Why waste time with calculators and complicated mathematical equations when you can turn to the ready-reference tables here and have the answers at your fingertips? There is no reason to take the difficult path when you can put your field skills to better use and make more money.

A few words of advice are needed here. Our country uses multiple plumb­ing codes. Every code jurisdiction can adopt a particular code and amend it to their local needs. It is impossible to provide one code source to serve every plumber’s needs. The code tables in this book are meant to be used as repre­sentative samples of how to arrive at your local requirements, but they are not a substitution for your regional code book. Always consult your local code be­fore installing plumbing.

The major codes at this time are the International Plumbing Code and the Uniform Plumbing Code. Both are excellent codes. There have been many code developments in recent years. In addition to these two major codes, there are smaller codes in place that are still active. I want to stress that this is not a handbook to the plumbing code,- this is a calculations manual. If you are interested in a pure code interpretation, you can review one of my other Mc­Graw-Hill books entitled: International and Uniform Plumbing Codes Handbook.

A

Подпись: INTRODUCTION

re you a plumber or pipe fitter who dislikes doing the math that is re­quired in your trade? If so, this book may be one of the best tools that you can put in your truck or office. Why? Because it does much of the math calculations for you. That’s right, the tables and visual graphics between these pages can make your life much easier and more profitable.

R. Dodge Woodson, the author, is a 30-year veteran of the trade who has been in business for himself since 1979. He knows what it takes to win in all financial climates as both a business owner and tradesman. This is your chance to learn from an experienced master plumber and, what is even better, you don’t have to study and memorize formulas. All you have to do is turn to the section of this professional reference guide that affects your work and see the answers to your questions in black and white. How much easier could it be?

Mathematical matters are not the only treasures to be found here. You will find advice on how to comply with the plumbing code quickly, easily, and without as much thought on your part.

The backbone of this book is math for the trades, but there is much more. There is a section on troubleshooting that is sure to save you time, frustration, and money. Find out what you may need to know about septic systems. In ad­dition to phase-specific math solutions, there is an appendix that is full of ref­erence and conversion tables for day-to-day work situations.

Take a moment to scan the table of contents. You will see that the pres­entation of material here is compiled in logical, accessible, easy-to-use chap­ters. Flip through the pages and notice the tip boxes and visual nature of the information offered. You don’t have to read much, but you will find answers to your questions.

If you are looking for a fast, easy, profitable way to avoid the dense read­ing and complicated math that is needed in your trade, you have found it. Once you put this ready reference guide at your fingertips, you will be able to concentrate on what you do best without the obstacles that may steal your time and your patience. Packed with 30 years of experience, you can’t go wrong by using Woodson’s resources to make you a better tradesman.

ix

This page intentionally left blank.

M

ath is not always a welcome topic among tradespeople. As much as math may be disliked, it plays a vital role in the trades, and plumb­ing and pipe fitting are no exceptions. In fact, the math requirements for some plumbing situations can be quite complicated. When people think of plumbers, few thoughts of scholarly types come to mind. I expect that most people would have trouble envisioning a plumber sitting at a drafting table and performing a variety of mathematical functions involving geometry, al­gebra, and related math skills. Yet, plumbers do use high-tech math in their trade, sometimes without realizing what they are doing.

Подпись:Think about your last week at work. Did you work with degrees of an­gles? Of course you did. Every pipe fitting you installed was an example of angles. Did you grade your drainage pipe? Sure you did, and you used frac­tions to do it. The chances are good that you did a lot more math than you realized. But, can you find the volume of a water heater if the tank is not marked for capacity? How much water would it take to fill up a 4-inch pipe that is 100 feet long? You might need to know if you are hauling the water in for an inspection test of the pipe. How much math you use on a daily basis is hard to predict. Much of the answer would depend on the type of work you do within the trade. But, it’s safe to say that you do use math on a daily basis.

I’ve taught a number of classes for plumbers and plumbing apprentices. Math is usually the least appreciated part of those classes. Experience has showed me that stu­dents resist the idea of learning math skills.

I remember when I took academic levels of math in school and thought that I’d never use it. Little did I know back then how valuable the skills I was learning would be.

1

A or a

Area, acre

AWG

American Wire Gauge

В or b

Breadth

bbl

Barrels

bhp

Brake horsepower

BM

Board measure

Btu

British thermal units

BWG

Birmingham Wire Gauge

В & S

Brown and Sharpe Wire Gauge (American Wire Gauge

C of g

Center of gravity

cond

Condensing

cu

Cubic

cyl

Cylinder

D or d

Depth, diameter

dr

Dram

evap

Evaporation

F

Coefficient of friction; Fahrenheit

F or f

Force, factor of safety

ft (or ‘I

Foot

ft lb

Foot pound

fur

Furlong

gal

Gallon

gi

Gill

ha

Hectare

H or h

Height, head of water

HP

horsepower

IHP

Indicated horsepower

in for ")

Inch

L or l

Length

lb

Pound

lb/sq in.

Pounds per square inch

mi

Mile

o. d.

Outside diameter (pipes)

oz

Ounces

pt

Pint

P or p

Pressure, load

psi

Pounds per square inch

R or r

Radius

rpm

Revolutions per minute

sq ft

Square foot

sq in.

Square inch

sq yd

Square yard

T or t

Thickness, temperature

temp

Temperature

V or v

Velocity

vol

Volume

W or w

Weight

W. I.

Wrought iron

FIGURE 1.1 ■ Abbreviations. (Courtesy of McGraw-Hill)

While I’m not a rocket scientist, I can take care of myself when it comes to do­ing math for trade applications.

I assume that your time is valuable and that you are not interested in a col­lege course in mathematics by the end of this chapter. We’re on the same page of the playbook. I’m going to give you concise directions for solving mathematical problems that are related to plumbing and pipefitting. We won’t be doing an in-depth study of the history of numbers, or anything like that. The work we do here will not be too difficult, but it will prepare you for the hurdles that you may have to clear as a thinking plumber. So, let’s do it.

The quicker we start, the quicker we can finish.

BENCHMARKS

Before we get into formulas and exercises, we need to establish some bench­marks for what we will be doing. It always helps to understand the termi­nology being used in any given situation, so refer to Figure 1.1 for reference to words and terms being used as we move forward in this chapter. The in­formation in Figure 1.2 shows you some basic formulas that can be applied

Подпись: Circumference of a circle = rr x diameter or 3.1416 x diameter Diameter of a circle = circumference x 0.31831 Area of a square = length x width Area of a rectangle = length x width Area of a parallelogram = base x perpendicular height Area of a triangle = Vi base x perpendicular height Area of a circle = 7г radius squared or diameter squared x 0.7854 Area of an ellipse = length x width x 0.7854 Volume of a cube or rectangular prism = length X width X height Volume of a triangular prism = area of triangle X length Volume of a sphere = diameter cubed x 0.5236 (diameter x diameter x diameter x 0.5236) Volume of a cone = ir x radius squared x Vi height Volume of a cylinder = v x radius squared x height Length of one side of a square x 1.128 = the diameter of an equal circle Doubling the diameter of a pipe or cylinder increases its capacity 4 times The pressure (in lb/sq in.) of a column of water = the height of the column (in feet) x 0.434 The capacity of a pipe or tank (in U.S. gallons) = the diameter squared (in inches) x the length (in inches) x 0.0034 1 gal water = 8Vi lb = 231 cu in. 1 cu ft water = 62 Vi lb = 7 Vi gal

FIGURE 1.2 ■ Useful formulas. (Courtesy of McGraw-Hill)

Подпись: Sine side opposite sin ~ hypotenuse Cosine side adjacent COS = hypotenuse Tangent side opposite tal1 “ * i ,• side adjacent Cosecant hypotenuse CSC = . side opposite Secant hypotenuse sec = side adjacent Cotangent side adjacent cot - — re-side opposite

FIGURE 1.3 ■ Trigonometry. (Courtesy of McGraw-Hill)

GENERAL TRADE MATHEMATICSПодпись: ► sensible shortcutПодпись: You don’t have to do the math if you have reliable tables to use when arriving at a viable answer for mathematical questions. The types of tables that you need to limit your math requirements are available in this book.to many mathematical situations. Trigonometry is a form of math that can send some people in the opposite direc­tion. Don’t run, it’s not that bad. Figure 1.3 provides you with some basics for trigonometry, and Figure 1.4 describes the names of shapes that contain a vari­ety of sides. Some more useful formulas are provided for you in Figure 1.5. Just in what I’ve provided here, you are in a much better position to solve mathe­matical problems. But, you probably want, or need, a little more explana­tion of how to use your newfound resources. Well, let’s do some math and see what happens.

GENERAL TRADE MATHEMATICS

Pentagon 5 sides

Hexagon 6 sides

Heptagon 7 sides

Octagon 8 sides

Nonagon 9 sides

Decagon 10 sides


FIGURE 1.4 ■ Polygons. (Courtesy of McGraw-Hill)


Parallelogram

Pyramid

Rectangle Rectangular prism Sphere

Square

Triangle

Trapezoid

Cone


Area = base x distance between the two parallel sides

Area = ‘h perimeter of base x slant height + area of base

Volume = area of base x l/> of the altitude

Area = length X width

Volume = width x height x length

Area of surface = diameter x diameter X 3.1416

Side of inscribed cube = radius x 1.547

Volume = diameter x diameter x diameter X 0.5236

Area = length x width

Area = one-half of height times base

Area = one-half of the sum of the parallel sides x the height

Area of surface = one-half of circumference of base X slant height + area of base

Volume = diameter x diameter x 0.7854 x one-third of the altitude


Cube

Ellipse

Cylinder


Volume = width X height X length

Area = short diameter x long diameter x 0.7854

Area of surface = diameter x 3.1416 X length + area of the two bases

Area of base = diameter x diameter x 0.7854

Area of base = volume – e length

Length = volume – e area of base

Volume = length x area of base

Capacity in gallons = volume in inches + 231

Capacity of gallons = diameter x diameter x length x 0.0034

Capacity in gallons = volume in feet x 7.48 Circumference = diameter X 3.1416 Circumference = radius x 6.2832 Diameter = radius x 2

Diameter = square root of = (area – e 0.7854)

Diameter = square root of area x 1,1233


Circle


THE ENERGY-SMART HOUSETHE

I

f there is one topic that has dominated the homebuilding field in recent years, it’s energy efficiency. But for all the headlines and airtime dedicated to the topic of trimming home-energy use, many of the discussions they generate don’t go any further than the admission that, yes, we need to work harder to save energy where we live. What we really need to talk about is how.

At Fine Homebuilding magazine, we focus not only on what good, responsible builders should do to construct or remodel homes that don’t waste energy, but also on how they do it. This book explains how you can, too.

In The Energy-Smart House, you’ll be able to follow these builders step-by-step through critical energy enhancements that include air-sealing, insulation upgrades, and window replacement, as well as choosing the best low-energy fixtures and appliances.

Today, the opportunities for reducing the energy requirements of the homes we live in—no matter how old they may be—are tremendous. The evolution in building products alone, from housewraps to LED lighting to high-performance windows, has equipped builders with a wide array of options to make homes more durable and healthier as well as less costly to live in and maintain. Ever-advancing technologies enable new mechanical systems to deliver heating, cooling, and hot water more effectively and at a lower cost. All the while, a greater understanding of building science enables knowledgeable builders to craft efficient, long-lasting dwellings regardless of the climate in which they build.

The fact is, true energy efficiency can only be achieved through a multifaceted approach that takes the whole house, its site, structure, and systems, into account.

A home is not made “energy efficient” by popping in a few new windows or loading up the attic with cellulose. Good builders know the path to energy efficiency is a multistep process, and that each improvement influences the steps that follow. And that the conscientious application of smart building techniques like the ones found here is the most reliable roadmap they can follow in their pursuit of an energy-smart home.

Debra Judge Silber, Managing editor, Fine Homebuilding magazine

Introduction

image11

image12

HAVE BEEN WRITING AND UPDATING one edition or another of this book for nearly three decades. I started the first edition in 1978, when Jimmy Carter was president and most computers were the size of closets. Since publication of the second edition in 1990, building materials and tools have changed so dramatically that I decided to rewrite the book com­pletely this time around, adding new chapters. All told, Renovation represents thousands of conversations with carpen­ters, electricians, engineers, plumbers, painters, masons, archi-

image13

tects, and other building professionals. And its nearly 700 new photos were winnowed from more than 9,000 shots taken on job sites across North America.

That last point—"on job sites”—is what distinguishes this book and is what should prove most useful to you when you’re in the thick of your renovation: It tells which sawblade to use. What nail size and spacing. When to tear out and when to make do. How to lay out and prep a job so it goes smoothly. Because this book contains thousands of tips and techniques from con­tractors who had schedules and budgets to meet, it will also save you time and money. In other words, the methods in this book have proven themselves. So, supported with lifetimes of practical experience, you can proceed confidently.

This book is as much concerned with what and why as it is with how to. Thus, for every topic—from foundations to finish flooring—you’ll find the tools and materials you’ll need, the problems you may encounter, and workable solutions to see you through. Because the information in each chapter follows the sequence of an actual renovation, you’ll know what to anticipate at every stage. Equally important, R 3’s often-ingenious solu­tions will help you deal with the unexpected situations that are a part of every renovation.

Please heed all safety warnings: They are there for your protection. The publisher and I have made every effort to describe safe construc­tion procedures in a clear and straightforward manner. But because of the differences in skill and experience of each reader and because of variations in materials, site conditions and the like, neither I nor the publisher can assume responsibility for results with particular projects.

image14

How to Use This Book

Read the opening remarks in a chapter before reviewing guid­ance for specific tasks. That is, each chapter’s information tends to be somewhat cumulative. The first few paragraphs often introduce vital terms and concepts. Thereafter, you’ll find tools and techniques presented more or less chronologically, in the manner you’d need them in a renovation.

Although new terms are defined early in each chapter and later in context, you may come across terms whose definitions you skipped over earlier. If you need a definition, consult the glossary or the index.

An in-depth review of tools and materials is beyond the scope of this book. If you want more information on either, consider browsing the Web. Although I do mention specific brand names and occasional Internet addresses, please consider them reference points for research and not product endorsements. Most of the brand names are those I encountered on job sites or were praised by a builder whose opinions I value.

image15Maybe it’s always been so, but research has become a big part of renovation. So supplement your reading and Web searches by talking to neighbors, local contractors, and building – material suppliers. Experience is always the best teacher—even if it’s someone else’s experience. A friend or neighbor who’s been through a renovation may be able to recommend reliable builders and suppliers and may also be a calm voice when you need one most. So go to it. As Aristotle once said (though not to me directly), "Courage is first among human virtues, for without it, we’re unlikely to practice many of the others.”

Hydrosystems Engineering Reliability Assessment and Risk Analysis


Failures of major engineering systems always raise public concern on the safety and reliability of engineering infrastructure. Decades ago quantitative evalua­tions of the reliability of complex infrastructure systems were not practical, if not impossible. Engineers had to resort to the use of a safety factor mainly de­termined through experience and judgment. The contribution of human factors to structural safety still remains elusive for analytical treatment. The main areas of concern and application in this book are hydrosystems and related environmental engineering.

Without exception, failures of hydrosystem infrastructure (e. g., dams, levees, and storm sewers) could potentially pose significant threats to public safety and inflict enormous damage on properties and the environment. The tra­ditional approach of considering occurrence frequency of heavy rainfalls or floods, along with an arbitrarily chosen safety factor, has been found inadequate for assessing the reliability of hydrosystem infrastructure and for risk-based cost analysis and decision making. In the past two decades or so, there has been a steady growth in the development and application of reliability analysis in hydrosystems engineering and other disciplines. The main objective ofthe book is to bring together some of these developments and applications in one volume and to present them in a systematic and understandable manner to the water resource related engineering profession. Through this book it is hoped to demon­strate how to integrate involved physical processes, along with some knowledge in mathematics, probability, and statistics, to perform reliability assessment and risk analysis of hydrosystem engineering problems. An accompanying book, Hydrosystems Engineering Uncertainty Analysis, provides treatments and quantifications of various types of uncertainty, which serve as essential infor­mation needed for the reliability assessment and risk analysis of hydrosystems.

Hydrosystems is the term used to describe collectively the technical areas of hydrology, hydraulics, and water resources. The term has now been widely used to encompass various water resource systems including surface water storage, groundwater, water distribution, flood control, drainage, and others. In many hydrosystem infrastructural engineering and management problems, both quantity as well as quality aspects of water and other environmental issues have to be addressed simultaneously. Due to the presence of numerous uncertainties, the ability of the system to achieve the goals of design and man­agement decisions cannot be assessed definitely. It is almost mandatory for an engineer involved in major hydrosystem infrastructural design or hazardous waste management to quantify the potential risk of failure and the associated consequences.

Application of reliability analysis to hydrosystems engineering covers a wide scope of subfields, ranging from data collection and gauging network design to turbulence loading on structures; and from inland surface water to groundwa­ter to coastal water. In terms of the system scale, it could involve entire river basins containing many components, or a large dam and reservoir, or a single culvert or pipe. Depending on the objective, the application could be for design­ing the geometry and dimension of hydraulic facilities, for planning of a hy­draulic project, for determining operation procedure or management strategy, for risk-cost analysis, or for risk-based decision making.

The book is not intended to be a review of literature, but is an introduction for upper level undergraduate and graduate students to methods applicable for reliability analysis of hydrosystem infrastructure. Most of the principles and methodologies presented in the book can equally be applied to other civil engi­neering disciplines. The book presents relevant theories of reliability analysis in a systematic fashion and illustrates applications to various hydrosystem engi­neering problems. Although more advanced statistical and mathematical skills are occasionally required, the great majority of the problems can be solved with basic knowledge of probability and statistics. Illustrations in the book bring to­gether the use of probability and statistics, along with knowledge of hydrology, hydraulics, water resources, and operations research for the reliability analysis and optimal reliability-based design of various hydrosystem engineering prob­lems. The book provides added dimensions to water resource engineers beyond conventional frequency analysis.

The book consists of eight chapters. In each chapter of the book, ample exam­ples are given to illustrate the methodology for enhancing the understanding of the materials. The book can serve as an excellent reference book not only for engineers, planners, system analysts, and managers in area of hydrosystems, but also other civil engineering disciplines. In addition, end-of-chapter problems are provided for practice and homework assignments for classroom teaching.

The book focuses on integration of reliability analysis with knowledge in hydrosystems engineering with applications made to hydraulics, hydrology, water resources, and occasionally, to environmental and water quality manage­ment related problems. Since many good books on basic probability, statistics, and hydrologic frequency analysis have been written, background in proba­bility, statistics, and frequency analysis that are relevant to reliability anal­ysis are summarized in Chapters 2 and 3, respectively. The book, instead of dwelling on the subject of data analysis, focuses on how to perform relia­bility analysis of hydrosystem engineering problems once relevant statistical data analysis has been conducted. As real-life hydrosystems generally involve various uncertainties other than just inherent natural randomness of hydro­logic events, the book goes beyond conventional frequency analysis by consider­ing reliability issues in a more general context of hydrosystems engineering and management. Chapter 4 elaborates the reliability analysis methods consider­ing load-resistance interaction under the static and time-dependent conditions. First-order and second-order reliability methods, with the emphasis given to the former, are derived. For many hydrosystem infrastructures, it is sometimes practical to treat the system as a whole and analyze its performance over time without considering detailed load-resistance interaction. Chapter 5 is devoted to time-to-failure analysis that is particularly useful for dealing with systems that are repairable. Chapter 6 provides a detailed treatment of using Monte Carlo simulation and its variations applicable to reliability analysis. The sub­ject, in most books, is covered in the context of univariate problems in which stochastic variables are treated as independent and uncorrelated. In reality, the great majority of the hydrosystem infrastructural engineering problems involve multiple stochastic variables, which are correlated. Treatment of such problems is emphasized. Chapter 7 focuses on the evaluation of system reliabil­ity by integrating load-resistance reliability analysis methods or time-to-failure analysis, along with system configuration, for assessing system reliability. Different methods for system reliability analysis are presented and demon­strated through examples. Chapter 8 presents the framework that integrates uncertainties, risk, reliability, and economics for an optimal design of hydrosys­tem infrastructure. A brief description of system optimization is also given.

The intended uses and audiences for the book are: (1) as a textbook for an intermediate course at the undergraduate senior level or graduate level in wa­ter resources engineering on the risk and reliability related subjects; (2) as a textbook for an advanced course in risk and reliability analysis of hydrosystem engineering; and (3) as a reference book for researchers and practicing engi­neers dealing risk and reliability issues in hydrosystems engineering, planning, management, and decision making.

The expected background for the readers of this book is a minimum of 12 credits of mathematics including calculus, matrix algebra, probability, and statistics; a one-semester course in elementary fluid mechanics; and a one- semester course in elementary water resources covering basic principles in hydrology and hydraulics. Additional knowledge on engineering economics, water-quality models, and optimization would be desirable.

Two possible one-semester courses could be taught from this book depend­ing on the background of the students and the type of course designed by the instructor. Instructors can also refer to the accompanying book Hydrosystems Engineering Uncertainty Analysis for other relevant materials to compliment this book. The possible course outlines are presented below.

Outline 1. (For students who have taken a one-semester probability and statis­tics course). The objective of this outline aims at achieving higher level of capability to perform reliability analysis. The optimal risk-based design concept can be introduced without having to formally cover subjects on opti­mization techniques. The subject materials could include Chapter 1, Chapter 2 (2.7), Chapter 3, Chapter 4 (4.1—4.4), Chapter 5 (5.1-5.3), Chapter 6 (6.1-6.4, 6.6), Chapter 7 (7.1-7.3), and Chapter 8 (8.1-8.4).

Outline 2. (For water resource engineers or students who have a good under­standing in basic statistics, probability, and operations research.) The aim of this outline is for readers to achieve higher level and deeper appreciation of the applications of reliability assessment techniques in hydrosystems engineering. The topics might include Chapters 1, 4, 5, 6, 7, and 8.

The uncertainty and reliability issues in hydrosystem engineering problems have been attracting a lot of attention of engineers and researchers. A tremen­dous amount of progress has been made in the area. This book, and the accompa­nying book Hydrosystems Engineering Uncertainty Analysis, merely represent our humble offer to the hydrosystem engineering community. We hope that readers will find this book useful and enjoyable. Due to our limited knowledge and exposure in the exciting area of stochastic hydraulics, we are unable to incorporate many brilliant works in this book. It is our sincere wish that this effort will bring out much greater works from others to improve and enhance our contribution to society and mankind.

Screwdrivers

Screwdrivers

I’ve tried my hand at many jobs.

I worked for several years as a farmer. I was a spiker once, laying railroad track.

I taught Spanish and carpentry at night for years, and I even worked as a coun­selor for the deaf and for wounded Vietnam veterans. But I always came back to carpentry. It must have been the smell and feel of wood.

Not all of carpentry is easy. Moving and cutting lumber all day long can be hard work. Yet I hardly remember a time when I wasn’t doing carpentry work. I was born in a farming-ranching region of western Nebraska, and carpentry – like sleeping and eating—was something everyone did.

I helped build my first house before I was out of high school. I worked with a kindly old man, a craftsman who taught me "white-overall" carpentry, the way houses were built from Civil War times until about World War II. Hand tools were used to cut the wood and build the homes because few power tools existed.

I was deeply impressed by the beauty of the tools this old carpenter had and the skill with which he used them, and I’m thankful for the knowledge he passed along to me.

When I was still a teenager, the post – WWII housing boom was beginning, and I found myself in Albuquerque trying to

ScrewdriversScrewdriversearn money to go to college by building houses with my older brother Jim. Because returning veterans were able to move into houses with nothing down and payments of $75 a month, the demand for housing was enormous. To meet that demand, we had to change the way we built. So, unlike Henry Ford, who took the automobile to the produc­tion line, we took the production line to the building site. We laid aside the white overalls and packed our pickups with tools built for speed. I set aside my handsaw and picked up a power saw that could cut wood to size in seconds, and I tossed my 16-oz. curved-claw hammer in favor of a 22-oz. straight – claw hammer that could drive a 16d nail with one lick.

In 1950, at age 19, I moved to Los Angeles to study at UCLA. I went to school three days a week and worked three days as a journeyman carpenter in the union. I got intellectual food for my mind and physical food for my body. On Sundays I rested.

By the mid-1950s, the building boom in Los Angeles was at its peak. Instead of building one house at a time, we were building 500 or even 5,000 at a time. Every person working in every trade was adapting. New tools, new procedures, and new materials were in evidence everywhere. It is a tribute to American ingenuity that we were able to build thousands of new homes without sacri­ficing quality for quantity. During these fast-paced days, I learned a lot about carpentry.

Nowadays I realize how fortunate I was to learn how to use hand tools from a traditional master builder when I was young. Today’s carpentry is different in that we have all kinds of power tools, nail guns, and hand-held computers that help us build. But carpentry still requires that some basic knowledge of hand

Screwdrivers

tools and layout skills be acquired so we can move on to become masters of our craft And this is my purpose in writing Homebuilding Basics: Carpentry. I want to share with others what I have learned from my teachers. Just as in my first book, The Very Efficient Carpenter, this second book continues the process of making information available to people about carpentry tools and the tech­niques for using them.

Homebuilding Basics: Carpentry is a step-by-step guide book to building. There is something in this book for any­one interested in carpentry or home improvement. In it, you will learn how to work safely and how to choose and use the basic hand and power tools for car­
pentry. You will learn the vocabulary of carpentry so that you can read plans and order building materials. You’ll learn the basic steps of how to put together an entire house. And you’ll see when preci­sion counts and when it doesn’t.

I no longer make my living as a full-time carpenter. Instead, among other things,

I now spend a lot of my time writing and teaching the trade. But that doesn’t mean I have stopped building. I help family and friends who need a willing hand. And my younger brother Joe and I work with Habitat for Humanity, building houses where we live in Oregon. Doing this physical work makes me feel good. It must be the smell and feel of wood.

"Take your time"

"Use the right tools for the job"

"Keep them sharp and clean"

In the end, I think,

there are really only a few simple rules.

—Phillip Rosenberg, A Few Simple Rules

When I started building houses, hand tools were the norm. Cutting wood, drilling holes, and driving nails all were done with hand tools. Even though today these tasks are often done with power tools, hand tools are still a part of every carpenter’s tool collection.

When you’re starting out as a carpenter, knowing which tools you’ll need can be difficult. I’ve been in the trades for years, and choosing a tool is still not easy for me. Each time I walk into a tool center or receive a tool catalog in the mail,

I am amazed by the dizzying array of carpentry tools offered for sale. Even buying something as basic as a hammer can be frustrating when there are 50 different models.

In this chapter I will introduce you to the basic hand tools every carpenter needs: fastening tools, cutting tools, shaping tools, gripping tools, bars, squares, tape measures, marking tools, and tools for checking level and plumb. I’ll also show you a few ways to tote your tools from job to job.

FASTENING TOOLS

Hammers, screwdrivers, and staplers are useful to any carpenter. These are the beginning core of a hand-tool collection and can easily be kept close by—either on a toolbelt or in a toolbucket.

Hammers

The first hammer I owned as a 7-year – old had curved claws with a wooden handle. It was a 16-oz. model made of iron, and it wasn’t much of a hammer. One claw was broken off, so it wasn’t good for pulling nails, but I learned to drive nails with it. I can still remember the fun I had on warm days, using my hammer to build playhouses, forts, and boxes.

I have been in the trades for more than 50 years, and over that time I have col­lected and lost a good number of hammers of varying sizes. Depending on the kind of work you will be doing,
Подпись:
you’ll more than likely build a collection of your own. But before you do that, take time to learn the parts of a hammer, the types of hammers, how to choose a hammer, and how to drive and pull nails with one.

Parts of a hammer The two basic parts of a hammer are the handle and the head. Most handles are made of wood, fiberglass, or steel. A wood handle absorbs some of the shock when ham­mering, but a fiberglass or steel handle
is so hard that it’s virtually unbreakable.

In most cases, I prefer wood handles, except when I do demolition work. For this job, I prefer to use a framing hammer with a fiberglass handle.

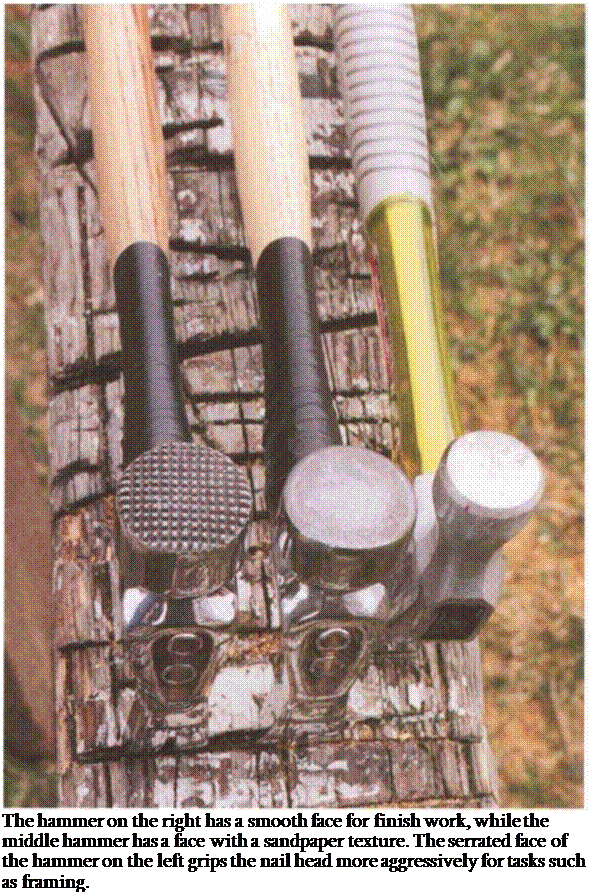
The head of a hammer includes the eye (where the handle enters the head), the cheek (the side of the head), the face (the striking end), and the claws. The face is either serrated or smooth (see the photo on p. 9). A serrated face won’t become slick and slip off the nail head

Safety is a serious issue. On the job site, safe work practices should be followed at all times. Every day construction workers get hurt. Some are temporarily disabled by these accidents. Others are permanent­ly disabled. Even worse, workers often die from job – related injuries.

Working safely is more than just protecting yourself physically with devices such as safety glasses. It’s more than using tools correctly and making sure that blades are sharp. Humans simply cannot be plugged in like power saws and run all day long. Be­sides a body, you have a heart and a mind that also need protection. The first and most important safety rule I can mention is that you must have your mind on your work, especially when using power tools.

Most of my on-the-job injuries have occurred when I went to work with a battered heart. It can happen to any of us. A death in the family, a divorce, a car acci­dent, or a sick child can make anyone lose concen­tration on what he is doing, resulting in a mistake. Unfortunately, a mistake on the building site can get someone hurt.

In the ’50s, I built roofs with a partner. He was going through rough times at home with his family. Every morning his body was on the job at 7 a. m., but his mind didn’t get there until around 1 0 a. m. During this three-hour period, he was basically unsafe at any speed. Twice he dropped a 2x rafter on my foot and injured me. One day he cut a huge gash in his forearm with a circular saw. This was before 9-1-1 existed, so I had to stop the bleeding, get him off the roof, take him to the hospital, and find another partner.

So, how can you keep your mind in focus even when times are hard? One thing that has worked well for me is to set aside a time every day for a period of meditation. I use this quiet time to bring my body and mind together. It helps me understand how I feel. Meditation takes some effort and practice, but after 50 years of pounding nails and running saws, I am here with all my body parts intact.

It is also important to admit when you are not men­tally right. If you are having trouble focusing on your work, don’t try to tough it out by yourself. It’s okay to confide in the crew leader or a coworker and tell him you are having problems. It’s okay to ask for help to get through the day.

Aside from staying mentally focused, what else can you do to be sure you are working safely? Through­out this book I have included specific safety guide­lines for certain jobs and for using certain tools.

during hammering. The drawback of a serrated face is that it leaves a distinct checkerboard pattern on the wood after a missed blow. A smooth face, on the other hand, won’t leave a checkerboard pattern when you miss. Unfortunately, a smooth face makes it easier for the face to slip off the nail head. To help a smooth face "catch" a nail head, you can rough it up a bit by using sandpaper or by rubbing it on concrete a few times. In general, a serrated face is used for rough framing, and a smooth face is used for finish work.

Most hammers, except for mallets, sledgehammers, and drywall hammers, have straight or curved claws that are used to pull nails. I prefer straight claws because they can also be used to move lumber around or to pry boards apart.

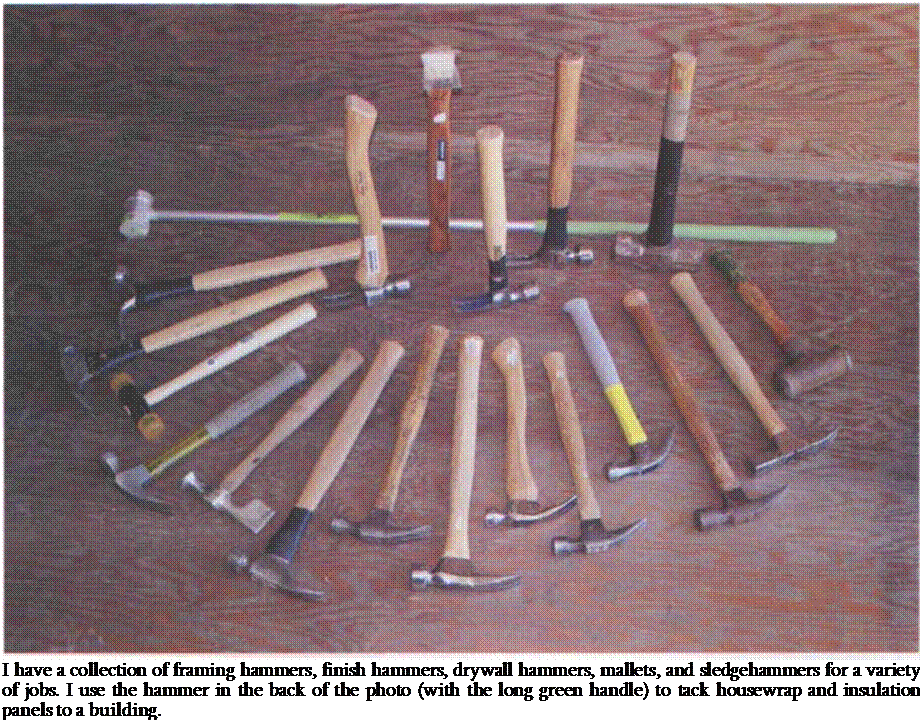
Types of hammers f knew a couple of brothers years ago who were framers around Palm Springs. They each had a 40-oz. hammer with a face about the size of a silver dollar. When framing 2×4 walls, they could roll out two 16d nails between thumb and forefinger, start both with one tap, and drive both home with one lick. My framing hammer is
Подпись:

smaller, with a 21-oz. head, an 18-in. oval-shape handle, straight claws, and a serrated face. I like the oval shape of the handle because it fits well in my hand and gives me more control when nailing together rough framing lumber. Other framing hammers have 20-oz. to 28-oz. heads and shorter handles.

A finish hammer is used to nail on items like door trim, siding, and windowsills. I have two finish hammers—16 oz. and 20 oz. Both have straight claws and smooth faces, but the 16-oz. hammer has a 1 б-in. handle that works well for driving small nails. My 20-oz. hammer has an 18-in. handle, and I use it to drive larger nails through siding or exterior trim. My favorite finish hammer is made by Dalluge (see Sources on p. 198). It has a milled face like 120-grit sandpaper, is well balanced, and drives a finish nail without slipping off.

You don’t need a power screwdriver to attach drywall to ceilings and walls. You can still get the job done with drywall nails and a drywall hammer. My drywall hammer weighs 16 oz., has a 15-in. wood handle, a rounded (convex) face, and a blade like a hatchet. The rounded face leaves a slight dimple (which is later filled with joint compound to hide the nail) in the drywall, and the hatchet blade is handy for prying or lifting sheets of drywall.

A mallet is a soft-faced hammer made of plastic, rawhide, rubber, or wood. It is often used to tap a wood chisel because it won’t damage the chisel handle. Mallets come in different weights, rang­ing from 1Vi oz. to 2 lb., with different handle lengths. The one I use weighs 10 oz. and has a 14-in. handle.

When driving stakes into very hard ground or doing heavy demolition work, you may need a 12-lb. sledgehammer with a 36-in. handle. This tool is also

used to nudge framed walls into posi­tion. Sledgehammers come in various weights, ranging from 4 lb. to 12 lb., with different handle lengths. I carry a 6-lb. sledgehammer with a 20-in. handle in my pickup.

Nailing with a hammer
Screwdrivers

Choosing a hammer A carpenter uses his hammer every day, so it’s important to pick the right one for the job. A ham­mer will become an extension of your arm, so buy one that feels good to you.

Regardless of which type of hammer you need, whether it’s for framing, finishing, drywalling, or demolition, always buy quality. A cheap hammer made of iron rather than hardened steel will most likely chip or break, like the one I had as a child.

Another consideration is the weight and length of the hammer. The best advice I can give regarding these two considera­tions is to buy a hammer that feels

comfortable in your hands. Take a swing or two and see how it feels. If it’s too heavy, try a lighter one. If it’s top-heavy, try a shorter or longer handle. It’s all a matter of fitting the hammer to your physical strength and comfort.

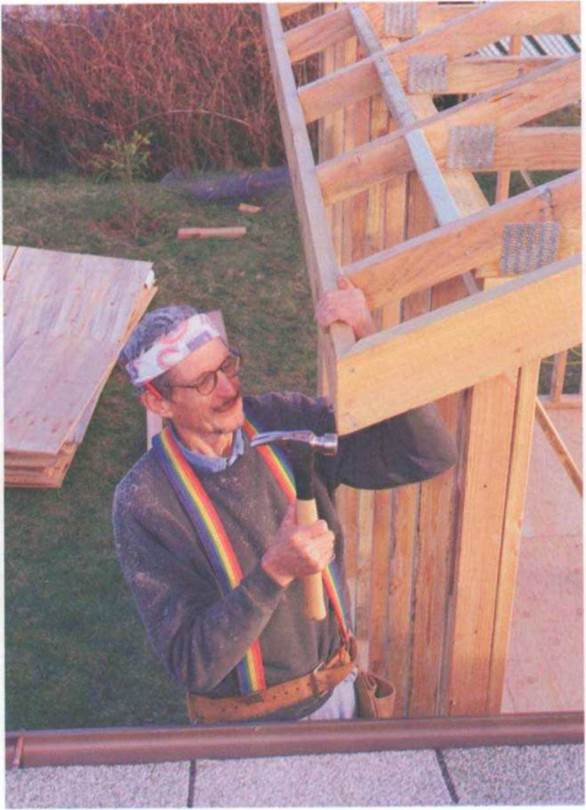
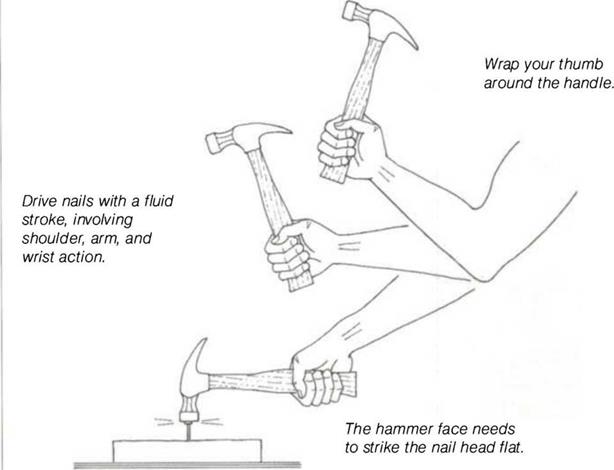
Driving nails Driving nails with a ham­mer has more to do with rhythm and coordination than it does with power and force. A long swing using shoulder, elbow, and forearm movement, with a decisive snap of the wrist at the end, is important for driving large nails (see the drawing above). Small nails can be driven mainly with simple wrist action. The key to nailing is to hit the nail head flat with the face of the hammer.

Otherwise, the nail will bend or pop out or the hammer will slide off and leave a mark on the wood.

Becoming a good nailer, like becoming a good typist, takes practice. I have heard old-time carpenters tell apprentices to sharpen their nailing skills and to stop leaving "Charlie Olsens" (the C – and 0- shaped indentations left in the wood by the hammer face after missed hammer blows). To practice nailing, I suggest you get a box of 8d or 16d framing nails, find a hunk of wood or scrap 2x, and start hammering nails (see the photo above). Your grip on the handle is criti­cal. There’s no need for a tiring,
white-knuckle hold. Rather, grab the handle near the end with an easy, firm grip and make sure your thumb is wrapped around the handle. Hold the nail on the wood with one hand, start it with a tap, remove your hand from the nail, and drive the nail home. Keep dri­ving until you develop a good rhythm. When driving nails through hard wood, try using softer, direct blows to keep the nail from bending.

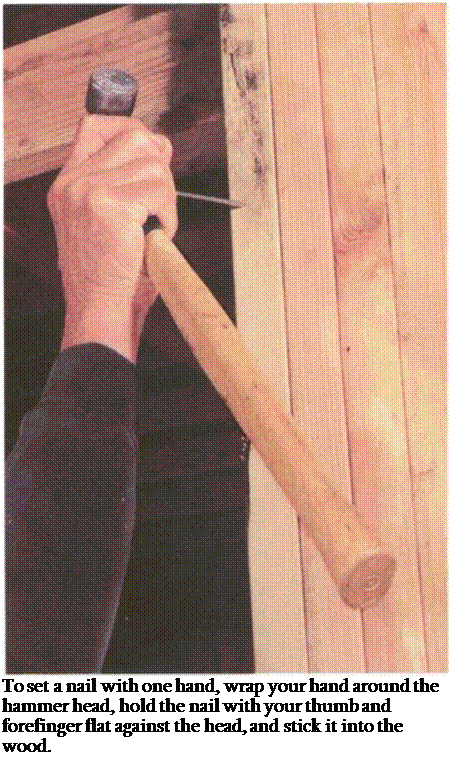
There are times when you need to set (or start) a nail in a hard-to-reach or high-up place. Practice setting this nail with one hand. Wrap your hand around the hammer head, hold the nail with

Like most carpenters, I can tell tales of steel and nails sent flying from a hammer blow. Unfortunately, many of these tales don’t have happy endings. Be­cause the hammer is a striking tool, it can be dan­gerous, so protect yourself by following a couple of simple safety rules.

First, don’t strike hard steel against hard steel, ham­mer face against hammer face, for whatever reason. Doing so can break off small pieces of steel (I call it job shrapnel), sending them flying—sometimes into unsuspecting bodies. I have carried a small piece of hammer steel lodged near the knuckle of my right index finger for 40 years.

Second, always wear safety glasses when you’re hammering—no exceptions. Flying steel and nails can be crippling if they hit you in the eye. I know. It happened to me.

In the early ’50s, I was framing walls on a very hot afternoon. Rather than stopping work to wipe the sweat off my glasses, I laid them aside.

I set a nail in a top plate and hit it with my hammer. Unfortunately, the blow barely caught the edge of the nail head, and the nail flew up and struck me in the right eye. It hurt some, but the pain was not in­tolerable. It felt like someone had poked me in the eye with their finger.

It took a few minutes before I realized that my vision was getting blurry.

The job site was near a hospital, so I drove my car to the emergency room. It took the doctor about 30 seconds to call for an eye specialist. The news was not great. The nail had hit me point-first and had punctured my eyeball, causing the fluid in my eye to leak out.

I was rolled into an operating room and was given a local anesthetic, so I got to watch as they stitched up my eyeball. I could sort of see a curved needle coming down to my eye as the doctor plugged the hole. I was sure wishing I had taken time to wipe the sweat off my glasses. After surgery, I was wheeled to a hospital bed with my head wrapped like a mummy.

After 10 days of wondering, waiting to find out if I would see again out of my right eye, the doctor took off the bandages. Good news. I still had to keep my eyes wrapped for another three weeks, but my vision was going to be more or less okay.

The effects of the accident still linger. Since then, I have had to wear dark glasses in bright sunlight be­cause the eye is very sensitive to light, and stop lights look like amoebas. But I do consider myself lucky. I can see. Learn from my mistake and don’t take chances with your eyes.

your thumb and forefinger flat against the head, and set the nail (see the left photo on the facing page). Some ham­mers are designed with a magnetic slot to hold a nail for setting in tight spots (Ted Hammers; see Sources on p. 198).

Once you have mastered the art of dri­ving framing nails, practice with finish nails. The two methods differ. When driving finish nails, you need to be more accurate, because a missed hammer blow could destroy an expensive piece of molding or other piece of finish work To get more control, hold the hammer closer to the head. Practice the same way with finish nails as you did with the framing nails. Hold the nail, set it, and drive it.

Pulling nails Pulling nails with a ham­mer is easy. If you have one with a fiberglass or steel handle, simply hook the nail head with the claws and pull on

Screwdrivers
Подпись: To set a nail with one hand, wrap your hand around the hammer head, hold the nail with your thumb and forefinger flat against the head, and stick it into the wood.

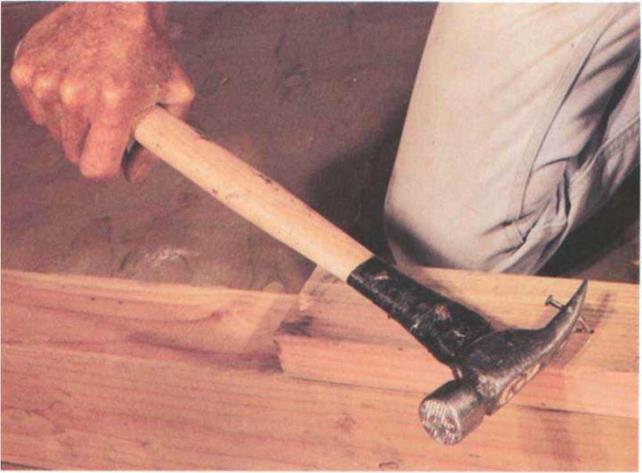
the handle. To protect the wood from being marred and to gain better lever­age, put a block of wood under the hammer (see the right photo above).

If you have a hammer with a wood handle, you have to be extra careful when pulling a nail to avoid breaking the handle. Slip the long part of the nail (called the shank) between the claws. Hook the shank by the inside ridge of the claws and push the hammer over to
one side (see the top photo on p. 14). Release, hook the nail again, and push the hammer to the opposite side. This should remove the nail or loosen it suffi­ciently for you to pull it out.

It’s not always practical to grab a power drill to drive screws, especially if you only have one or two to set. So a couple of screwdrivers are still commonly found in a carpenter’s toolbucket. There are two

Screwdrivers

When pulling nails using a hammer with a wood handle, hook the nail and push the hammer to one side. Then release and repeat on the other side until the nail is loose.

Screwdrivers

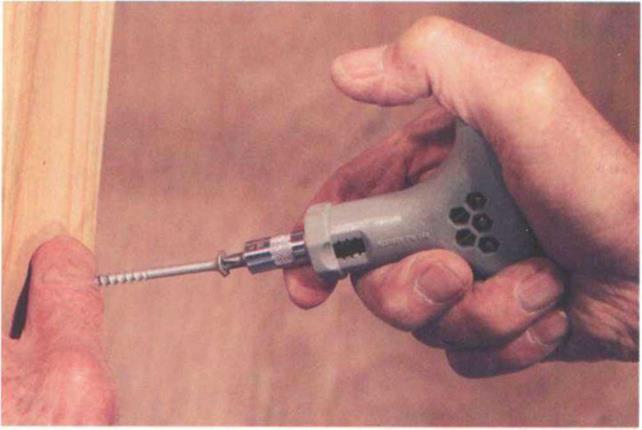
A T-shaped screwdriver with interchangeable bits is compact and holds several bits in the handle, so it’s easy to carry. Its design also allows you to apply a lot of force to driving a screw.
Подпись:

common types of screwdrivers: standard and Phillips. The standard screwdriver has a flat tip shaped to fit a slotted screw. The Phillips has a tip shaped like a cross to fit a screw with a cross-shaped hole. Other types of screwdrivers include square and star-shaped tips.

All screwdrivers come in different lengths with different size tips and blade thicknesses. It’s a good idea to buy a set of screwdrivers with a variety of tip types and sizes. Another option is to buy a screwdriver with interchangeable heads. This type will take up less room in your toolbelt or toolbox. I own a compact, T-shaped screwdriver (Judson Enterprises; see Sources on p. 198) that I carry in my toolbucket (see the bottom photo on the facing page). It’s small but powerful, has a reversible ratchet, and the handle holds the extra bits. In general, I prefer to use Phillips-head screws and screw­drivers because the screwdriver is less likely to slip out of the slot in the screw.

Staplers

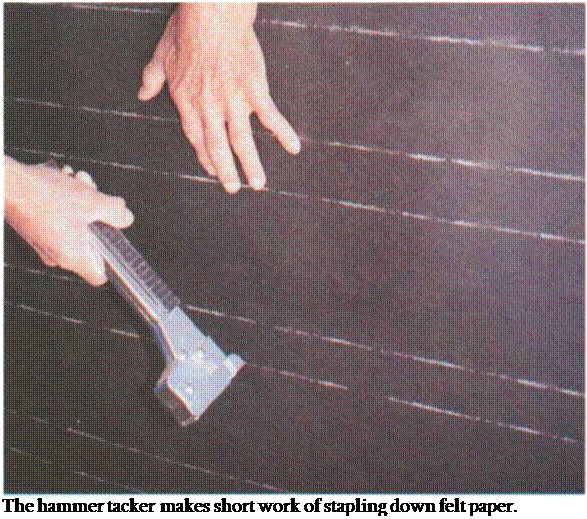
A stapler is a handy tool to keep around. Two types are commonly found on the job site: the hammer tacker and the staple gun. Most carpenters prefer the hammer tacker because it’s fast and easy to use. The hammer tacker is about 1 ft. long and can be loaded with strips of staples. It got its name because you swing it like a hammer (see the photo above). When the tool hits a solid sur­face, it drives a staple. A hammer tacker usually accepts staples from! Л in. to Vi in. long. It’s most commonly used to tack down building paper, housewrap, plastic vapor barriers, the kraft-paper flanges on fiberglass insulation, and car­pet underlayment. On remodeling jobs,

I use a hammer tacker to staple plastic over doors so that dust won’t drift into other rooms.

A staple gun allows you to place staples more accurately. Most models drive staples from ]A in. to 9/i6 in. long. I use a staple gun for installing acoustical tile or for tacking down phone wires. The problem with a staple gun is that squeezing the trigger handle repeatedly can be tiring on the hand and wrist. If you have lots of staples to drive, you may want to buy a small electric stapler.

A Healthy. House

For this 3rd edition of Prescriptions for a Healthy House we would like to thank our readers, who over the years have used this book in search of a healthier way to build their homes. We thank the folks at New Society Publishers for keeping us in print and inviting us to update our information to make this work current in a rapidly growing field. We also want to take this opportunity to thank them for their ex­ceptional vision in publishing a whole roster of books for creating a better world. We wish to acknowledge our editor, Diane Killou, for her thoughtful, skilled, and thorough work.

Many thanks to Jesus Bendezu and Liz Jan from the Baker-Laporte office for their re­search assistance, to Stephen Wiman for his review and additions regarding water puri­fication, and to Toni and Paul Fuge for their review and updates regarding sustainable for­estry.

We are grateful to the many Building Bi­ologists who have taken time from their busy careers to enrich the 3rd edition with their informative essays about various aspects of the Building Biology approach to healthy building. Thank you, Warren Clough, Mary Cordaro, Andre Fauteux, Rowena Finegan, Larry Gust, Katharina Gustavs, Ernst Kiesling, David McAuley, Peter Sierck, Will Spates, Dan Stih, George Swanson, Athena Thompson,

Vicki Warren, and last but not least Helmut Ziehe, founder of the International Institute for Bau-Biology & Ecology in Clearwater, Florida, teacher and mentor of many of us who are concerned about healthy homes.

The authors wish to thank the many peo­ple who offered their guidance, expertise, and encouragement in the completion of the origi­nal manuscript. Special thanks go to Pauline Kenny for her tireless efforts and computer wizardry, which helped transform the data into something that resembled a book. Our gratitude goes to Will and Louise Pape, who graciously offered their ranch as a working re­treat center and gave practical advice and in­spiration each step of the way.

Paula would like to acknowledge her hus­band, Robert Laporte, not only for his patience in living with a “writing” partner but also for the teaching and inspiration he has shared with her in the field of natural building.

John Banta wishes to thank his wife, Trisha, who has patiently endured her husbands au­thorship of two books in one year, and James Holland of Restoration Consultants, who has continued to be a personal mentor.

Paula Baker-Laporte, FAIA, BBP John Banta, CAIH Erica Elliott, MD

By Helmut Ziehe

Подпись: xvit

I am honored to be asked to write the foreword for this book, which I find extraordinarily suitable for practical use by architects, build­ers, and homeowners. Building professionals, who already understand the complexities of conventional construction, can now learn how to incorporate the principles of Bau-Biologie (Building Biology) into their buildings in or­der to make healthier places to live.

Bau-Biologie is a German word. “Bau” means building and “bio” comes from the Greek “bios,” meaning life or mode of life. Combined, the words refer to how buildings influence life, or the relationship between buildings and life. Bau-Biologie has two as­pects. One is the study of how building materi­als and construction methods impact human health and how this knowledge can be ap­plied to the new construction and the modifi­cation of homes and workplaces. This is what we call basic Bau-Biologie. The other aspect is ecological and is concerned with the im­pact buildings have on the environment. The words Bau-Biologie and Building Biology are used interchangeably and are trademarked in the United States.

The Bau-Biologie movement began in Ger­many some 40 years ago. A number of con­cerned professionals from various disciplines noted a general decline in health following
the post-World War II surge in construction. Hubert Palm coined the term Bau-Biologie and wrote a book about it. Gustav Freiherr von Pohl did some research on water veins and their influence on peoples health. Anton Sch­neider, a wood specialist, and some colleagues formed a group and taught Bau-Biologie at a vocational school in Rosenheim, Bavaria. Af­ter a successful start, the program became the Institut fur Baubiologie und Okologie Neu – beuern (IBN). Under Anton Schneider, the IBN flourished. Through courses, seminars, books, and a magazine entitled Wohnung und Gesundheit, it soon gained a reputation in Germany, Austria, Switzerland, and the Neth­erlands and throughout Northern Europe.

I first studied Building Biology after an “aha” experience in North Africa in 1980 that changed the course of my career and life. I was the resident engineer for a new city of 90,000 inhabitants. It was a nice design, but the build­ing materials were wrong! Concrete was the basic material. They had sand in abundance, and everything else had to be imported. One – to three-story houses were built, but the mis­take was that these concrete buildings heated up so much that even air conditioning could not bring substantial relief. The people were forced to live in these houses, but the majority refused, living in tents instead.

I found the solution by looking at houses dating back as much as 4,000 years that used clay as the basic building material and covered walkways for shading and ventilation.

Very simple! The new town designers and the local committee were unwilling to accept the truths in my observations about the genius of the indigenous architecture and the short­comings of the modern buildings we were imposing on these people. This eye-opening experience led me to forsake my education and my career as a modernist architect and to embrace the precepts of Bau-Biologie. I had no intention of going back to a conventional architectural practice once my job in North Africa was finished.

After leaving North Africa, I lived in Eng­land, where I became aware that Bau-Biologie education was not available in English. I con­tacted Anton Schneider to study and eventu­ally translate the Correspondence Course. This led me to found the International Institute for Bau-Biologie & Ecology (IBE), first in Eng­land and then in the United States. Eventually the knowledge of Bau-Biologie was dissemi­nated to other English-speaking countries.

In England in 1984 I worked on the trans­lation and began determining if there was indeed an interest in Bau-Biologie in the English-speaking world. The translation went well, even with a manual typewriter and freez­ing conditions, but over a period of two years I had only twelve students! However, one of the students was David Pearson, who promised to write a book on Bau-Biologie. The Natural House Book appeared some two years later.

In 1987,1 relocated to the United States. In the beginning I worked alone in my new Flor­ida residence and the Institute started slowly. At that time in North America there were very few people focusing on the built environ­ment and its relationship to human health. Of note were the human ecologist and physician Theron G. Randolph, the architect Richard Crowther, and the writer Ken Kern (author of The Owner-Built Home).

When a reporter asked me in 1989 how many students I had, I answered: “Only eight.” He replied: “Everyone has to start small” A big boost came shortly afterward as a result of an article in East West Journal, which initi­ated a surge of public awareness of and inter­est in Bau-Biologie. Another very important event was meeting Wolfgang Maes, a very suc­cessful Bau-Biologist from Germany and ini­tiator of the Bau-Biologie Standards. He pro­posed seminars and came from Germany to help run the first three. They were a great suc­cess. John Banta was among the first graduat­ing students.

With the computer age underway, the course material could be fine-tuned. I was no longer capable of doing all the work of the In­stitute alone. My staff and I refined the original Correspondence Course and created a Mini­Course, now called IBE 111 — Natural, Healthy Buildings: An Introductory Overview of Bau – Biologie Principles.

During the following years I was invited to numerous events in the US and abroad, including an invitation to speak in Quebec in 1993; the AIA Chicago annual conference; various exhibitions in Austin, New York, Seat­tle, Los Angeles, San Francisco, and Phoenix; and many feng shui conferences throughout the country. In the midst of all this were invi­tations to Indore and to Bogota, Mexico City, Rio de Janeiro, and Sao Paulo, leading to the dissemination of the Building Biology prin­ciples into the Latin American countries and the translation of the Mini-Course into Por­tuguese. Without my actually traveling there, IBE established a presence in Australia and New Zealand. In New Zealand, one of my stu­dents, Reinhard Kanuka, founded an institute and offered the American translation of the Correspondence Course to his students.

Sometimes I wonder where I found the strength to endure twenty-five years of Bau – Biologie development. Although the prog­ress was at times discouragingly slow and the financial rewards less than supportive, much encouragement along the way reinforced my belief in this valuable body of knowledge. My commitment to it has been renewed again and again.

I am entirely aware that a single person cannot do it alone. To disseminate a rele­vant body of knowledge, there needs to be a collaboration of people who are captured by the same mission. I think we have begun to achieve this. Bau-Biologie, or Building Biol­ogy, has found its niche in society. This newest edition of Prescriptions for a Healthy House, which includes contributions from many of the continents leading Bau-Biologists, is a milestone along the way.

Authors’ note: Rather than have a conven­tional foreword written in praise of our book, we invited Helmut Ziehe, founder of the Inter­national Institute for Bau-Biology & Ecology, to write about the history of Bau-Biologie, where our inspiration for the book originated. In 2004, Helmut suifered a severe stroke. His students rallied to his side and carried on the work of the Institute with a renewed sense of commitment. Helmut continues to progress in his recovery with the same courage and perseverance with which he single-mindedly ran the Institute against all obstacles for so many years to the great benefit of his students. His language skills have had to be slowly and painfully relearned. Knowing the effort it has taken him to write this foreword, we are hon­ored and touched.

It has been said that we shape our buildings and then our buildings shape us. When we consider that the average North American spends 90 percent or more of life indoors, the significance of this statement becomes appar­ent. In this era of unprecedented technologi­cal advancement, it stands to reason that we would use our knowledge to create indoor environments with exceptional vitality that would enhance our health and our sense of well-being. But this has not been the case.

Indoor air pollution is one of the top four environmental health risks identified by the US Environmental Protection Agency (EPA) and the Scientific Advisory Board authorized by Congress to consult with the EPA on tech­nical matters.1 Indoor pollution is estimated to cause thousands of cancer deaths and hun­dreds of thousands of respiratory health prob­lems each year. Millions of children have experienced elevated blood levels of contami­nants resulting from their exposure to indoor pollutants.2

How has this sad state of affairs developed? Since the oil embargo of 1973, we have placed a high priority on energy efficiency, creating buildings that are increasingly airtight. Con­currently, the building industry has promoted inexpensive synthetic building products and furnishings that are mass-produced and re­quire little maintenance. Since little attention has been paid to the toxicity of these prod­ucts until very recently, consumers have re­mained largely ignorant of the health threats they pose.

The average person has little background in chemistry and makes the false assumption that building products must be reasonably safe to be allowed on the market. The disturbing truth is that, according to the EPA, there are now more than 88,000 chemicals in common use.3 Many of these have been associated with cancer, birth defects, reproductive disorders, and neurological and behavioral problems. Furthermore, “as amazing as it may seem, there are no mandatory pre-market health testing or approval requirements under any federal law for chemicals in cosmetics, toys, clothing, carpets, or construction materials, to name just a few obvious sources of chemical exposure in everyday life.”4

The limited testing that has been imple­mented rarely takes into consideration the on­going, low-level exposure to the hundreds of chemicals we inhale or absorb simultaneously throughout our daily lives. The toll on human health resulting from exposure to the chemical soup surrounding us is finally becoming clear. In 1986, the National Academy of Sciences estimated that 15 percent of the population suffered from chemical sensitivities.5 Based on current unofficial reports by physicians specializing in environmental medicine, that number is rising rapidly. These figures do not include people who unknowingly suffer from problems either directly or indirectly related to chronic, low-level toxic exposure. All too often symptoms are falsely attributed to the normal aging process.

Exposure to toxins in the indoor envi­ronment, even at low levels, has been linked to a vast spectrum of illnesses ranging from chronic sinus infections, headaches, insom­nia, anxiety, and joint pain to full-blown mul­tiple chemical sensitivity and other immune system disorders.

In spite of overwhelming evidence of the health risks, the majority of new construction in the United States continues to create envi­ronments that harm human health. There is, in fact, nothing complicated about creating a healthy building. The solution is composed of many simple but important steps. Many safer alternative materials and methods of design and building are becoming readily available. Nevertheless, the homeowner who desires to create a healthy building or remodel an exist­ing building is still a pioneer facing the follow­ing major obstacles:

• Building for health is not the current stan­dard of the construction industry. Al­though most architects and builders are now aware that health problems are asso­ciated with standard building practices, the industry in general has not responded with appropriate changes. There are no set and sanctioned prescriptions to fol­low for healthy building. In the nine years since the publication of the first edition of Prescriptions for a Healthy House, several

organizations have emerged with the pur­pose of demonstrating and rewarding the creation of healthier, more energy efficient, and more ecologically friendly homes. The American Lung Association has built ex­emplary model homes. Several voluntary rating and certification programs, such as LEED-R, Green Seal, and the National As­sociation of Home Builders’ Green Rat­ing System, and various county and state guidelines have emerged to promote the creation of healthier homes. The Califor­nia Air Resources Board has defined strin­gent environmental codes that have been adopted throughout the US and have in­fluenced manufacturers of building prod­ucts. As encouraging as these advances are, there is still no guarantee that a new home built today will support the health of its oc­cupants.

• The homeowner receives false informa­tion. Most building professionals are un­informed about the details of healthful de­sign and building. The prospective client who has heard about healthful building is often advised by professionals either that there is no need for concern or that health­ful building is cost prohibitive.

• There is a dearth of concise information. If homeowners are still committed to creat­ing a healthy house and have managed to find an architect and builder who are re­ceptive to working with them, then they must undertake together the daunting task of educating themselves and others. Dis­tilling enough information to create a set of specifications for a project is an under­taking requiring extensive time and dedi­cation.

• Even if healthy materials and practices are

specified, a lack of quality control may re­sult in a major degradation of the building, which in turn can lead to occupant health problems, decline in energy efficiency, and structural damages. These damages maybe especially difficult to discover and costly to repair when they are hidden in wall cavi­ties or other inaccessible spaces.

Tire purpose of this book is to take the mys­tery out of healthy house building by walk­ing the owner/architect/builder team through the construction process. We explain where and why standard building practices are not healthful, what to do differently, and how to obtain alternative materials and expertise. The Resource List in Appendix В provides sources for all products and services printed in bold type in the text.

We hope you will find this 3rd revised and updated edition of Prescriptions for a Healthy House to be a useful tool in your quest for healthier living.

Introduction

Until about 35 years ago, indoor air pollution was a very limited phenomenon. Since that time, two basic things have changed in the way buildings are constructed. First, thou­sands of synthetic chemicals have been in­corporated into building materials. Second, building envelopes are sealed so tightly that chemicals and occupant-generated pollutants remain trapped inside homes, where they are inhaled into the lungs and absorbed through the skin. Prior to the energy crisis, the typi­cal home averaged approximately one air ex­change per hour. Now, in a well-sealed home, the air is often exchanged as infrequently as once every five hours, and that is not enough to ensure healthful air quality. Furthermore, the synthetic building materials used to seal out air and water often result in the trapping and condensation of water vapor in the walls, leading to mold and structural deterioration.

There are two basic approaches to solv­
ing the indoor pollution problem and creating healthier living environments. The first and more mainstream approach in North Amer­ica involves eliminating as many pollutants as possible from within the building envelope and ensuring an airtight barrier on the inside so there is less need to worry about the chem­ical composition of the structure and insu­lation. This approach addresses for the most part conventional frame construction and the prevention of water intrusion. Filtered or clean outside air is then mechanically pumped in, keeping the house under a slightly positive pressure so that air infiltration is controlled. If one does not have the luxury of clean, vital, and refreshing natural surroundings, then a certain amount of isolation and filtering may be essential.

The second approach involves building the structure of natural or nontoxic materials that are vapor diffusible or “breathable.” Building materials are chosen for their capacity (hygric

capacity) to reach a state of equilibrium with the natural surroundings on one side and the indoor environment on the other, creating a comfortable interior climate by moderating natural conditions without distorting their nurturing aspects. This approach is based on the precepts of Bau-Biologie, or Building Bi­ology, which views the natural environment as the gold standard against which built envi­ronments should be measured. Our home is considered to be a third skin, with our clothes being the second. By Building Biology stan­dards, a home that nurtures health is not only free of toxins and synthetic materials. It also achieves a natural balance of ionization, re­duces the influence of human-caused electro­magnetic fields, avoids building over naturally occurring geopathic disturbances, and much more. Building Biology recognizes the genius of nature and the failure of industrialized building to fully understand natural laws in our attempts to create vital environments with the synthetic materials that are prevalent in conventional construction today.

Although little known in this country, the term “Building Biology” was translated from the German and introduced into the English language in 1987 by the founder of the Inter­national Institute for Bau-Biologie & Ecology, Helmut Ziehe. The institute has since fostered a dedicated and multidisciplinary following of practitioners who have used these principles to create healthier living environments for their clients. Paula Baker-Laporte and John Banta are both students and practitioners of Building Biology.

In this 3rd edition of Prescriptions for a Healthy House we have invited some of our Building Biology colleagues to contribute in their areas of expertise. Among these writers are experts in the fields of inspecting, diagnos­ing, repairing, and furnishing homes. Many of them focus on the work they do to remedy buildings that have, over time, become un­healthy environments for the people who live in them. With the inclusion of these essays we hope to extend the usefulness of the book to those wishing to turn their existing homes into healthier living environments.

Dispersed throughout the book are rel­evant medical and building case studies, the stories of real people from different walks of life with whom the authors have personally come into contact over the past few years. What they all have in common is firsthand experience of the consequences of living in unhealthy environments. They have agreed to share their stories with you.

Building or renovating a home involves making thousands of choices. Whether you are working with conventional building meth­ods and materials or with natural, “alternative” ones, this book has been designed to walk you through the construction process and help you to make choices that will promote your health and well-being and the optimum ser­viceability of your home.