Framing Rake Walls
![]()
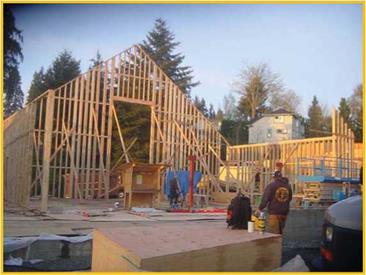
There are four common ways to figure stud heights and build rake walls.
1. Chalk lines on the floor.
2. Figure lengths on paper.
3. Build and chalk lines.
4. Stick frame.
Each has its own advantages. With all these methods, you must use the pitch given in the plans to determine the wall height. The pitch is generally shown on the elevation sheet just above the roof slope.
Method 1: Chalk Lines on the Floor
The first method is to chalk out a duplicate on the floor, if you have the space. Then you can measure and cut the studs and plates right from your chalk lines.
The advantage to using this method is that it is quick, easy, accurate, and doesn’t require a lot of math. However, if you don’t have the space on the floor, if it’s raining and you can’t chalk lines, or you have a lot of rake walls in the building, it is probably best to use one of the other methods suggested.
To chalk the lines, you need to know the heights of your low point and high point. You must also ensure that the wall is square. To find the height, you can use the “Chalk the Actual Dimensions" system. The pitch on the plans gives you the relationship of the rise to the run. For example, a 6:12 pitch means that for every 12 units of run, there are 6 units of rise. To find the high point on the wall, go out 12 units of run, then up square 6 units. Mark this reference point and chalk a line from
the low point of the wall through this point, and extend it as far as necesary to reach the high point in the wall. The closer you make the reference point to the high point in the wall, the more accurate your line will be.
To find the rake wall stud heights using the “Chalk the Actual Dimensions" method, follow these steps:
1. Chalk a bottom plate line (1). Usually you can use the chalk line for your wall. (See “Chalk the Actual Dimensions" illustration.)
2. Chalk the short stud line (2). Make sure it’s square (perpendicular) with the bottom plate line (1). You can use the 3-4-5 triangle to square the line. (Explained in “To Square the Wall" and “3-4-5 Triangle" later in this chapter.)
3. Chalk a parallel line (3) with the bottom plate line (1) that aligns with the top of the short stud. Extend this line out toward the long stud (5).
4. 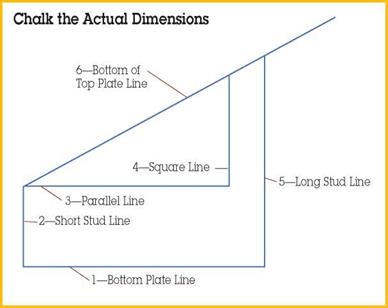 Chalk a square line (4) to the parallel line that is close to the long stud line (5), but convenient for figuring its length. The length of the square line (4) will be in a relationship to the parallel line (3), depending on the pitch of the rake wall. If, for example, the pitch is 6/12 and the parallel line is 12, the square line will be 6.
5. Chalk a line square (4) with the bottom plate line (1) where the long stud line (5) should be.
6. Chalk a line from the short point of the short stud (2) through the top of the square line (4) and on past the long stud line (5). This will be your bottom of top plate line (6).
7. Once you have these lines, you will be able to fill in all the remaining studs.
• Draw a straight line where you want to place your bottom plate, then make a perpendicular line at the high point of your wall.
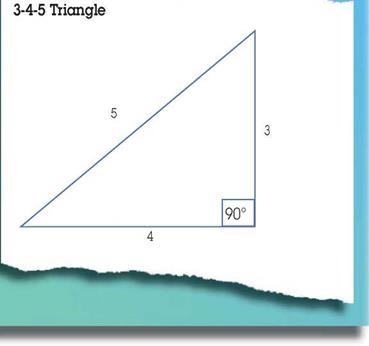
• Use a 3-4-5 triangle to double-check that the line is exactly perpendicular or square. (See “3-4-5 Triangle" illustration.)
A 3-4-5 triangle will help you establish that two lines are square or at right angles to each other. To establish square, just follow these steps:
1. Start with the line you want to square from; this will be the 4-unit line—also referred to as the run.
2. Measure a line perpendicular to the run line at 3 units in length, called the rise.
3. Measure the diagonal from the outside of the 4-unit line (run) and the 3-unit line (rise), and adjust the 3-unit line so that the diagonal (hypotenuse) is exactly 5 units.
The units can be anything as long as they are in the same ratio. For example, they could be 3′, 4′, and 5′, or they could be 15′, 20′, and 25′. The longer the units, the more accurate your measurement will be.
Method 2: Figure Lengths on Paper
With this method, you figure the stud heights, plate lengths, and layout anywhere you want— whether in the office, at home, or on the job site. All you need is a set of plans. Once you have the heights and lengths figured, you can build the wall anywhere, then move it into position.
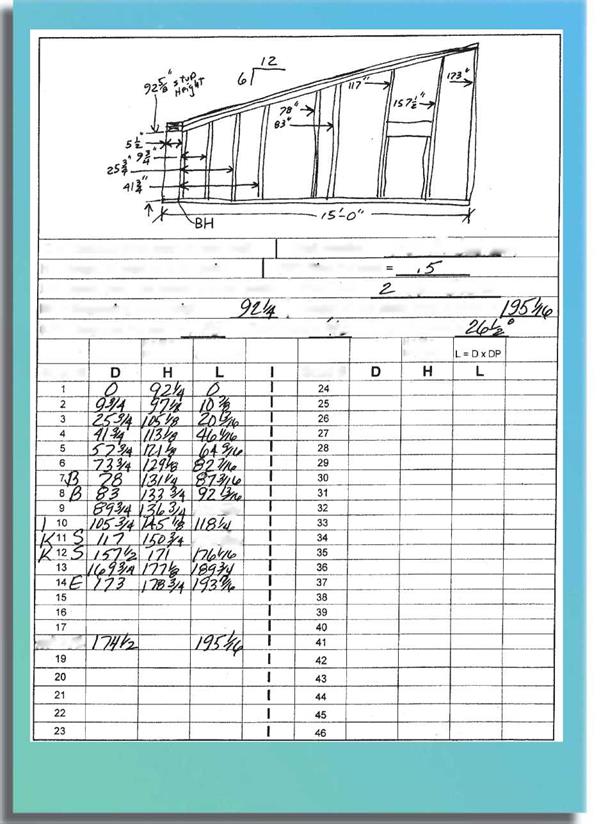
Use the “Rake Wall Stud Heights" worksheet later in this chapter to figure the stud heights, the plate lengths, and the layout points. Give the completed worksheet with all needed information to whoever is framing the wall.
A construction calculator, such as Construction Master IV®, can be used to figure lengths accurately. With a construction calculator, you can work in feet and inches and use a memory function for repetitive calculations.
depending on how the rafter or lookouts rest on the rake wall.
 A typical beginning height would be slightly lower than the adjoining wall, as shown in the "Rake Wall Beginning Stud Height" drawing.
In this example, the beginning stud height is only 3/8" less than the adjoining wall stud height because the plates on the rake are thicker on a slope than they are when flat.
To find the layout points for the studs and the length of the plates, use the formula D x DP.
DP is the diagonal percent, or the relationship between the Diagonal and the Run. This relationship tells you the length increase of the top plate or layout point per increase in the distance of the bottom
To use the Rake Wall Stud Heights Worksheet,
just fill in the blanks and find the stud heights.
The column "D" is where you write the distance on the bottom plate from the start of the rake wall to the short point on the stud. There is less confusion if you always use the short point on the studs. It is also easier to cut the short point than the long point when using a worm drive saw.
plate. This relationship is shown in the "Rise & Diagonal Percent" illustration, which also provides the formula for finding DP. The drawing gives the Diagonal Percents for the common roof pitches and the saw angles—the different angles at which you can set your saw to cut the top of the studs and the ends of the top plate and double plate.
 The stud height to the short point is found by using the formula (D x RP) + BH. RP is the rise percent, or the relationship between the rise and the run. The relationship gives you the height increase of the studs per increase in the distance of the plate. This relationship is illustrated in the filled-in version of the Rake Wall Stud Heights Worksheet. The formula for finding RP is also shown, in the "Rise & Diagonal Percent" illustration later in this chapter.
The "Rake Wall, RP, DP, Saw Angle" illustration provides the rise percent for common roof pitches. The "BH" from the formula is the beginning stud height. BH is a constant and is the height of the first stud at the lowest point. This height can vary
|
|
|
|
|
|
|
|
|
|
|
|
|
|
|
|
|
|
|
|
|
|
|
|
|


Leave a reply