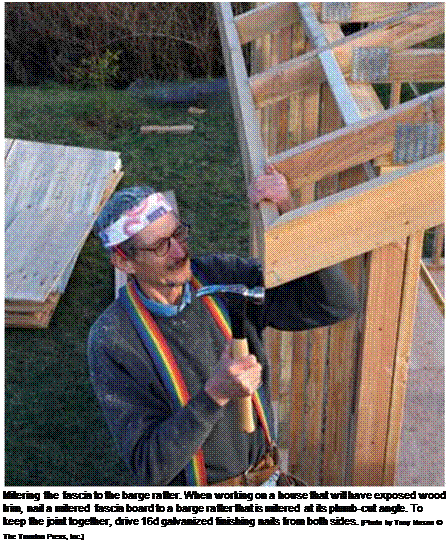
STEP 6 INSTALL THE BARGE RAFTERS AND THE FASCIA BOARDS
As explained earlier in this chapter, barge rafters extend beyond the end of a building, creating an overhang at the gable ends. The rafters are supported by 2×4 lookouts that fit into notches cut in the gable-end rafters. The lookouts run back to the first inboard rafter (or roof truss). At the bottom corner of the roof,
 a barge rafter meets a gutter or fascia board, which extends along the eave and is fastened to the ends of the rafter tails.
There are a few tricks to making sure that these exterior trim details are done correctly.
If you plan to cover the trim with aluminum cladding, as we did on this house (see Chapter 7), the cutting and installation work is a little easier. On the other hand, if the barge rafter and fascia will be exposed as finished trim, you’ll need to cut tight-fitting miter joints where the boards meet. Both types of installation will go more smoothly if you follow the steps described here.
I like to install lookouts long, then snap a line from eave to ridge and cut the lookouts in place. If you’re framing with rafters rather than with trusses, the ridge board can also run long at this stage. This process ensures a straight barge rafter. Hoist a supply of 2×4 lookout stock up to the roof, set each lookout in its notch, and secure the end of each one against the face of
the first inboard truss (or rafter) with two 16d nails. Keep the top surface of the lookout flush with the top edge of the truss. Now, before driving a pair of 16d nails into each notch, move the gable-end rafter in or out to make the framing member as straight as possible. Nail all the lookouts in their notches, and leave them like this for now.
If the truss tails have been set straight, begin to cut and install the gutter or fascia boards. If they’re not straight, snap a line across the top or bottom edges, then mark plumb cuts to line up the truss ends in the same plane. This is another exception to the “never cut a truss” rule. As long as you’re only making a small cutoff at the end of the truss (well away from joints and gussets), there’s no chance of structural damage. Check the eave overhang called for in the plans. Measure this distance on the gable-end trusses at opposite ends of the house. Then snap a line across all the trusses, going from one end of the house to the other. Mark the cut lines on the truss ends and make the cuts. This technique also works when building plans call for exposed rafter tails that must be cut in the same plane. Use a jig or pattern, such as the one shown in the top illustration on p. 130, to mark identical plumb cuts on the rafter tails. You can make the cuts from above, while standing on the top plate of the wall, or from below, while standing on a ladder or scaffolding.
Install the gutter or fascia boards
Although both gutter and fascia boards are nailed to the rafter tails, the distinction between the two is that gutter boards are later covered with trim (aluminum or vinyl cladding or 1x finish material). Fascia, on the other hand, is a finished surface. Some builders install 1x fascia boards over 2x gutter boards or subfascia, whereas others use the 2x stock as the finished fascia.
Obviously, smooth, accurate cuts are re-
quired to install fascia boards, whereas gutter


Leave a reply