STEP 1 LAY OUT THE WALLS
I’ve done plenty of house layouts on my own, but it’s better to tackle this job with a helper or two. The work goes faster when you have someone else to hold the other end of the tape or chalkline. More important, your chances of catching mistakes improve significantly.
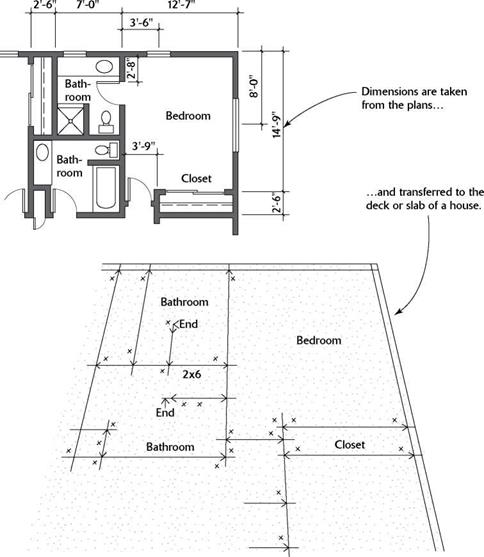
A building plan is a guide, just like a road map. There are symbols and measurements to tell you what to do (see the illustration on the facing page). You don’t have to visualize every detail on a road map to get from Texas to Maine. Neither do you have to visualize every detail on a plan to be able to build a house. You just have to know how to read the plan, then take it one step at a time.
The most common plan scale uses 1/4 in. to equal 1 ft., so 1 in. on a plan equals 4 ft. on a subfloor. Plan dimensions, however, can be
labeled as outside to outside, inside to inside, outside to center, or center to center (wall to wall), so you need to pay close attention to this information (see the illustration below). For layout purposes, if you encounter an outside to center (o/s to c) dimension, simply add 13/4 in.—half the width of a 2×4—to the overall measurement to obtain the outside to outside measurement, which you can then transfer to the floor (for a 2×6 wall, add 23/4 in.).
The first layout work involves transferring key information from the building plans to the subfloor or slab. These layout lines enable you to lay down the top and bottom plates for every wall in the house—a process called plating the walls. With each wall’s top and bottom plates temporarily tacked together on the subfloor, you can mark up the plates to identify exactly where each stud, king stud, header, and trimmer is located. If you haven’t already done so, take the time to familiarize yourself with the various parts that go into a wood-frame wall (see the illustration on p. 87).
Three marking tools are essential: a chalkline, a keel, and a carpenter’s pencil. A chalkline and an ample supply of chalk allow you to snap wall layout lines on the subfloor or slab (see the top photo on p. 80). It’s not necessary to mark two lines for a wall; instead, use a carpenter’s crayon, or keel, to mark an “X” on the side of the line that will be covered by the wall plates. A keel is also useful for labeling parts, writing cripple sizes on headers, and indicating door and window openings.
To make a snapped line easier to find, use a pencil or keel to make a crow’s foot, or a large “V” mark, with the point centered on the line. If you snap a line in error, wipe it away with your foot or at least draw a wavy line through it before snapping a line in the correct place.
Use another chalk color to snap the correct line. Try to keep all markings clear and simple, and avoid complicating things unnecessarily. The object is to get all the information you
 Select the right chalk.
The powdered chalk used for chalklines comes in different colors. Have a second color on hand, in case you need to snap a new chalkline close to an incorrectly snapped line. If you need to lay out walls in wet weather, use waterproof chalk to make sure your lines stay sharp and precise.
Chalklines are snapped on the floor to show the location of all the walls. The top and bottom plates will be tacked to the deck along those lines.

need off the plan and onto the floor in an understandable format.


Leave a reply