Fasten according to code
Hold screws or nails back about 5/s in. from the edges of the panel, and drive them in straight so you don’t break the paper. Follow the fastening schedule for drywall that applies in your area. When ceiling joists are 24 in. o. c., nails or screws are usually driven every 8 in. along the edge of the panel and every 12 in. in the middle.
Some builders use drywall panel adhesive when attaching sheets of drywall. The adhesive is applied with a caulking gun, just like caulk or sealant. With panel adhesive, the need for screws
or nails is greatly reduced. Don’t use adhesive over a poly vapor barrier or kraft paper-faced insulation; it’s designed to affix drywall to a wood surface. Follow the application and installation instructions on the label.
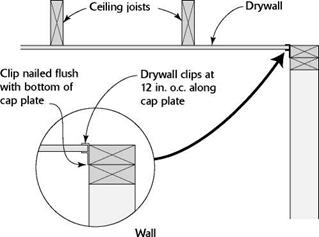
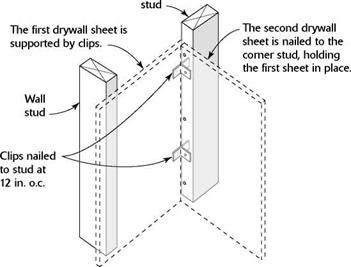
If you provided backing or deadwood while building interior walls (see Chapter 4) and installing roof trusses (see Chapter 5), you’ll be able to drive nails or screws along the walls to fasten drywall panels. But if solid backing material for drywall was not nailed to the tops of parallel walls or in the corners where walls intersect, metal drywall clips can be used instead. See the illustration on p. 223 for instructions on using these clips. Unlike a drywall corner secured with nails or screws, a corner secured with clips can be more resistant to cracking when the framing material moves in response to temperature fluctuations.
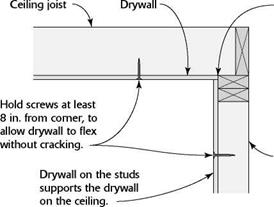
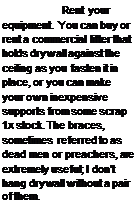 Another strategy is to let the corner “float,” eliminating nails where a ceiling panel meets the wall. The top edges of wall panels are
 |
 |
then pushed snugly against the ceiling panels, holding them in place (see the top illustration on p. 224). Again, this can help prevent corner cracks at the ceiling-wall juncture due to wood shrinkage or truss uplift. If you’re uncertain about how to handle drywall corners, check with experienced builders in your area.
Once all the ceiling panels are in place, run a bead of caulk where the ceiling panels butt the exterior walls to reduce air infiltration (see the top illustration on p. 224). I finish the ceiling by marking the location of wall studs with a small pencil mark on the ceiling drywall. These marks help when nailing drywall to the walls. Don’t use a keel on drywall (unless it is covered with drywall tape) because it can bleed through paint.
STEP 3 INSTALL THE WALL PANELS
Hanging drywall on the walls is easier than hanging it on the ceiling. You have to work around window and door openings, and there are more electrical outlet openings to mark and cut, but you don’t have to work overhead. It’s important to know that some electrical wires (for the thermostat, doorbell, range hood, and so on) will not be enclosed in a box. Electricians often wrap those wires around a nail to locate their position. All you need to do is make a small hole in the drywall and pull the wires through.
It’s smart to plan an installation sequence when there are a number of walls to finish with

 drywall. Determining which walls to cover first, and how panel layout will work, saves time and aggravation. Here are some tips to help you plan the installation sequence for walls:
HANG PANELS HORIZONTALLY. By installing 12-ft. panels horizontally, you greatly reduce the number of joints in a wall. The top panels should be hung first. Don’t worry if the bottom panel doesn’t extend all the way to the subfloor; this small gap will be covered by the baseboard trim. For rooms with 9-ft.-high walls, use 54-in.-wide drywall panels instead of the standard 48-in.-wide panels.
START ON CLOSETS FIRST. Check to see whether there are any closets that must be drywalled before working on long walls. Sometimes it’s easier to get large drywall pieces into a closet through a wall rather than through the closet door. Don’t bother cutting and installing small pieces of drywall to completely cover a closet. You can do that later with scrap pieces cut from the long sheets. At this stage, you just want to have an easier time getting big pieces into the closets.
WORK FROM THE OUTSIDE IN. I like to drywall exterior walls before interior walls. Leaving the interior wall framing open when you start gives you greater freedom to maneuver the panels. To maximize this freedom, drywall the interior hallways last.
PAY ATTENTION TO BACKING AT WALL INTERSECTIONS. As shown in the bottom right illustration on p. 224, backing can sometimes determine which wall should be covered with drywall first. When 2 x6s have been used for backing where 2×4 walls intersect, there will be only a l-in.-wide nailing surface for attaching drywall. In this situation, always install the intersecting wall’s drywall after the other wall has been covered. Butt the intersecting wall’s panel tightly against the adjoining wall panel to make a solid corner.
As mentioned earlier, the top panels should be installed first. It’s important to butt the top edge
of each wall panel snugly against the ceiling drywall. To make installation easier, you can start a few nails near the top of a sheet before you raise the panel into position.
Although I drive a few nails just to hold a panel in place, I like to use screws in the rest of the sheet on both ceilings and walls. Screws hold better, resist popping when framing lumber shrinks, and can be installed quickly once you get into the rhythm of using a screw gun.

![]()
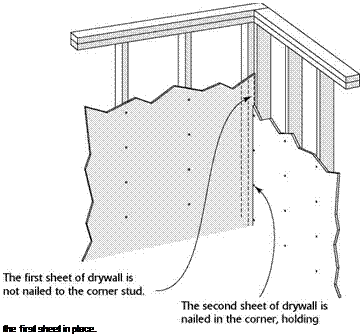

If you use nails in the middle of a panel, code may require that the panels be double-nailed (see the illustration on the facing page).
When fastening a panel, work from the center to the outside edges. If you do use nails, drive the first set, then go back later and drive the second set, making sure the drywall is tight against the wall framing. When driving nails, it’s always advisable to push the panel tightly against the wall.
When hanging the bottom row of drywall,
stagger the end or butt joints, just as you did on the ceiling. The bottom panels can be placed against the wall, then raised and held in place against the top sheet with a drywall lifter, allowing you to concentrate on fastening the sheet (see the sidebar on the facing page). Long sheets can be raised with a drywall lifter at each end.
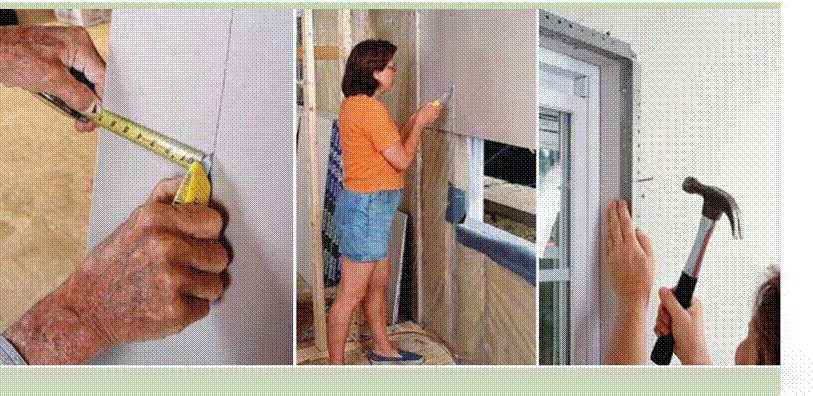
Try to keep butt joints away from the center of the wall so that the joints will be less obvious. Also, have a sheet break over a door or window rather than right at the edge of a king stud or trimmer. A joint at the edge of a door or window increases the likelihood of a crack in the drywall as the wood dries. Run panels all the way across doors and windows when you can, then cut them out later with a saw or router. You can also run a panel past an outside corner, then cut it flush with a utility knife after the panel has been fastened in place. This eliminates the need to measure and mark the panel.
PROPER DRYWALL INSTALLATION
ON 2×4 INTERSECTING WALLS
USING 2×6 BACKING
|
|
|
1/2 in. |
|
1 in. |
|
2×6 backing |
WRONG
You’ll only have a 1/2-in.-wide nailing surface if you install drywall on the intersecting wall first.
Intersecting wall


Leave a reply